设计模式(结构型)
结构型设计模式关注如何将现有的类或对象组织在一起形成更加强大的结构。并且根据我们前面学习的合成复用原则,我们该如何尽可能地使用关联关系来代替继承关系是我们本版块需要重点学习的内容。
类/对象适配器模式
在生活中,我们经常遇到这样的一个问题:笔记本太轻薄了,以至于没有RJ45网口和USB A口(比如Macbook为了轻薄甚至全是type-c形式的雷电口)但是现在我们因为工作需要,又得使用这些接口来连接线缆,这时我们想到的第一个解决方案,就是去买一个转接口(扩展坞),扩展坞可以将type-c口转换为其他类型的接口供我们使用,实际上这就是一种适配模式。
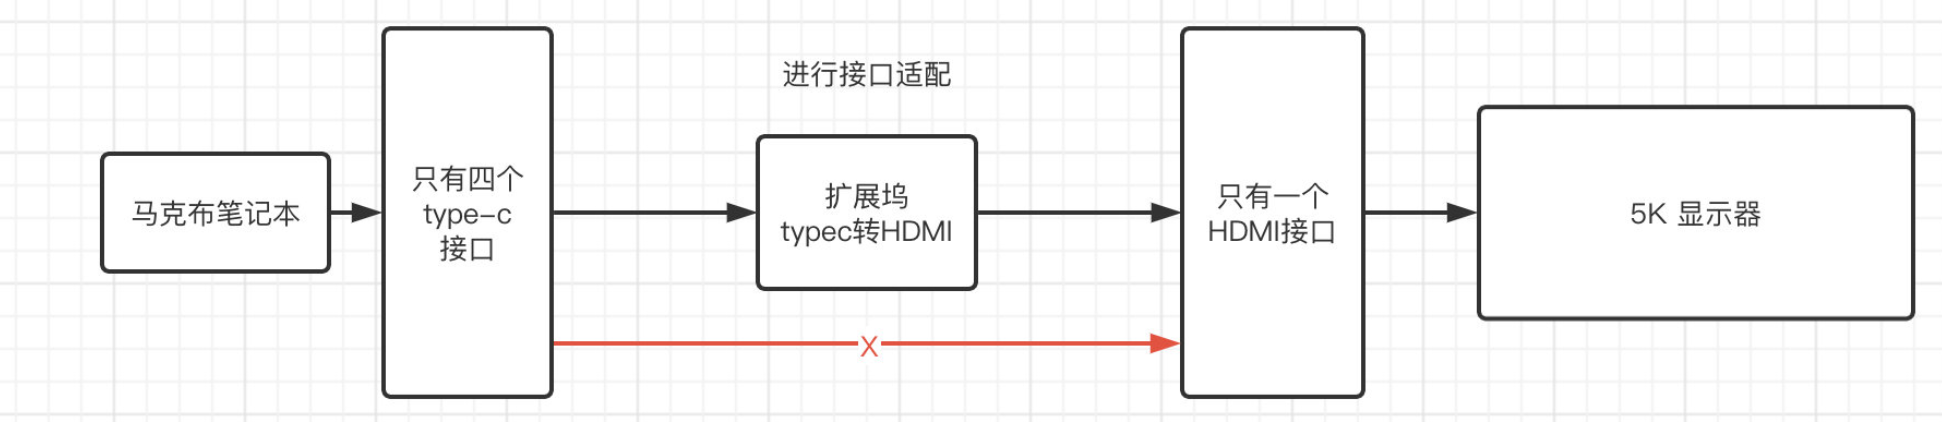
由于我们的电脑没有这些接口,但是提供了type-c类型的接口,虽然接口类型不一样,但是同样可以做其他接口能做的事情,比如USB文件传输、有线网络连接等,所以,这个时候,我们只需要添加一个中间人来帮我们转换一下接口形态即可。包括我们常用的充电头,为什么叫电源适配器呢?我们知道传统的供电是220V交流电,但是我们的手机可能只需要5V的电压进行充电,虽然现在有电,但是不能直接充,我们也不可能让电力公司专门为我们提供一个5V的直流电使用。这时电源适配器就开始发挥作用了,比如苹果的祖传5V1A充电头,实际上就是将220V交流电转换为5V的直流电进行传输,这样就相当于在220V交流电和我们的手机之前,做了一个适配器的角色。
在我们的Java程序中,也会经常遇到这样的问题,比如:
public class Main {
    public static void main(String[] args) {
        TestSupplier supplier = new TestSupplier();
        test( ? );   //我们没有Target类型的手机供应商,只有其他的,那这里该填个啥
    }

    public static void test(Target target){   //现在我们需要调用test方法,但是test方法需要Target类型的手机供应商
        System.out.println("成功得到:"+target.supply());
    }
}
这个时候,我们就可以使用适配器模式了,适配器模式分为类适配器和对象适配器,我们首先来看看如何使用类适配器解决这种问题,我们直接创建一个适配器类:
public class TestAdapter extends TestSupplier implements Target {
  //让我们的适配器继承TestSupplier并且实现Target接口
    @Override
    public String supply() {   //接着实现supply方法,直接使用TestSupplier提供的实现
        return super.doSupply();
    }
}
这样,我们就得到了一个Target类型的实现类,并且同时采用的是TestSupplier提供的实现。
public static void main(String[] args) {
    TestAdapter adapter = new TestAdapter();
    test(adapter);
}

public static void test(Target target){
    System.out.println("成功得到:"+target.supply());
}
不过,这种实现方式需要占用一个继承坑位,如果此时Target不是接口而是抽像类的话,由于Java不支持多继承,那么就无法实现了。同时根据合成复用原则,我们应该更多的通过合成的方式去实现功能,所以我们来看看第二种,也是用的比较多的一种模式,对象适配器:
public class TestAdapter implements Target{   //现在不再继承TestSupplier,仅实现Target

    TestSupplier supplier;

    public TestAdapter(TestSupplier supplier){
        this.supplier = supplier;
    }

    @Override
    public String supply() {
        return supplier.doSupply();
    }
}
现在,我们就将对象以组合的形式存放在TestAdapter中,依然是通过存放的对象调用具体实现。
桥接模式
相信各位都去奶茶店买过奶茶,在购买奶茶的时候,店员首先会问我们,您需要什么类型的奶茶,比如我们此时点了一杯啵啵芋圆奶茶,接着店员会直接问我们需要大杯、中杯还是小杯,最后还会询问我们需要加什么配料,比如椰果、珍珠等,最后才会给我们制作奶茶。

那么现在让你来设计一下这种模式的Java类,该怎么做呢?首先我们要明确,一杯奶茶除了类型之外,还分大中小杯,甚至可能还分加什么配料,这个时候,如果我们按照接口实现的写法:
比如现在我们创建一个新的类型:
/**
 * 大杯芋圆啵啵奶茶
 */
public class LargeKissTea implements Tea, Size{

    @Override
    public String getSize() {
        return "大杯";
    }

    @Override
    public String getType() {
        return "芋圆啵啵奶茶";
    }
}
虽然这样设计起来还挺合理的,但是如果现在我们的奶茶品种多起来了,并且每种奶茶都有大中小杯,现在一共有两个维度需要考虑,那么我们岂不是得一个一个去创建这些类?甚至如果还要考虑配料,那么光创建类就得创建不知道多少个了。显然这种设计不太好,我们得换个方式。
这时,就可以使用我们的桥接模式了,现在我们面临的问题是,维度太多,不可能各种类型各种尺寸的奶茶都去创建一个类,那么我们就还是单独对这些接口进行简单的扩展,单独对不同的维度进行控制,但是如何实现呢?我们不妨将奶茶的类型作为最基本的抽象类,然后对尺寸、配料等属性进行桥接:
public abstract class AbstractTea {

    protected Size size;   //尺寸作为桥接属性存放在类中

    protected AbstractTea(Size size){   //在构造时需要知道尺寸属性
        this.size = size;
    }

    public abstract String getType();   //具体类型依然是由子类决定
}
不过这个抽象类提供的方法还不全面,仅仅只有Tea的getType方法,我们还需要添加其他维度的方法,所以继续编写一个子类:
public abstract class RefinedAbstractTea extends AbstractTea{
    protected RefinedAbstractTea(Size size) {
        super(size);
    }

    public String getSize(){   //添加尺寸维度获取方式
        return size.getSize();
    }
}
现在我们只需要单独为Size创建子类即可:
现在我们如果需要一个大杯的啵啵芋圆奶茶,只需要:
public class KissTea extends RefinedAbstractTea{   //创建一个啵啵芋圆奶茶的子类
    protected KissTea(Size size) {   //在构造时需要指定具体的大小实现
        super(size);
    }

    @Override
    public String getType() {
        return "啵啵芋圆奶茶";   //返回奶茶类型
    }
}
现在我们就将两个维度拆开,可以分别进行配置了:
public static void main(String[] args) {
    KissTea tea = new KissTea(new Large());
    System.out.println(tea.getType());
    System.out.println(tea.getSize());
}
通过桥接模式,使得抽象和实现可以沿着各自的维度来进行变化,不再是固定的绑定关系。
组合模式
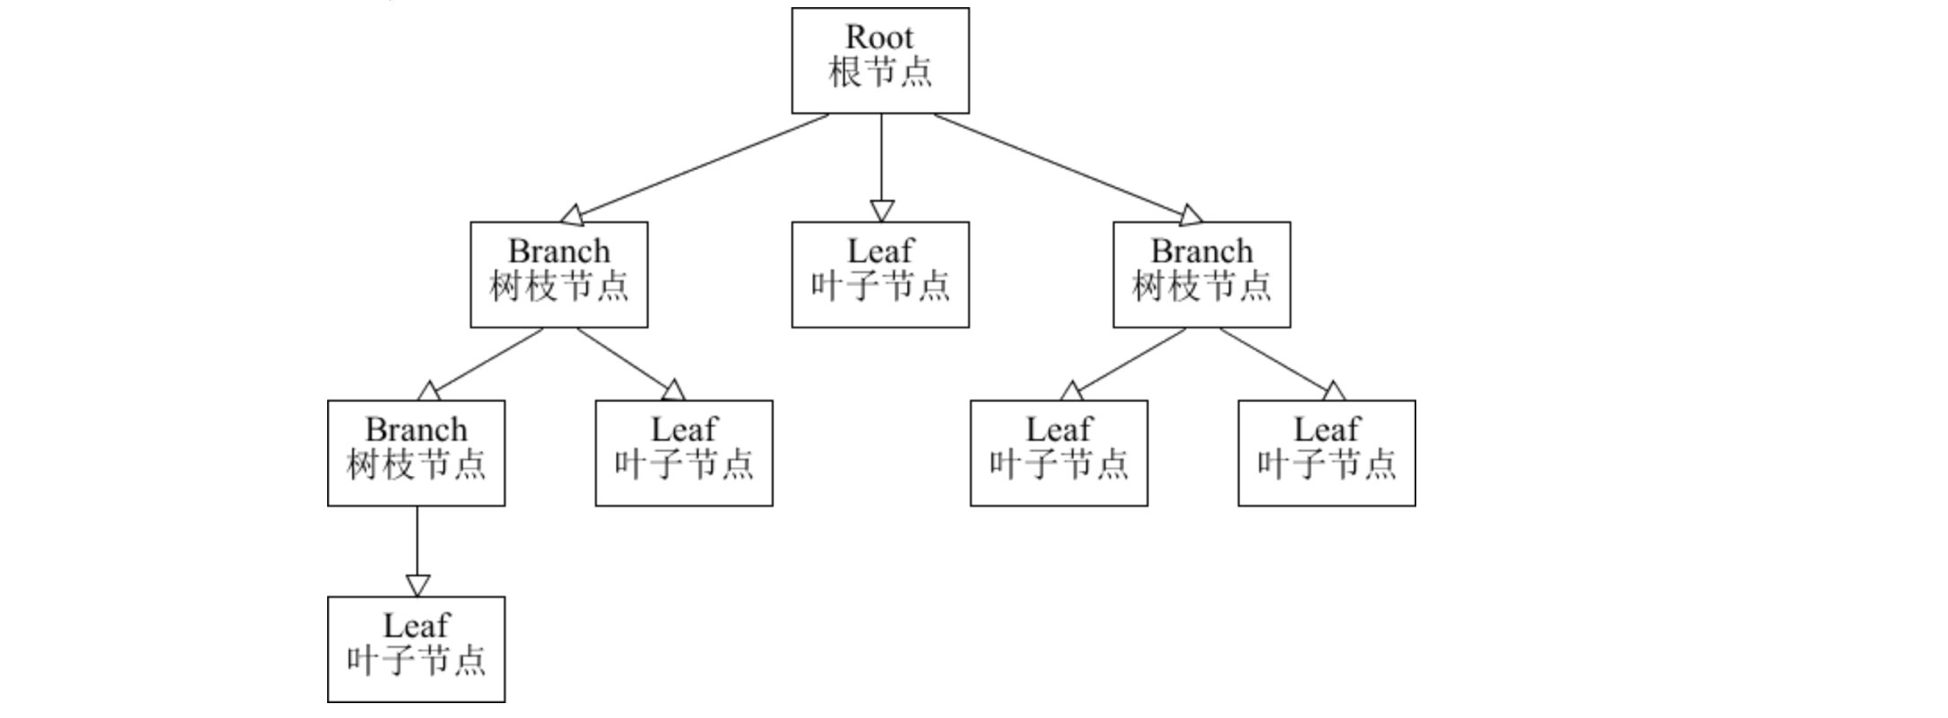
组合模式实际上就是将多个组件进行组合,让用户可以对它们进行一致性处理。比如我们的文件夹,一个文件夹中可以有很多个子文件夹或是文件:

它就像是一个树形结构一样,有分支有叶子,而组合模式则是可以对整个树形结构上的所有节点进行递归处理,比如我们现在希望将所有文件夹中的文件的名称前面都添加一个前缀,那么就可以使用组合模式。
组合模式的示例如下,这里我们就用文件和文件夹的例子来讲解:
/**
 * 首先创建一个组件抽象,组件可以包含组件,组件有自己的业务方法
 */
public abstract class Component {
    public abstract void addComponent(Component component);    //添加子组件
    public abstract void removeComponent(Component component);   //删除子组件
    public abstract Component getChild(int index);   //获取子组件
    public abstract void test();   //执行对应的业务方法,比如修改文件名称
}
接着我们来编写两种实现类:
public class Directory extends Component{   //目录可以包含多个文件或目录

    List<Component> child = new ArrayList<>();   //这里我们使用List来存放目录中的子组件

    @Override
    public void addComponent(Component component) {
        child.add(component);
    }

    @Override
    public void removeComponent(Component component) {
        child.remove(component);
    }

    @Override
    public Component getChild(int index) {
        return child.get(index);
    }

    @Override
    public void test() {
        child.forEach(Component::test);   //将继续调用所有子组件的test方法执行业务
    }
}
public class File extends Component{   //文件就相当于是树叶,无法再继续添加子组件了

    @Override
    public void addComponent(Component component) {
        throw new UnsupportedOperationException();   //不支持这些操作了
    }

    @Override
    public void removeComponent(Component component) {
        throw new UnsupportedOperationException();
    }

    @Override
    public Component getChild(int index) {
        throw new UnsupportedOperationException();
    }

    @Override
    public void test() {
        System.out.println("文件名称修改成功!"+this);   //具体的名称修改操作
    }
}
最后,我们来测试一下:
public static void main(String[] args) {
    Directory outer = new Directory();   //新建一个外层目录
    Directory inner = new Directory();   //新建一个内层目录
    outer.addComponent(inner);
    outer.addComponent(new File());   //在内层目录和外层目录都添加点文件,注意别导错包了
    inner.addComponent(new File());
    inner.addComponent(new File());
    outer.test();    //开始执行文件名称修改操作
}
可以看到我们对最外层目录进行操作后,会递归向下处理当前目录和子目录中所有的文件。
装饰模式
装饰模式就像其名字一样,为了对现有的类进行装饰。比如一张相片就一张纸,如果直接贴在墙上,总感觉少了点什么,但是我们给其添加一个好看的相框,就会变得非常对味。装饰模式的核心就在于不改变一个对象本身功能的基础上,给对象添加额外的行为,并且它是通过组合的形式完成的,而不是传统的继承关系。
比如我们现在有一个普通的功能类:
public class BaseImpl extends Base{
    @Override
    public void test() {
        System.out.println("我是业务方法");   //具体的业务方法
    }
}
不过现在的实现类太单调了,我们来添加一点装饰上去:
public class Decorator extends Base{   //装饰者需要将装饰目标组合到类中

    protected Base base;

    public Decorator(Base base) {
        this.base = base;
    }

    @Override
    public void test() {
        base.test();    //这里暂时还是使用目标的原本方法实现
    }
}
public class DecoratorImpl extends Decorator{   //装饰实现

    public DecoratorImpl(Base base) {
        super(base);
    }

    @Override
    public void test() {    //对原本的方法进行装饰,我们可以在前后都去添加额外操作
        System.out.println("装饰方法:我是操作前逻辑");
        super.test();
        System.out.println("装饰方法:我是操作后逻辑");
    }
}
这样,我们就通过装饰模式对类的功能进行了扩展:
public static void main(String[] args) {
    Base base = new BaseImpl();
    Decorator decorator = new DecoratorImpl(base);  //将Base实现装饰一下
    Decorator outer = new DecoratorImpl(decorator);  //装饰者还可以嵌套

    decorator.test();

    outer.test();
}
这样我们就实现了装饰模式。
Proxy Pattern 🤔
The Proxy Pattern is quite similar to the Decorator Pattern, and beginners often find them easy to confuse. To clarify, remember this key point: when it's difficult or impossible to access an object directly, we can use a proxy object to access it indirectly.
In fact, proxies are everywhere in our daily lives. For example, consider a mobile phone manufacturer that wants to sell phones but lacks the channels to reach consumers on a large scale. In such cases, they rely on agents or distributors to handle sales. Take Apple, for instance—there are very few official Apple stores in China, but many authorized resellers exist. These resellers act as proxies to facilitate wider sales. Another example is accessing GitHub; direct connections can be challenging at times. However, by using a proxy, we can easily access it, demonstrating the value and function of the Proxy Pattern in real-world scenarios.
代理模式和装饰模式很像,初学者很容易搞混,所以这里我们得紧接着来讲解一下。首先请记住,当无法直接访问某个对象或访问某个对象存在困难时,我们就可以通过一个代理对象来间接访问。
实际上代理在我们生活中处处都存在,比如手机厂商要去销售手机,但是手机厂商本身没有什么渠道可以大规模地进行售卖,很难与这些消费者进行对接,这时就得交给代理商去进行出售,比如Apple在中国的直营店很少,但是在中国的授权经销商却很多,手机厂商通过交给旗下代理商的形式来进行更大规模的出售。比如我们经常要访问Github,但是直接连接会发现很难连的上,这时我们加了一个代理就可以轻松访问,也是在体现代理的作用。

At the same time, the proxy class needs to ensure transparency for the client, meaning that the operations should remain identical to interacting with the original object. For example, when we access GitHub, we simply enter the URL, and even after adding a proxy, we still access GitHub in the same way. This ensures that the operation feels consistent and unchanged. Similarly, in the Spring framework, the Proxy Pattern is used to implement AOP (Aspect-Oriented Programming) features, such as logging.
For example, suppose we have a target class, but now we want to interact with it through a proxy:
同时,代理类需要保证客户端使用的透明性,也就是说操作起来需要与原本的真实对象相同,比如我们访问Github只需要输入网址即可访问,而添加代理之后,也是使用同样的方式去访问Github,所以操作起来是一样的。包括Spring框架其实也是依靠代理模式去实现的AOP记录日志等。
比如现在有一个目标类,但是我们现在需要通过代理来使用它:
public class SubjectImpl extends Subject{
// This class cannot be used directly; we need to create a proxy for it.

    @Override
    public void test() {
        System.out.println("I am a test method!");
    }
}
Now, let's create a proxy class for it.
现在我们为其建立一个代理类:
public class Proxy extends Subject{   //为了保证和Subject操作方式一样,保证透明性,也得继承
  // To ensure it operates the same way as Subject and maintain transparency, we extend it

    Subject target;    // The object being proxied (can even support multiple levels of proxying)
  //被代理的对象(甚至可以多重代理)

    public Proxy(Subject subject){
        this.target = subject;
    }

    @Override
    public void test() {   // The proxy executes the target object's method, and we can add additional logic before and after
      //由代理去执行被代理对象的方法,并且我们还可以在前后添油加醋
        System.out.println("Pre-proxy method");
        target.test();
        System.out.println("Post-proxy method");
    }
}
At first glance, this might seem identical to the Decorator Pattern, right?
In the Decorator Pattern, both the decorator and the decorated object implement the same interface/abstract class. Similarly, in the Proxy Pattern, the proxy and the proxied class also implement the same interface/abstract class. Structurally, there appears to be no difference. However, their purposes are distinct.
The Decorator Pattern emphasizes enhancing the object itself. After being decorated, the object gains additional functionality, but it's still fundamentally the same object—just enhanced. On the other hand, the Proxy Pattern focuses on having someone else perform tasks for you, often adding actions unrelated to the core business logic (like logging, caching, etc.). The key idea here is delegation—having others do something on your behalf.
The main difference between the Decorator and Proxy Patterns lies in their intent.
Additionally, besides the method we showed above for implementing the Proxy Pattern, we can also use Java's built-in dynamic proxy mechanism. This approach allows us to avoid manually writing the inheritance to create a proxy class. Instead, it can generate proxy classes for us at runtime using reflection:
乍一看,这不跟之前的装饰模式一模一样吗?
对装饰器模式来说,装饰者和被装饰者都实现同一个接口/抽象类。对代理模式来说,代理类和被代理的类都实现同一个接口/抽象类,在结构上确实没有啥区别。但是他们的作用不同,装饰器模式强调的是增强自身,在被装饰之后你能够在被增强的类上使用增强后的功能,增强后你还是你,只不过被强化了而已;代理模式强调要让别人帮你去做事情,以及添加一些本身与你业务没有太多关系的事情(记录日志、设置缓存等)重点在于让别人帮你做。
装饰模式和代理模式的不同之处在于思想。
当然实现代理模式除了我们上面所说的这种方式之外,我们还可以使用JDK为我们提供的动态代理机制,我们不再需要手动编写继承关系创建代理类,它能够在运行时通过反射机制为我们自动生成代理类:
public class SubjectImpl implements Subject{

    @Override
    public void test() {
        System.out.println("I am a test method!");
    }
}
Next, we need to create the handling logic for the dynamic proxy:
接着我们需要创建一个动态代理的处理逻辑:
public class TestProxy implements InvocationHandler {    //代理类,需要实现InvocationHandler接口

    private final Object object;    // This stores the object being proxied, which will be used later
  //这里需要保存一下被代理的对象,下面需要用到

    public TestProxy(Object object) {
        this.object = object;
    }

        // This method is invoked whenever a corresponding method on the proxy object is called. Here, we define how the proxying will be handled
    @Override   //此方法就是调用代理对象的对应方法时会进入,这里我们就需要编写如何进行代理了
    public Object invoke(Object proxy, Method method, Object[] args) throws Throwable {
      // 'method' represents which method of the proxy object is being called, and 'args' contains the array of actual arguments
            //method就是调用的代理对象的哪一个方法,args是实参数组
        System.out.println("Proxy object type: "+proxy.getClass());
      // 'proxy' is the generated proxy object, let's check its type
      //proxy就是生成的代理对象了,我们看看是什么类型的
        Object res = method.invoke(object, args);
      // Call the original method on the proxied object within the proxy. Since you are a proxy, you still need to execute the actual object's business logic (although you could skip it, but that would defeat the purpose of the proxy). Make sure to use 'object'
      //在代理中调用被代理对象原本的方法,因为你是代理,还是得执行一下别人的业务,当然也可以不执行,但是这样就失去代理的意义了,注意要用上面的object
        System.out.println("Method invocation completed, return value: " + res);
      // Display the return value
        return res;
    }
}
Finally, let's see how to create a proxy class:
最后我们来看看如何创建一个代理类:
public static void main(String[] args) {
    SubjectImpl subject = new SubjectImpl();   //被代理的大冤种  // The target object to be proxied
    InvocationHandler handler = new TestProxy(subject);
    Subject proxy = (Subject) Proxy.newProxyInstance(
            subject.getClass().getClassLoader(),    //需要传入被代理的类的类加载器 // Provide the class loader of the target class
            subject.getClass().getInterfaces(),    //需要传入被代理的类的接口列表 // Provide the list of interfaces implemented by the target class
            handler);    //最后传入我们实现的代理处理逻辑实现类 // Finally, provide our proxy handling logic implementation

    proxy.test();    //比如现在我们调用代理类的test方法,那么就会进入到我们上面TestProxy中invoke方法,走我们的代理逻辑
} // Now, when we call the 'test' method on the proxy object, it will invoke the 'invoke' method in our TestProxy class, following our proxy logic
After running it, you can see that when the method of the proxy class is called, it ultimately reaches our invoke method for execution.
运行一次,可以看到调用代理类的方法,最终会走到我们的invoke方法中进行:


According to the interface, the proxy object is of the class com.sun.proxy.$Proxy0 (judging by the name, you can tell it’s not something we wrote ourselves). This class is dynamically generated, and we can't find the specific source code for it.
However, JDK's dynamic proxy only works with interfaces. If we were to use an abstract class instead, it wouldn't work. In such cases, we can use third-party frameworks that offer more flexible dynamic proxy options, such as the CGLib framework, which is widely used in Spring. Here’s the Maven dependency for CGLib:
根据接口,代理对象是
com.sun.proxy.$Proxy0类(看名字就知道不对劲),这个类是动态生成的,我们也找不到具体的源代码。不过JDK提供的动态代理只能使用接口,如果换成我们一开始的抽象类,就没办法了,这时我们可以使用一些第三方框架来实现更多方式的动态代理,比如Spring都在使用的CGLib框架,Maven依赖如下:
<dependency>
    <groupId>cglib</groupId>
    <artifactId>cglib</artifactId>
    <version>3.3.0</version>
</dependency>
Since CGLib uses the ASM framework (introduced in JVM video tutorials) at its core for bytecode manipulation, it is not limited to just proxying interfaces; it can also proxy concrete classes and abstract classes.
由于CGlib底层使用ASM框架(JVM篇视频教程有介绍)进行字节码编辑,所以能够实现不仅仅局限于对接口的代理:
public class TestProxy implements MethodInterceptor {  //首先还是编写我们的代理逻辑
  // First, we write our proxy logic

    private final Object target;   //这些和之前JDK动态代理写法是一样的
  // This is similar to the JDK dynamic proxy implementation

    public TestProxy(Object target) {
        this.target = target;
    }

    @Override   // Here, we need to write our proxy logic
    public Object intercept(Object o, Method method, Object[] objects, MethodProxy methodProxy) throws Throwable {
        System.out.println("The operation is now being handled by CGLib! " + o.getClass());
        return method.invoke(target, objects);  // Simply invoke the method on the target object
      //也是直接调用代理对象的方法即可
    }
}
Next, let's create the proxy class using CGLib:
接着我们来创建一下代理类:
public static void main(String[] args) {
    SubjectImpl subject = new SubjectImpl();

    Enhancer enhancer = new Enhancer();   // The enhancer will help us generate the dynamic proxy object
  //增强器,一会就需要依靠增强器来为我们生成动态代理对象

    enhancer.setSuperclass(SubjectImpl.class);
   // Set the target class type we want to proxy. Unlike JDK dynamic proxies, we don't need an interface or abstract class. The specified class will act as the superclass for the proxy, allowing us to interact with the proxy class as if it were the original type.
  //直接选择我们需要代理的类型,直接不需要接口或是抽象类,SuperClass作为代理类的父类存在,这样我们就可以按照指定类型的方式去操作代理类了

    enhancer.setCallback(new TestProxy(subject));
   // Set our previously written proxy logic
  //设定我们刚刚编写好的代理逻辑

    SubjectImpl proxy = (SubjectImpl) enhancer.create();
  // Create the proxy class
  //直接创建代理类

    proxy.test();
  // Call the 'test' method on the proxy class
  //调用代理类的test方法
}
As you can see, the outcome is quite similar:
可以看到,效果其实是差不多的:

You can see that the proxy class is named something like package.SubjectImpl$$EnhancerByCGLIB$$47f6ed3a, indicating that it's a dynamically generated class. Although we can't view the source code of this generated class, it's worth noting that this class indeed extends the type we specified (SubjectImpl).
可以看到代理类是
包名.SubjectImpl$$EnhancerByCGLIB$$47f6ed3a,也是动态生成的一个类,所以我们无法去查看源码,不过此类是继承自我们指定的类型的。

... I will back 感觉不是那么能理解, 大致概念可以知道它在干啥 具体细节觉得有点儿懵逼
I will back again...
https://www.bilibili.com/video/BV1u3411P7Na?spm_id_from=333.788.videopod.episodes&vd_source=73e7d2c4251a7c9000b22d21b70f5635&p=18
Explain Proxy Design Pattern
外观模式
你是否经历过类似的情况:今年计算机学院的奖学金评定工作开始了,由于你去年一不小心拿了个ACM的区域赛金牌,觉得自己又行了,于是也想参与到奖学金的争夺中,首先你的辅导员会通知你去打印你的获奖材料,然后你高高兴兴拿给辅导员之后,辅导员又给了你一张表,让你打印了之后填写一下,包括你的个人信息还有一些个人介绍,完成后,你本以为可以坐等发奖了,结果辅导员又跟你说我们评定还要去某某地方盖章,盖完章还要去找谁谁谁签字,最后还要参加一下答辩... 看着如此复杂的流程,你瞬间不想搞了。
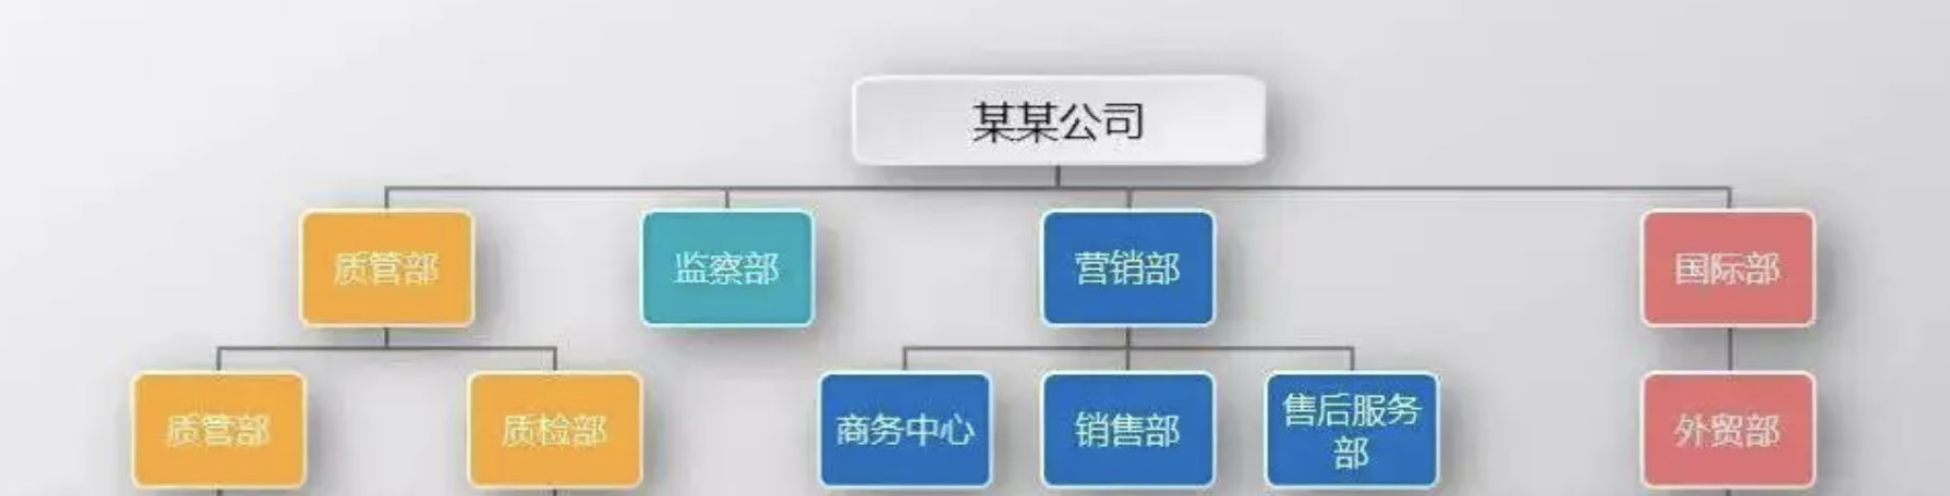
实际上我们生活中很多时候都是这样,可能在办一件事情的时候,由于部门职能的不同,你得各个部门到处跑,你肯定会抱怨一句,就不能有个人来统一一下吗,就不能在一个地方一起把事情都办了吗?这时,我们就可以用到外观模式了。
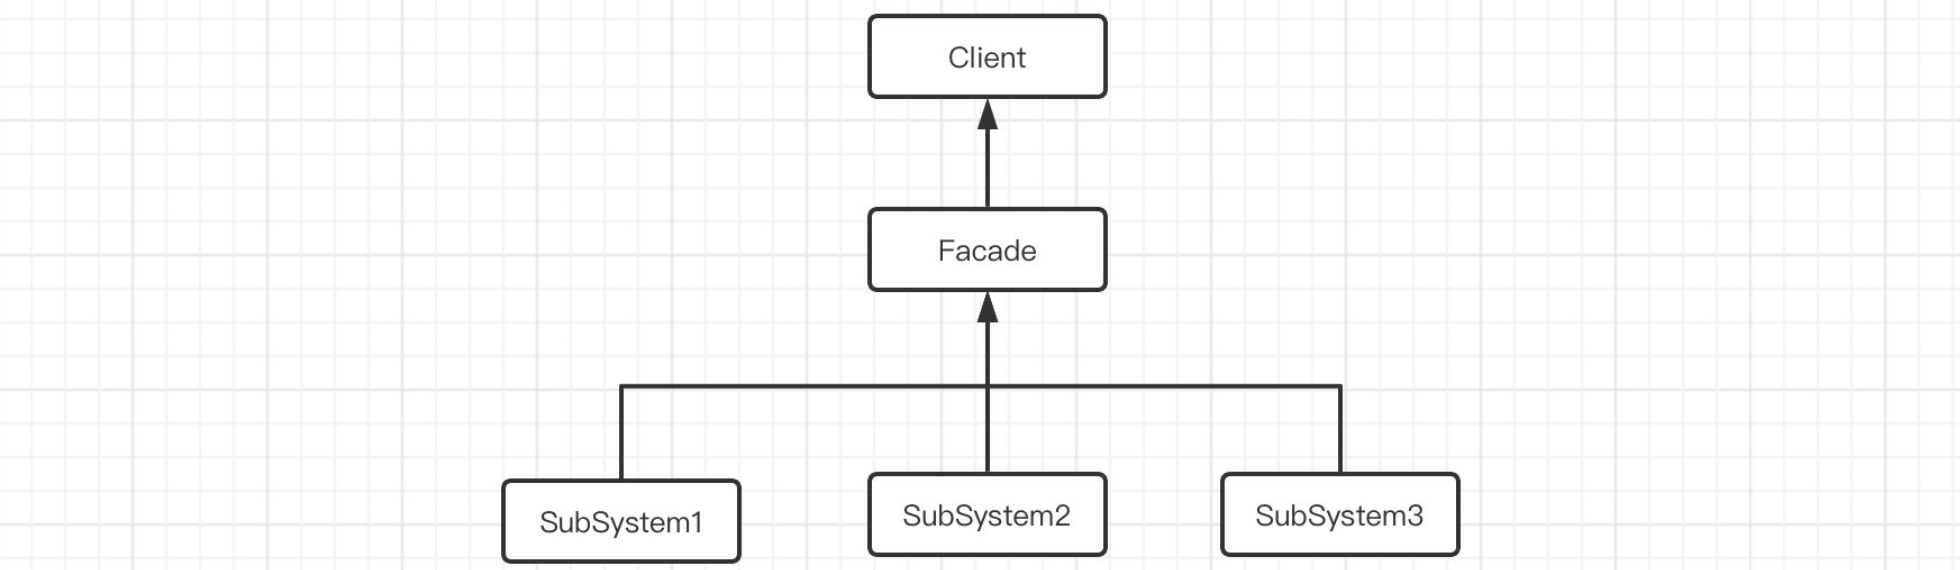
外观模式充分体现了迪米特法则。可能我们的整个项目有很多个子系统,但是我们可以在这些子系统的上面加一个门面(Facade)当我们外部需要与各个子系统交互时,无需再去直接使用各个子系统,而是与门面进行交互,再由门面与后面的各个子系统操作,这样,我们以后需要办什么事情,就统一找门面就行了。这样的好处是,首先肯定方便了代码的编写,统一找门面就行,不需要去详细了解子系统,并且,当子系统需要修改时,也只需要修改门面中的逻辑,不需要大面积的变动,遵循迪米特法则尽可能少的交互。
比如现在我们设计了三个子系统,分别是排队、结婚、领证,正常情况下我们是需要分别去找这三个部门去完成的,但是现在我们通过门面统一来完成:
现在三个系统太复杂了,我们添加一个门面:
public class Facade {

    SubSystemA a = new SubSystemA();
    SubSystemB b = new SubSystemB();
    SubSystemC c = new SubSystemC();

    public void marry(){   //红白喜事一条龙服务
        a.test1();
        b.test2();
        c.test3();
    }
}
现在我们只需要一个门面就能直接把事情办完了:
通过使用外观模式,我们就大大降低了类与类直接的关联程度,并且简化了流程。
享元模式
最后我们来看看享元模式(Flyweight),那么这个"享元"代表什么意思呢?我们先来看看下面的问题:
我们发现上面的例子中,两个字符串虽然长短不同,但是却包含了一段相同的部分,那么现在我们如果要对内存进行优化:
public static void main(String[] args) {
    String str1 = "efg";   //由于str1包含str2,所以我们可以去掉重复的部分,当需要原本的str1时,再合在一起
    String str2 = "abcd";
    System.out.println("str1 = "+str2+str1);
}
而享元模式就是这个思想,我们可以将那些重复出现的内容作为共享部分取出,这样当我们拥有大量对象时,我们把其中共同的部分抽取出来,由于提取的部分是多个对象共享只有一份,那么就可以减轻内存的压力。包括我们的围棋,实际上我们只需要知道棋盘上的各个位置是黑棋还是白棋,实际上没有毕业创建很多个棋子对象,我们只需要去复用一个黑棋和一个白棋子对象即可。
比如现在我们有两个服务,但是他们都需要使用数据库工具类来操作,实际上这个工具类没必要创建多个,我们这时就可以使用享元模式,让数据库工具类作为享元类,通过享元工厂来提供一个共享的数据库工具类:
public class DBUtilFactory {
    private static final DBUtil UTIL = new DBUtil();   //享元对象被存放在工厂中

    public static DBUtil getFlyweight(){   //获取享元对象
        return UTIL;
    }
}
最后当我们需要使用享元对象时,直接找享元工厂要就行了:
public class UserService {   //用户服务

    public void service(){
        DBUtil util = DBUtilFactory.getFlyweight();   //通过享元工厂拿到DBUtil对象
        util.selectDB();    //该干嘛干嘛
    }
}
当然,这只是简单的享元模式实现,实际上我们一开始举例的String类,也在使用享元模式进行优化,比如下面的代码:
public static void main(String[] args) {
    String str1 = "abcd";
    String str2 = "abcd";
    String str3 = "ab" + "cd";
    System.out.println(str1 == str2);
    System.out.println(str1 == str3);   //猜猜这三个对象是不是都是同一个?
}
虽然我们这里定义了三个字符串,但是我们发现,这三个对象指向的都是同一个对象,这是为什么呢?实际上这正是Java语言实现了数据的共享,想要了解具体实现请前往JVM篇视频教程。