Design Patterns (Creational)
Software Design Patterns, also known as design patterns, are sets of well-documented, reusable solutions for common software design challenges. These patterns represent best practices and accumulated knowledge widely recognized and cataloged for repeated use. The primary goal of using design patterns is to make code reusable, easier for others to understand, and ensure code reliability and reusability.
Kent Beck and Ward Cunningham developed the concept of design patterns in 1987, inspired by the ideas of architect Christopher Alexander, who applied patterns in building design. They implemented these ideas in generating graphical user interfaces in Smalltalk. The following year, Erich Gamma explored these principles further in his University of Zurich doctoral thesis, adapting them specifically for software development. Meanwhile, James Coplien worked with similar ideas for C++ development between 1989 and 1991, publishing his book Advanced C++ Idioms in 1991. That same year, Erich Gamma received his doctorate and collaborated in the U.S. with Richard Helm, Ralph Johnson, and John Vlissides to publish Design Patterns: Elements of Reusable Object-Oriented Software. This book introduced 23 design patterns, and its authors became widely known in software development as the "Gang of Four" (GoF), whose collaboration marked a breakthrough in software design patterns.
Let’s start by exploring a few design patterns focused on object creation.
Factory Method Pattern ✅
The Factory Method Pattern is one of the simplest design patterns. When we need to create an object, the most straightforward way is to directly new an instance. However, the Factory Method Pattern replaces this direct instantiation. Why do we need to replace the traditional new?
Consider if we create all objects using new statements. If this object is widely used and then, one day, its constructor or class name changes, we would need to modify every occurrence of new in our code. According to the Law of Demeter, we should minimize direct dependencies between classes. By encapsulating frequently used object creation logic within a factory class, we only need to call the factory method to get an object. If the class changes, we only need to update the factory, not the rest of the codebase.
Additionally, some objects require more than a simple new to create and may need extra steps for configuration. Let's see how to create objects using a Simple Factory first, and then enhance it into a Factory Method Pattern.
public abstract class Fruit {   // Abstract Fruit class
    private final String name;

    public Fruit(String name){
        this.name = name;
    }

    @Override
    public String toString() {
        return name + "@" + hashCode();   // Print the fruit's name and hashCode
    }
}
public class Apple extends Fruit {   // Apple, inheriting from Fruit

    public Apple() {
        super("Apple");
    }
}
public class Orange extends Fruit {  // Orange, also inheriting from Fruit
    public Orange() {
        super("Orange");
    }
}
Under normal circumstances, we could create an object with new:
public class Main {
    public static void main(String[] args) {
        Apple apple = new Apple();
        System.out.println(apple);
    }
}
Now, let’s encapsulate object creation within a factory:
public class FruitFactory {
    /**
     * A static method that creates fruit based on the type specified.
     * @param type The type of fruit.
     * @return The corresponding fruit object.
     */
    public static Fruit getFruit(String type) {
        switch (type) {
            case "Apple":
                return new Apple();
            case "Orange":
                return new Orange();
            default:
                return null;
        }
    }
}
Now, we can use the factory to create objects:
public class Main {
    public static void main(String[] args) {
        Fruit fruit = FruitFactory.getFruit("Orange");   // Get fruit from the factory rather than creating it ourselves
        System.out.println(fruit);
    }
}
However, this still has some issues. According to the Open-Closed Principle (OCP), software entities like classes, modules, and functions should be open to extension but closed to modification. If we want to add a new fruit, like a peach, we’d need to modify the factory method, which goes against OCP, as the factory should ideally remain unchanged.
To adhere to OCP, we can transform the Simple Factory Pattern into the Factory Method Pattern by using extension:
public abstract class FruitFactory<T extends Fruit> {   // Abstract factory with generic type T for different fruits
    public abstract T getFruit();  // Each factory produces its specific fruit
}
public class AppleFactory extends FruitFactory<Apple> {  // Apple factory returns an Apple
    @Override
    public Apple getFruit() {
        return new Apple();
    }
}
This allows us to use different factories to produce different types of fruits. If we want to add a new fruit, we can simply create a new factory without modifying existing code.
public class Main {
    public static void main(String[] args) {
        test(new AppleFactory()::getFruit);   // To get an apple, we use the AppleFactory
    }

    // Simulate eating a fruit
    private static void test(Supplier<Fruit> supplier){
        System.out.println(supplier.get() + " has been eaten. Delicious!");
    }
}
In this way, we’ve implemented the Factory Method Pattern, hiding object creation details behind the factory, so users only need to focus on how to use the objects.
Provide a Code Example for Factory Design Pattern
What is the Factory Design Pattern? Why Do We Use Factories? How Do You Use This Design Pattern in Your Application?
https://www.bilibili.com/video/BV1u3411P7Na?spm_id_from=333.788.videopod.episodes&vd_source=73e7d2c4251a7c9000b22d21b70f5635&p=9
Abstract Factory Pattern ✅
In the previous section, we discussed the Factory Method Pattern, which defines a top-level abstract factory class that can be extended with specific factory classes for each product type. However, this pattern is limited to simpler cases. When we need to produce multiple related products—forming what we call product families—the Factory Method Pattern becomes inefficient.
For example:
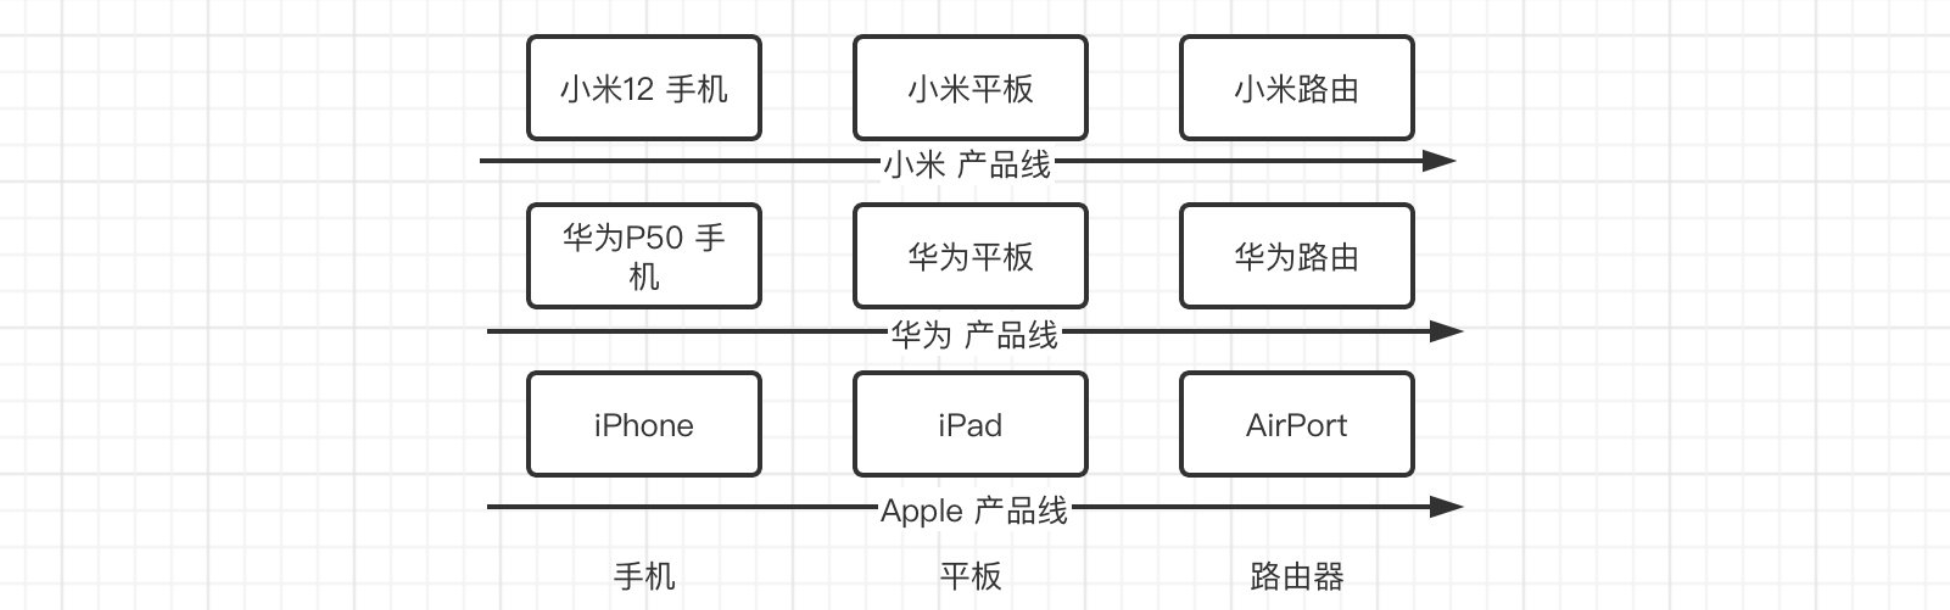
These products often come in families. For instance, Xiaomi’s product line includes the Xiaomi 12 smartphone and Xiaomi tablets, while Huawei’s line includes Huawei phones and tablets. Using the Factory Method Pattern here would require creating nine separate factories to produce each individual product, which is time-consuming and inefficient.
To address this, we can use the Abstract Factory Pattern. This pattern allows us to group multiple related products within a single factory, organized by product family. For example, a Xiaomi factory could produce all Xiaomi products like phones, tablets, and routers, while a Huawei factory could do the same for Huawei’s product line.
Let’s set up an abstract factory structure:
public abstract class AbstractFactory {
    public abstract Phone getPhone();
    public abstract Table getTable();
    public abstract Router getRouter();
}
With this setup, a single factory can produce all products within the same family, making it more efficient than the Factory Method Pattern for complex product families.
Advantages
- Consistency: The factory produces products that belong to the same family, ensuring consistency in the product line.
- Ease of Management: Adding new products to a specific family requires changes only within the family’s factory.
Drawbacks
If we add a new product to each family (e.g., a smartwatch), we must add a new method in every factory, which violates the Open-Closed Principle, as the factory classes are no longer closed to modification.
Difference between Factory vs. Abstract Factory Design Pattern
https://www.bilibili.com/video/BV1u3411P7Na?spm_id_from=333.788.videopod.episodes&vd_source=73e7d2c4251a7c9000b22d21b70f5635&p=10
Builder Pattern ✅
The Builder Pattern is a common design pattern used to construct complex objects step-by-step, especially when these objects have multiple attributes or parameters. Many frameworks provide XXXBuilder classes for constructing instances, allowing us to configure them piece by piece before finalizing the creation.
For example, in Java SE, we have the StringBuilder class:
public static void main(String[] args) {
    StringBuilder builder = new StringBuilder(); // Create a StringBuilder
    builder.append(666); // Append a number
    builder.append("老铁"); // Append a string
    builder.insert(2, '?'); // Insert a character at a specific position
    System.out.println(builder.toString()); // Convert to string
}
Here, we are progressively configuring the StringBuilder, and once all modifications are done, we convert it to a string. The focus of the Builder Pattern is on configuring an object step-by-step, which is especially useful if the object’s constructor has many parameters.
Example: Using the Builder Pattern for a Student Class
Consider a Student class with numerous attributes:
public class Student {
    int id;
    int age;
    int grade;
    String name;
    String college;
    String profession;
    List<String> awards;

    public Student(int id, int age, int grade, String name, String college, String profession, List<String> awards) {
        this.id = id;
        this.age = age;
        this.grade = grade;
        this.name = name;
        this.college = college;
        this.profession = profession;
        this.awards = awards;
    }
}
The constructor for Student is quite long, which can be cumbersome to use and easy to make mistakes with. For instance:
public static void main(String[] args) {
    Student student = new Student(1, 18, 3, "Xiao Ming", "Computer Science College", "Computer Science", Arrays.asList("ICPC-ACM Regional Gold", "LPL 2022 Spring Champion"));
}
Using a new constructor requires matching parameters carefully, which is prone to errors. Now, let’s apply the Builder Pattern to create the Student class:
public class Student {
    ...

    // Only allow creation via the builder, so make the constructor private
    private Student(int id, int age, int grade, String name, String college, String profession, List<String> awards) {
        ...
    }

    public static StudentBuilder builder() { // Return a builder instance
        return new StudentBuilder();
    }

    public static class StudentBuilder { // Inner builder class
        // Fields for storing parameter values during the building process
        int id;
        int age;
        int grade;
        String name;
        String college;
        String profession;
        List<String> awards;

        // Methods for setting parameters, returning the builder itself for chaining
        public StudentBuilder id(int id) {
            this.id = id;
            return this;
        }

        public StudentBuilder age(int age) {
            this.age = age;
            return this;
        }

        // Additional methods for other attributes
        ...

        public StudentBuilder awards(String... awards) {
            this.awards = Arrays.asList(awards);
            return this;
        }

        public Student build() { // Final method to create the object
            return new Student(id, age, grade, name, college, profession, awards);
        }
    }
}
Now, we can create Student objects with a clearer, more readable approach:
public static void main(String[] args) {
    Student student = Student.builder() // Obtain the builder
            .id(1) // Set each attribute step-by-step
            .age(18)
            .grade(3)
            .name("Xiao Ming")
            .awards("ICPC-ACM Regional Gold", "LPL 2022 Spring Champion")
            .build(); // Finalize and create the `Student` object
}
This approach ensures each parameter is placed correctly, and the code is more readable and maintainable. The Builder Pattern makes constructing complex objects much more elegant and less error-prone.
Provide a Code Example for Builder Design Pattern
https://www.bilibili.com/video/BV1u3411P7Na?spm_id_from=333.788.videopod.episodes&vd_source=73e7d2c4251a7c9000b22d21b70f5635&p=11
Singleton Pattern ✅
The Singleton Pattern is a frequently used design pattern in software development. It ensures that a class has only one instance and provides a global point of access to it. For example, for a database connection class, only one instance is needed to manage connections, and additional instances would be unnecessary.
Eager Initialization (Singleton)
Here’s a simple Singleton implementation using eager initialization:
public class Singleton {
    private static final Singleton INSTANCE = new Singleton();  // Create the instance eagerly

    private Singleton() {}   // Private constructor to prevent direct instantiation

    public static Singleton getInstance() {  // Provides access to the single instance
        return INSTANCE;
    }
}
Now, when we need to retrieve the instance, we use getInstance():
This approach is called eager initialization since the instance is created when the class is loaded. Another approach is lazy initialization, where the instance is only created when needed.
Lazy Initialization (Singleton)
public class Singleton {
    private static Singleton INSTANCE; // The instance is not created initially

    private Singleton() {} // Private constructor

    public static Singleton getInstance() { // Instance is created only when needed
        if (INSTANCE == null) { // Check if an instance has already been created
            INSTANCE = new Singleton();
        }
        return INSTANCE;
    }
}
In this lazy initialization version, the instance is created only when getInstance() is called.
However, this implementation has thread-safety issues in a multi-threaded environment. If multiple threads call getInstance() simultaneously, they might all see INSTANCE == null, and each could create a new instance.
Thread-Safe Lazy Initialization
However, it’s important to note that since lazy initialization occurs within the getInstance() method, there can be issues in a multi-threaded environment. (It’s recommended to review the Java Util Concurrent (JUC) tutorials before implementing in concurrent settings.) Imagine a scenario where multiple threads call the getInstance() method simultaneously—what might happen in this case?

In a multi-threaded environment, if three threads simultaneously call the getInstance() method, they will all check the INSTANCE == null condition at the same time. Since the instance hasn’t been created yet, each thread will see the condition as true, which will lead all three threads to attempt initialization. (This issue doesn’t occur with eager initialization, as the instance is created when the class loads.)
To make lazy initialization thread-safe, we can use the synchronized keyword:
public static synchronized Singleton getInstance() { // Synchronized to prevent concurrent access
    if (INSTANCE == null) {
        INSTANCE = new Singleton();
    }
    return INSTANCE;
}
Since multiple threads may call getInstance(), we can add a lock using the synchronized keyword on the method. This ensures only one thread can enter the method at a time. However, while this approach is simple and effective, it may reduce efficiency under high concurrency. To optimize, we can modify the code so that only the instantiation step is locked:
public static Singleton getInstance(){
    if(INSTANCE == null) {
        synchronized (Singleton.class) {    // Only lock the instantiation step
            INSTANCE = new Singleton();
        }
    }
    return INSTANCE;
}
However, this isn’t perfect yet. It’s still possible for multiple threads to check INSTANCE == null and then wait for the lock. To solve this, we can add an additional inner check:
public static Singleton getInstance() {
    if (INSTANCE == null) {
        synchronized (Singleton.class) { // Lock only for initialization
            if (INSTANCE == null) {
              INSTANCE = new Singleton(); // Double-checked locking
            }
        }
    }
    return INSTANCE;
}
With this double-checked locking, only the first thread to enter will initialize the instance, ensuring that only one instance is created.
We still need to consider one more detail. In this scenario, IntelliJ IDEA likely displays a warning, suggesting that we add the volatile keyword to INSTANCE.
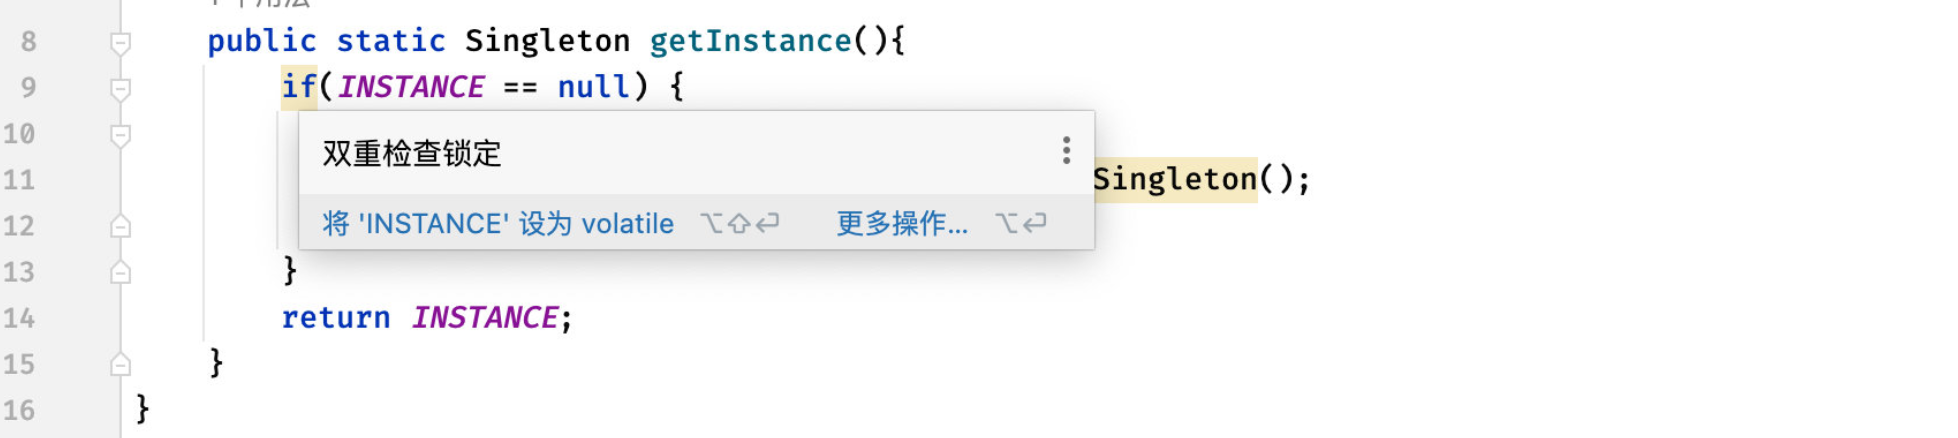
The volatile keyword ensures visibility across threads, meaning that when one thread updates INSTANCE, other threads see the latest value immediately. Without volatile, there’s a chance that threads might see a partially constructed object or an outdated value, which could lead to unexpected behavior. By marking INSTANCE as volatile, we ensure that any changes to it are visible to all threads, making our Singleton implementation safer and more reliable.
So, the final version of our thread-safe Singleton with double-checked locking would look like this:
public class Singleton {
    private static volatile Singleton INSTANCE;

    private Singleton() {}

    public static Singleton getInstance() {
        if (INSTANCE == null) {
            synchronized (Singleton.class) {
                if (INSTANCE == null) {
                  INSTANCE = new Singleton(); // Double-checked locking with volatile
                }
            }
        }
        return INSTANCE;
    }
}
This completes our Singleton with thread safety, visibility across threads, and lazy initialization.
Static Inner Class (Lazy Initialization)
A cleaner approach to lazy initialization without locking is to use a static inner class:
public class Singleton {
    private Singleton() {} // Private constructor prevents direct instantiation

    private static class Holder {
        private static final Singleton INSTANCE = new Singleton(); // Singleton instance created within inner class
    }

    public static Singleton getInstance() {
        return Holder.INSTANCE; // Returns the Singleton instance
    }
}
This approach leverages the Java class loader’s lazy loading, ensuring that the Holder class is only loaded when it’s accessed. This is a thread-safe, efficient way to implement a Singleton without locking, making it an ideal solution for lazy initialization.
Note that this method may depend on the specific language and JVM implementation, as not all languages support this pattern.
https://www.bilibili.com/video/BV1u3411P7Na?spm_id_from=333.788.player.switch&vd_source=73e7d2c4251a7c9000b22d21b70f5635&p=12
What is the Singleton Design Pattern?
How to Create a Singleton? (Eager Initialization and Lazy Initialization)
How to Make Singleton Thread-Safe? (For Both Eager and Lazy)
原型模式
原型模式实际上与对象的拷贝息息相关,原型模式使用原型实例指定待创建对象的类型,并且通过复制这个原型来创建新的对象。也就是说,原型对象作为模板,通过克隆操作,来产生更多的对象,就像细胞的复制一样。
开始之前,我们先介绍一下对象的深拷贝和浅拷贝,首先我们来看浅拷贝:
- 浅拷贝: 对于类中基本数据类型,会直接复制值给拷贝对象;对于引用类型,只会复制对象的地址,而实际上指向的还是原来的那个对象,拷贝个基莫。
public static void main(String[] args) {
    int a = 10;
    int b = a;  //基本类型浅拷贝
    System.out.println(a == b);

    Object o = new Object();
    Object k = o;    //引用类型浅拷贝,拷贝的仅仅是对上面对象的引用
    System.out.println(o == k);
}
- 深拷贝: 无论是基本类型还是引用类型,深拷贝会将引用类型的所有内容,全部拷贝为一个新的对象,包括对象内部的所有成员变量,也会进行拷贝。
在Java中,我们就可以使用Cloneable接口提供的拷贝机制,来实现原型模式:
public class Student implements Cloneable{   //注意需要实现Cloneable接口
    @Override
    public Object clone() throws CloneNotSupportedException {   //提升clone方法的访问权限
        return super.clone();
    }
}
接着我们来看看克隆的对象是不是原来的对象:
public static void main(String[] args) throws CloneNotSupportedException {
    Student student0 = new Student();
    Student student1 = (Student) student0.clone();
    System.out.println(student0);
    System.out.println(student1);
}
可以看到,通过clone()方法克隆的对象并不是原来的对象,我们来看看如果对象内部有属性会不会一起进行克隆:
public class Student implements Cloneable{

    String name;

    public Student(String name){
        this.name = name;
    }

    public String getName() {
        return name;
    }

    @Override
    public Object clone() throws CloneNotSupportedException {
        return super.clone();
    }
}
public static void main(String[] args) throws CloneNotSupportedException {
    Student student0 = new Student("小明");
    Student student1 = (Student) student0.clone();
    System.out.println(student0.getName() == student1.getName());
}
可以看到,虽然Student对象成功拷贝,但是其内层对象并没有进行拷贝,依然只是对象引用的复制,所以Java为我们提供的clone方法只会进行浅拷贝。那么如何才能实现深拷贝呢?
@Override
public Object clone() throws CloneNotSupportedException {   //这里我们改进一下,针对成员变量也进行拷贝
    Student student = (Student) super.clone();
    student.name = new String(name);
    return student;   //成员拷贝完成后,再返回
}
这样,我们就实现了深拷贝。