SpringBoot
Spring Boot 让您可以轻松地创建独立的、生产级别的 Spring 应用程序,并“直接运行”这些应用程序。SpringBoot 为大量的第三方库添加了支持,能够做到开箱即用,简化大量繁琐配置,用最少的配置快速构建你想要的项目。在 2023 年,SpringBoot 迎来了它的第三个大版本,随着 SpringBoot 3 的正式发布,整个生态也迎来了一次重大革新。
目前的最新版本以及对应的维护情况:

可以看到,曾经的 SpringBoot 2.5 版本将会在 2023 年 8 月底终止商业支持,届时将不会再对这类旧版本进行任何维护,因此,将我们的老版本 SpringBoot 项目进行升级已经迫在眉睫,目前最强的 3.1 正式版会维护到 2025 年中旬。
在 3.X 之后的变化相比 2.X 可以说是相当大,尤其是其生态下的 SpringSecurity 框架,旧版本项目在升级之后 API 已经完全发生改变;以及内置 Tomcat 服务器的升级,Servlet 也升级到 5 以上,从javax全新升级到jakarta新包名;包括在 3.X 得到的大量新特性,如支持 GraalVM 打包本地镜像运行等;并且 Java 版本也强制要求为 17 版本。迁移到新版本不仅可以享受到免费维护支持,也可以感受 Java17 带来的全新体验。
介绍了这么多,我们首先还是来看看 SpringBoot 功能有哪些:
- 能够创建独立的 Spring 应用程序
- 内嵌 Tomcat、Jetty 或 Undertow 服务器(无需单独部署 WAR 包,打包成 Jar 本身就是一个可以运行的应用程序)
- 提供一站式的“starter”依赖项,以简化 Maven 配置(需要整合什么框架,直接导对应框架的 starter 依赖)
- 尽可能自动配置 Spring 和第三方库(除非特殊情况,否则几乎不需要进行任何配置)
- 提供生产环境下相关功能,如指标、运行状况检查和外部化配置
- 没有任何代码生成,也不需要任何 XML 配置(XML 是什么,好吃吗)
SpringBoot 是现在最主流的开发框架,国内的公司基本都在使用,也是我们出去找工作一定要会的框架,它提供了一站式的开发体验,能够大幅度提高我们的开发效率。

在 SSM 阶段,当我们需要搭建一个基于 Spring 全家桶的 Web 应用程序时,我们不得不做大量的依赖导入和框架整合相关的 Bean 定义,光是整合框架就花费了我们大量的时间,但是实际上我们发现,整合框架其实基本都是一些固定流程,我们每创建一个新的 Web 应用程序,基本都会使用同样的方式去整合框架,我们完全可以将一些重复的配置作为约定,只要框架遵守这个约定,为我们提供默认的配置就好,这样就不用我们再去配置了,约定优于配置!
而 SpringBoot 正是将这些过程大幅度进行了简化,它可以自动进行配置,我们只需要导入对应的启动器(starter)依赖即可。
快速上手
要感受 SpringBoot 带来的快速开发体验,我们就从创建一个项目开始。
极速创建项目
在过去,我们创建一个 SSM 项目,需要先导入各种依赖,进行大量的配置,而现在,有了 SpringBoot,我们可以享受超快的项目创建体验,只需要前往官网进行少量配置就能快速为你生成一个 SpringBoot 项目模版:https://start.spring.io/
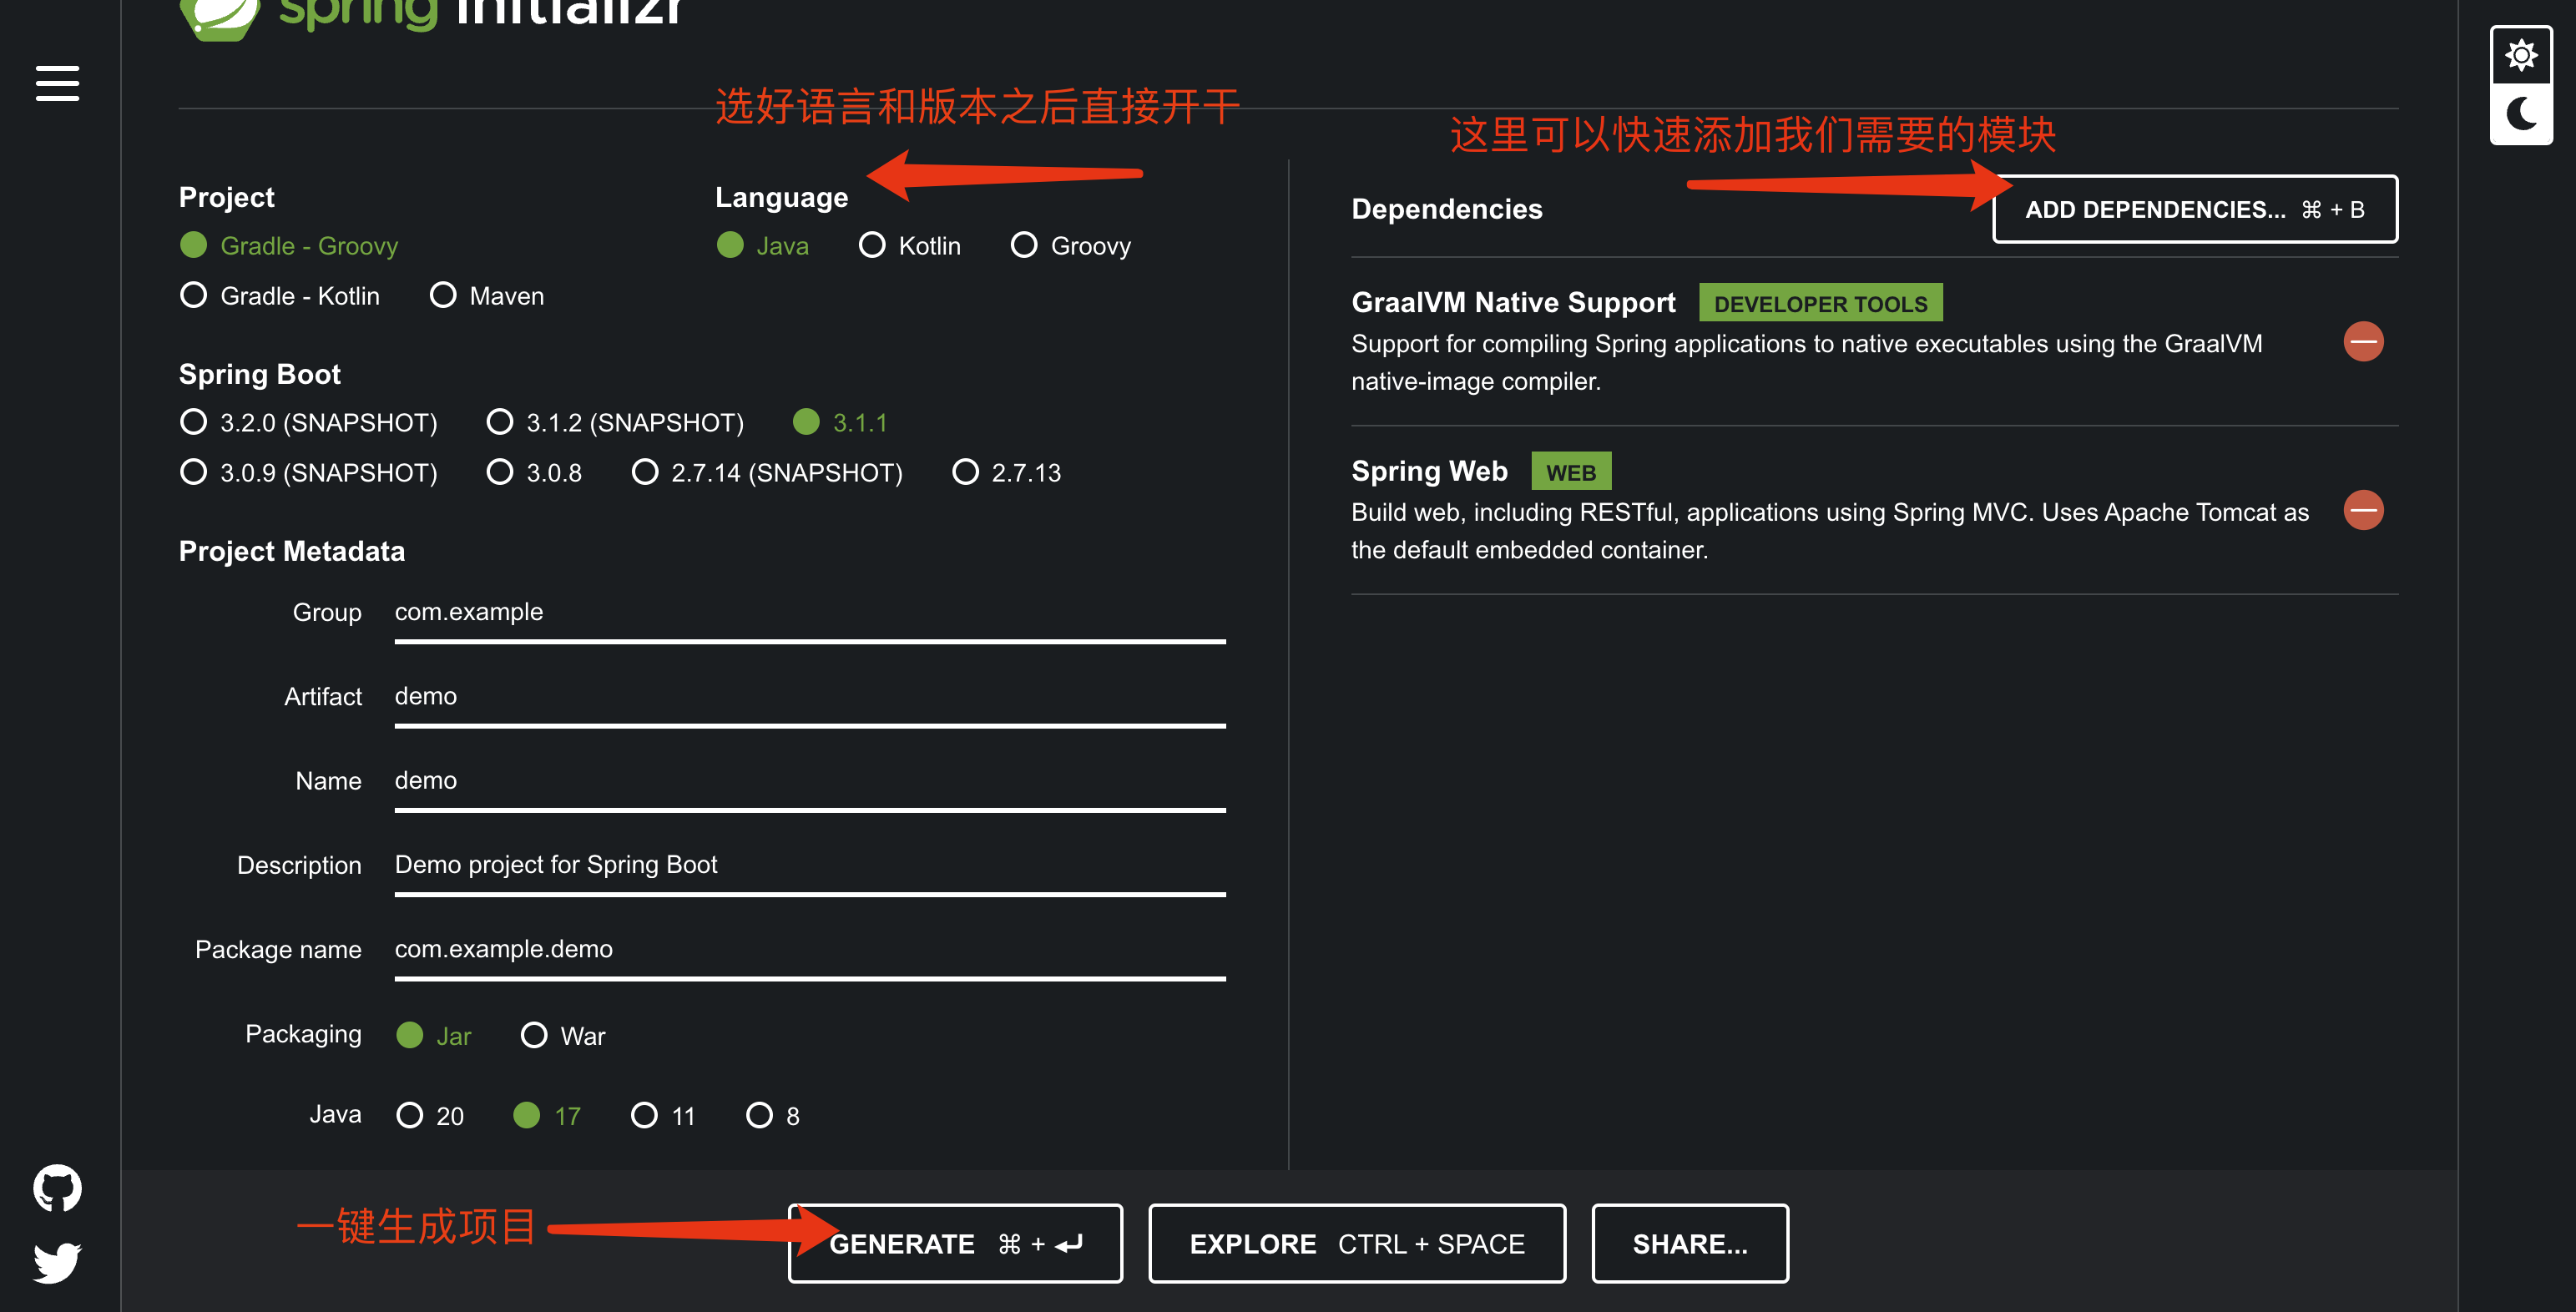
不过,为了方便,IDEA 已经将这个工具集成到内部了,我们可以直接在 IDEA 中进行创建,效果是一样的,首先在新建项目阶段,选择 Spring Initializr 类型:


接着我们就可以配置项目的语言,并且选择项目需要使用的模块,这里我们简单选择两个依赖:
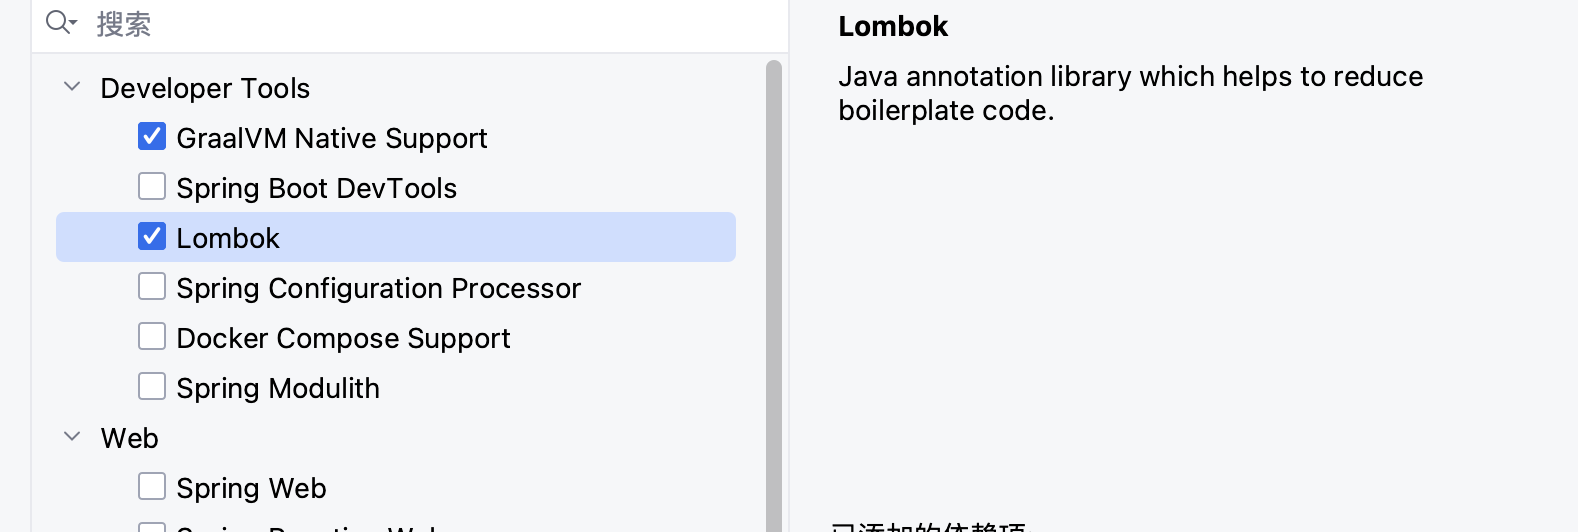
如果一开始不清楚自己需要哪些模块,我们也可以后续自己手动添加对应模块的 starter 依赖,使用非常简单。

项目自动生成之后,可以看到 Spring 相关的依赖已经全部自动导入:


并且也自动为我们创建了一个主类用于运行我们的 SpringBoot 项目:

我们可以一键启动我们的 SpringBoot 项目:

只不过由于我们没有添加任何有用的模块,也没有编写什么操作,因此启动之后项目就直接停止了。


常用模块快速整合
前面我们说了,SpringBoot 的核心思想就是约定大于配置,能在一开始默认的就直接默认,不用我们自己来进行配置,我们只需要配置某些特殊的部分即可,这一部分我们就来详细体验一下。
我们来尝试将我们之前使用过的模块进行一下快速整合,可以看到在一开始的时候,我们没有勾选其他的依赖,因此这里只导入了最基本的spring-boot-starter依赖:
<dependency>
     <groupId>org.springframework.boot</groupId>
     <artifactId>spring-boot-starter</artifactId>
</dependency>
所有的 SpringBoot 依赖都是以 starter 的形式命名的,之后我们需要导入其他模块也是导入spring-boot-starter-xxxx这种名称格式的依赖。
首先我们还是从 SpringMvc 相关依赖开始。SpringBoot 为我们提供了包含内置 Tomcat 服务器的 Web 模块,我们只需要导入依赖就能直接运行服务器:
<dependency>
     <groupId>org.springframework.boot</groupId>
     <artifactId>spring-boot-starter-web</artifactId>
</dependency>
spring-boot-starter-web inclues spring-boot-starter
我们不需要进行任何配置,直接点击启动:


它真的做到了开箱即用,我们现在可以直接访问这个网站:


可以看到成功响应了 404 页面,相比之前的大量配置,可以说方便了很多,我们到目前为止仅仅是导入了一个依赖,就可以做到直接启动我们的 Web 服务器并正常访问。
SpringBoot 支持自动包扫描,我们不需要编写任何配置,直接在任意路径(但是不能跑到主类所在包外面去了)下创建的组件(如 Controller、Service、Component、Configuration 等)都可以生效,比如我们这里创建一个测试的 Controller 试试看:
@Controller
public class TestController {

    @ResponseBody
    @GetMapping("/")
    public String index(){
        return "Hello World";
    }
}

重启之后,可以看到直接就能访问到,而这期间我们只是创建了对应的 Controller 却没有进行任何配置,这真的太方便了:


包括一个对象现在也可以直接以 JSON 形式返回给客户端,无需任何配置:
@ResponseBody
@GetMapping("/")
public Student index(){
    Student student = new Student();
    student.setName("小明");
    student.setSex("男");
    student.setSid(10);
    return student;
}


最后浏览器能够直接得到application/json的响应数据,就是这么方便,这都得归功于 SpringBoot 对应的 start 帮助我们自动将处理 JSON 数据的 Converter 进行了配置,我们不需要再单独去配置 Converter 了。不过 SpringBoot 官方默认使用的是Jackson和Gson 的 HttpMessageConverter 来进行配置,不是我们之前教程中使用的 FastJSON 框架。
我们最后来看看这个 Start 包含了哪些依赖:
<dependencies>
    <dependency>
      <groupId>org.springframework.boot</groupId>
      <artifactId>spring-boot-starter</artifactId>
      <version>3.1.1</version>
      <scope>compile</scope>
    </dependency>
    <dependency>
      <groupId>org.springframework.boot</groupId>
      <artifactId>spring-boot-starter-json</artifactId>
      <version>3.1.1</version>
      <scope>compile</scope>
    </dependency>
    <dependency>
      <groupId>org.springframework.boot</groupId>
      <artifactId>spring-boot-starter-tomcat</artifactId>
      <version>3.1.1</version>
      <scope>compile</scope>
    </dependency>
    <dependency>
      <groupId>org.springframework</groupId>
      <artifactId>spring-web</artifactId>
      <version>6.0.10</version>
      <scope>compile</scope>
    </dependency>
    <dependency>
      <groupId>org.springframework</groupId>
      <artifactId>spring-webmvc</artifactId>
      <version>6.0.10</version>
      <scope>compile</scope>
    </dependency>
  </dependencies>
里面包含了以下内容:
- spring-boot-starter 基础依赖 starter
- spring-boot-starter-json 配置 JSON 转换的 starter
- spring-boot-starter-tomcat 内置 Tomcat 服务器
- spring-web、spring-webmvc 不用多说了吧,之前已经讲过了
如果需要像之前一样添加 WebMvc 的配置类,方法是一样的,直接创建即可:
//只需要添加Configuration用于注册配置类,不需要其他任何注解,已经自动配置好了
@Configuration
public class WebConfiguration implements WebMvcConfigurer {
    @Override
    public void addInterceptors(InterceptorRegistry registry) {
        registry.addInterceptor(new HandlerInterceptor() {
            @Override
            public boolean preHandle(HttpServletRequest request, HttpServletResponse response, Object handler) throws Exception {
                return HandlerInterceptor.super.preHandle(request, response, handler);
            }
        });
    }
}
我们在 SSM 阶段编写的大量配置,到现在已经彻底不需要了。


同样的,我们来看看 SpringSecurity 框架如何进行整合,也是非常简单,我们只需要直接导入即可:
<dependency>
    <groupId>org.springframework.boot</groupId>
    <artifactId>spring-boot-starter-security</artifactId>
</dependency>

导入完成后,再次访问网站,就可以看到熟悉的登录界面了:


我们没有进行任何配置,而是对应的 Starter 帮助我们完成了默认的配置,并且在启动时,就已经帮助我们配置了一个随机密码的用户可以直接登录使用:

密码直接展示在启动日志中,而默认用户名称为user我们可以直接登录:

同样没有进行任何配置,我们只需要添加对应的 starter 就能做到开箱即用,并且内置一套默认配置,自动帮助我们创建一个测试用户,方便我们快速搭建项目,同样的,如果要进行额外配置,我们只需要直接添加配置类即可:
//依然只需要Configuration注解即可,不需要其他配置
@Configuration
public class SecurityConfiguration {

    //配置方式跟之前SSM阶段是一样的
    @Bean
    public SecurityFilterChain filterChain(HttpSecurity http) throws Exception {
        return http
                .authorizeHttpRequests(auth -> {
                    auth.anyRequest().authenticated();
                })
                .formLogin(conf -> {
                    conf.loginPage("/login");
                    conf.loginProcessingUrl("/doLogin");
                    conf.defaultSuccessUrl("/");
                    conf.permitAll();
                })
                .build();
    }
}
同样的,我们也可以快速整合之前使用的模版引擎,比如 Thymeleaf 框架,直接上对应的 Starter 即可:
<dependency>
    <groupId>org.springframework.boot</groupId>
    <artifactId>spring-boot-starter-thymeleaf</artifactId>
</dependency>
在默认情况下,我们需要在resources目录下创建两个目录:

这两个目录是默认配置下需要的,名字必须是这个:
templates- 所有模版文件都存放在这里static- 所有静态资源都存放在这里
我们只需要按照上面的样子放入我们之前的前端模版,就可以正常使用模版引擎了,同样不需要进入任何的配置,当然,如果各位小伙伴觉得不方便,我们后续也可以进行修改。


我们不需要在 controller 中写任何内容,它默认会将 index.html 作为首页文件,我们直接访问服务器地址就能展示首页了:

这都是得益于约定大于配置的思想,开箱即用的感觉就是这么舒服,不过肯定有小伙伴好奇那现在要怎么才能像之前一样自己写呢,这个肯定还是跟之前一样的呗,该怎么写就怎么写。


我们最后再来看看 Mybatis 如何进行整合,同样只需要一个 starter 即可,这里顺便把 MySQL 的驱动加上:
<dependency>
    <groupId>org.mybatis.spring.boot</groupId>
    <artifactId>mybatis-spring-boot-starter</artifactId>
    <version>3.0.2</version>
</dependency>
<dependency>
    <groupId>com.mysql</groupId>
    <artifactId>mysql-connector-j</artifactId>
    <scope>runtime</scope>
</dependency>
注意这里的mybatis-spring-boot-starter版本需要我们自己指定,因为它没有被父工程默认管理。

启动服务器时,我们发现这里出现了问题,导致无法启动。这是因为我们没有配置数据源导致的,虽然 SpringBoot 采用约定大于配置的思想,但是数据库信息只有我们自己清楚,而且变化多样,根本没有办法提前完成约定,所以说这里我们还是需要再配置文件中编写,至于如何编写配置文件我们会在下一节中进行讲解。

自定义运行器
在项目中,可能会遇到这样一个问题:我们需要在项目启动完成之后,紧接着执行一段代码。
我们可以编写自定义的 ApplicationRunner 来解决,它会在项目启动完成后执行:
@Component
public class TestRunner implements ApplicationRunner {
    @Override
    public void run(ApplicationArguments args) throws Exception {
        System.out.println("我是自定义执行!");
    }
}
当然也可以使用 CommandLineRunner,它也支持使用@Order 或是实现 Ordered 接口来支持优先级执行。
这个功能比较简单,不多做介绍了。

配置文件介绍
前面我们已经体验了SpringBoot 带来的快捷开发体验,不过我们发现有些东西还是需要我们自己来编写配置才可以,不然 SpringBoot 项目无法正常启动,我们来看看如何编写配置。我们可以直接在application.properties中进行配置编写,它是整个 SpringBoot 的配置文件,比如要修改服务器的默认端口:

这些配置其实都是各种 Starter 提供的,部分配置在 Starter 中具有默认值,我们即使不配置也会使用默认值,比如这里的 8080 就是我们服务器的默认端口,我们也可以手动修改它,来变成我们需要的。


除了配置已经存在的选项,我们也可以添加自定义的配置,来方便我们程序中使用,比如我们这里创建一个测试数据:

我们可以直接在程序中通过@Value来访问到(跟我们之前 Spring 基础篇讲的是一样的)


配置文件除了使用properties格式以外,还有一种叫做yaml格式,它的语法如下:
我们可以看到,每一级目录都是通过缩进(不能使用 Tab,只能使用空格)区分,并且键和值之间需要添加冒号+空格来表示。
SpringBoot 也支持这种格式的配置文件,我们可以将application.properties修改为application.yml或是application.yaml来使用 YAML 语法编写配置:
现在我们来尝试为之前的数据源进行一下配置,这样才能正常启动我们的服务器:
spring:
  datasource:
    url: jdbc:mysql://localhost:3306/test
    username: root
    password: 123456
    driver-class-name: com.mysql.cj.jdbc.Driver
配置完成后,我们就可以正常启动服务器了。

这里我们接续来测试一下 MyBatis 的配置,想要在 SpringBoot 中使用 Mybatis 也很简单,不需要进行任何配置,我们直接编写 Mapper 即可,这里我们随便创建一个表试试看:


注意,在 SpringBoot 整合之后,我们只需要直接在配置类上添加@MapperScan注解即可,跟我们之前的使用方法是一样的:
@Configuration
@MapperScan("com.example.mapper")
public class WebConfiguration implements WebMvcConfigurer {
  ...
不过,为了方便,我们也可以直接为需要注册为 Mapper 的接口添加@Mapper注解,来表示这个接口作为 Mapper 使用:

这样,即使不配置 MapperScan 也能直接注册为 Mapper 正常使用,是不是感觉特别方便?
@Mapper
public interface UserMapper {
    @Select("select * from user where id = #{id}")
    User findUserById(int id);
}
访问接口测试一下:

最后,我们再来介绍一下常见的配置项,比如 SpringSecurity 和 SpringBootMvc 配置:
spring:
  #  Spring Mvc相关配置
  mvc:
    static-path-pattern: /static/** #静态资源解析地址
  # Spring Security 相关配置
  security:
    filter:
      order: -100 #Spring Security 过滤器优先级
    user:
      name: "admin" #默认登录用户名
      password: "123456" #默认登录密码
      roles: #默认用户的角色
        - admin
        - user
更多的配置我们可以在后续的学习中继续认识,这些配置其实都是由 Starter 提供的,确实极大程度简化了我们对于框架的使用。


记得保存下 有的时候更新的东西才会更新
        <dependency>
            <groupId>org.mybatis.spring.boot</groupId>
            <artifactId>mybatis-spring-boot-starter</artifactId>
            <version>3.0.3</version>
        </dependency>
https://github.com/spring-projects/spring-framework/issues/31247
轻松打包运行
前面我们介绍了一个 SpringBoot 如何快捷整合其他框架以及进行配置编写,我们接着来看如何打包我们的 SpringBoot 项目使其可以正常运行,SpringBoot 提供了一个非常便捷的打包插件,能够直接将我们的项目打包成一个 jar 包,然后使用 java 命令直接运行,我们直接点击 Maven 中的:

点击之后项目会自动打包构建:

打包完成之后,会在 target 目录下出现一个打包好的 jar 文件:


我们可以直接在命令行中运行这个程序,在 CMD 中进入到 target 目录,然后输入:
这样就可以直接运行了:


现在,我们的 SpringBoot 项目就可以快速部署到任何计算机了,只要能够安装 JRE 环境,都可以通过命令一键运行。
当然,可能也会有小伙伴好奇,怎么才能像之前一样在我们的 Tomcat 服务器中运行呢?我们也可以将其打包为 War 包的形式部署到我们自己环境中的 Tomcat 服务器或是其他任何支持 Servlet 的服务器中,但是这种做法相对比较复杂,不太推荐采用这种方式进行项目部署,不过我们这里还是介绍一下。
首先我们需要排除掉spring-boot-starter-web中自带的 Tomcat 服务器依赖:
<dependency>
    <groupId>org.springframework.boot</groupId>
       <artifactId>spring-boot-starter-web</artifactId>
       <exclusions>
          <exclusion>
             <groupId>org.springframework.boot</groupId>
             <artifactId>spring-boot-starter-tomcat</artifactId>
          </exclusion>
       </exclusions>
</dependency>
然后自行添加 Servlet 依赖:
<dependency>
   <groupId>jakarta.servlet</groupId>
   <artifactId>jakarta.servlet-api</artifactId>
   <scope>provided</scope>
</dependency>
最后将打包方式修改为 war 包:
接着我们需要修改主类,将其继承 SpringBoot 需要的 Initializer(又回到 SSM 阶段那烦人的配置了,所以说一点不推荐这种部署方式)
@SpringBootApplication
public class DemoApplication extends SpringBootServletInitializer {  //继承专用的初始化器
    public static void main(String[] args) {
        SpringApplication.run(DemoApplication.class, args);
    }

    //重写configure方法,完成启动类配置
    @Override
    protected SpringApplicationBuilder configure(SpringApplicationBuilder builder) {
        return builder.sources(DemoApplication.class);
    }
}

最后,我们再次运行 Maven 的 package 指令就可以打包为 war 包了:


我们可以直接将其部署到 Tomcat 服务器中


接着启动服务器就能正常访问了:


如果各位小伙伴需要在 IDEA 中进行调试运行,我们需要像之前一样配置一个 Tomcat 运行环境:

这样就可以跟之前一样使用外部 Tomcat 服务器了:

最后,我们需要特别介绍一下新的特性,在 SpringBoot3 之后,特别对 GraalVM 进行了支持:
GraalVM 是一种通用的虚拟机,最初由 Oracle 开发。它支持多种编程语言(例如 Java、JavaScript、Python 等),可以在不同的环境中运行,并提供高性能和低内存消耗。
GraalVM 的核心是一个即时编译器,它能够将各种语言的代码直接编译成本地机器码,以获得更高的性能。此外,GraalVM 还提供了一个强大的运行时环境,包括垃圾回收器、即时编译器、线程管理器等,可以提供更好的性能和可扩展性。
GraalVM 的一个重要特性是它的跨语言互操作性。GraalVM 可以使不同语言之间的互操作更加容易。例如,你可以在 Java 代码中直接调用 JavaScript 函数,或者在 JavaScript 代码中直接调用 Java 类。这使得在不同语言之间共享和复用代码变得更加容易。
总的来说,GraalVM 是一个开创性的技术,可以提供出色的性能和灵活性,同时也为多语言开发提供了更好的支持。它是一个非常有潜力的工具,可以用于构建高效的应用程序和解决方案。
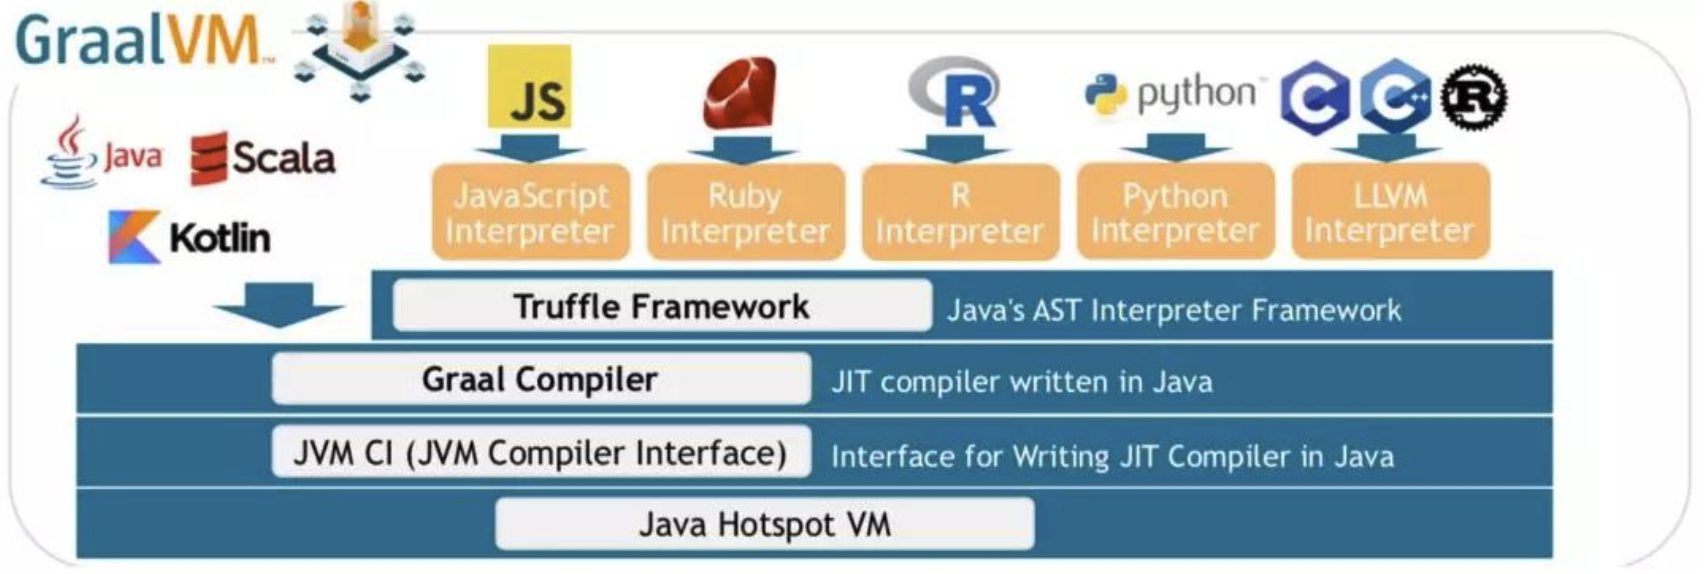
简而言之,我们的 SpringBoot 项目除了打包为传统的 Jar 包基于 JVM 运行之外,我们也可以将其直接编译为操作系统原生的程序来进行使用(这样会大幅提升程序的运行效率,但是由于编译为操作系统原生程序,这将无法支持跨平台)
首先我们需要安装 GraalVM 的环境才可以,这跟安装普通 JDK 的操作是完全一样的,下载地址:https://github.com/graalvm/graalvm-ce-builds/releases/tag/jdk-17.0.7


https://www.graalvm.org/jdk17/docs/getting-started/macos//
tar -xzf graalvm-jdk-<version>_macos-<architecture>.tar.gz
sudo mv graalvm-community-openjdk-17.0.7+7.1 /Library/Java/JavaVirtualMachines
export PATH=/Library/Java/JavaVirtualMachines/graalvm-community-openjdk-17.0.7+7.1/Contents/Home/bin:$PATH
export JAVA_HOME=/Library/Java/JavaVirtualMachines/graalvm-community-openjdk-17.0.7+7.1/Contents/Home
下载好对应系统架构的 GraalVM 环境之后,就可以安装部署了,首先我们需要为 GraalVM 配置环境变量,将 GRAALVM_HOME 作为环境变量指向你的安装目录的 bin 目录下,接着我们就可以开始进行打包了(注意,SpringBoot 项目必须在创建的时候添加了 Native 支持才可以,否则无法正常打包)

JDK 要改了这里 改成GraalVM的


注意,一定要将GRAALVM_HOME配置到环境变量中,否则会报错:


一切无误后,我们直接在 IDEA 中或是命令行中输入:

接着会自动安装native-image组件,然后进行本地镜像的编译(建议挂梯,不然卡一天都下不动)

编译过程中比较消耗资源,建议 CPU 选择 6 核及以上,不然速度会很慢,编译完成之后如下图:

这样一个系统原生的 SpringBoot 项目就打包好了,我们可以直接运行这个程序:

不过由于 Mybatis 目前不支持 Native-Image,所以只能期待有朝一日这些框架都能够完整支持原生镜像,让我们的程序运行效率更上一层楼。


日志系统介绍
SpringBoot 为我们提供了丰富的日志系统,它几乎是开箱即用的。我们在之前学习 SSM 时,如果不配置日志,就会报错,但是到了 SpringBoot 阶段之后似乎这个问题就不见了,日志打印得也非常统一,这是为什么呢?
日志门面和日志实现
我们首先要区分一下,什么是日志门面(Facade)什么是日志实现,我们之前学习的 JUL 实际上就是一种日志实现,我们可以直接使用 JUL 为我们提供的日志框架来规范化打印日志。
而日志门面,如 Slf4j,是把不同的日志系统的实现进行了具体的抽象化,只提供了统一的日志使用接口,使用时只需要按照其提供的接口方法进行调用即可,由于它只是一个接口,并不是一个具体的可以直接单独使用的日志框架,所以最终日志的格式、记录级别、输出方式等都要通过接口绑定的具体的日志系统来实现,这些具体的日志系统就有 log4j、logback、java.util.logging 等,它们才实现了具体的日志系统的功能。
日志门面和日志实现就像 JDBC 和数据库驱动一样,一个是画大饼的,一个是真的去做饼的。
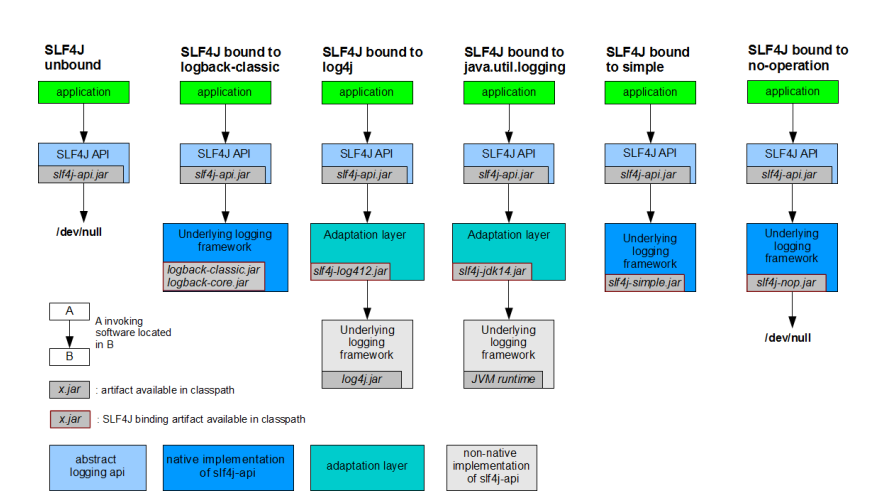
但是现在有一个问题就是,不同的框架可能使用了不同的日志框架,如果这个时候出现众多日志框架并存的情况,我们现在希望的是所有的框架一律使用日志门面(Slf4j)进行日志打印,这时该怎么去解决?我们不可能将其他框架依赖的日志框架替换掉,直接更换为 Slf4j 吧,这样显然不现实。
这时,可以采取类似于偷梁换柱的做法,只保留不同日志框架的接口和类定义等关键信息,而将实现全部定向为 Slf4j 调用。相当于有着和原有日志框架一样的外壳,对于其他框架来说依然可以使用对应的类进行操作,而具体如何执行,真正的内心已经是 Slf4j 的了。
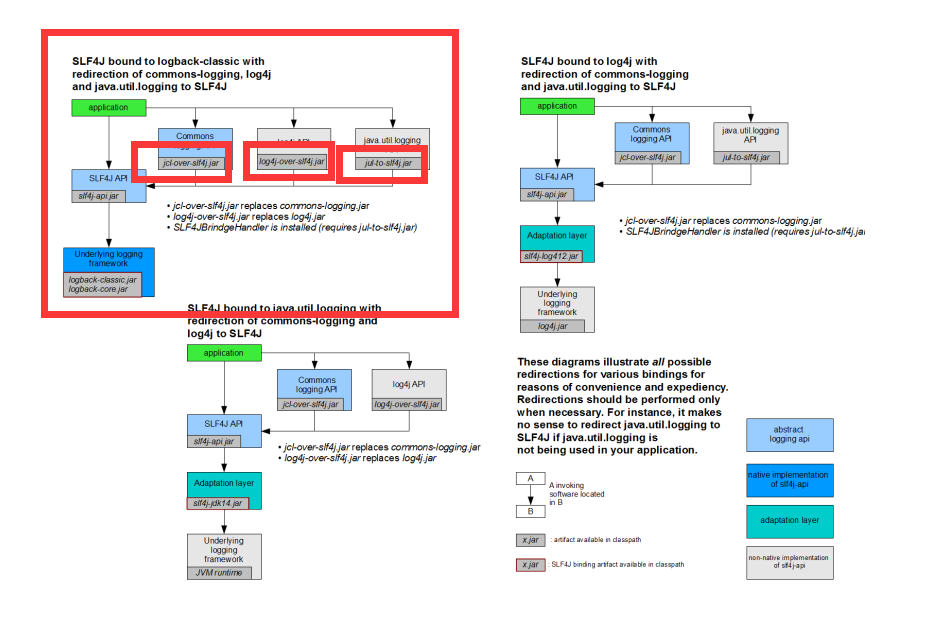
所以,SpringBoot 为了统一日志框架的使用,做了这些事情:
- 直接将其他依赖以前的日志框架剔除
- 导入对应日志框架的 Slf4j 中间包
- 导入自己官方指定的日志实现,并作为 Slf4j 的日志实现层
打印项目日志信息
SpringBoot 使用的是 Slf4j 作为日志门面,Logback(Logback 是 log4j 框架的作者开发的新一代日志框架,它效率更高、能够适应诸多的运行环境,同时天然支持 SLF4J)作为日志实现,对应的依赖为:
<dependency>
    <groupId>org.springframework.boot</groupId>
    <artifactId>spring-boot-starter-logging</artifactId>
</dependency>
此依赖已经被包含了,所以我们如果需要打印日志,可以像这样:
@ResponseBody
@GetMapping("/test")
public User test(){
    Logger logger = LoggerFactory.getLogger(TestController.class);
    logger.info("用户访问了一次测试数据");
    return mapper.findUserById(1);
}


因为我们使用了 Lombok,所以直接一个注解也可以搞定哦:
@Slf4j
@Controller
public class MainController {

    @ResponseBody
        @GetMapping("/test")
    public User test(){
            log.info("用户访问了一次测试数据");
            return mapper.findUserById(1);
        }

    ...
日志级别从低到高分为 TRACE < DEBUG < INFO < WARN < ERROR < FATAL,SpringBoot 默认只会打印 INFO 以上级别的信息,效果如下,也是使用同样的格式打印在控制台的:

配置 Logback 日志
Logback 官网:https://logback.qos.ch
和 JUL 一样,Logback 也能实现定制化,我们可以编写对应的配置文件,SpringBoot 推荐将配置文件名称命名为logback-spring.xml表示这是 SpringBoot 下 Logback 专用的配置,可以使用 SpringBoot 的高级 Profile 功能,它的内容类似于这样:
最外层由configuration包裹,一旦编写,那么就会替换默认的配置,所以如果内部什么都不写的话,那么会导致我们的 SpringBoot 项目没有配置任何日志输出方式,控制台也不会打印日志。

我们接着来看如何配置一个控制台日志打印,我们可以直接导入并使用 SpringBoot 为我们预设好的日志格式,在org/springframework/boot/logging/logback/defaults.xml中已经帮我们把日志的输出格式定义好了,我们只需要设置对应的appender即可:
<included>
   <conversionRule conversionWord="clr" converterClass="org.springframework.boot.logging.logback.ColorConverter" />
   <conversionRule conversionWord="wex" converterClass="org.springframework.boot.logging.logback.WhitespaceThrowableProxyConverter" />
   <conversionRule conversionWord="wEx" converterClass="org.springframework.boot.logging.logback.ExtendedWhitespaceThrowableProxyConverter" />

   <property name="CONSOLE_LOG_PATTERN" value="${CONSOLE_LOG_PATTERN:-%clr(%d{${LOG_DATEFORMAT_PATTERN:-yyyy-MM-dd HH:mm:ss.SSS}}){faint} %clr(${LOG_LEVEL_PATTERN:-%5p}) %clr(${PID:- }){magenta} %clr(---){faint} %clr([%15.15t]){faint} %clr(%-40.40logger{39}){cyan} %clr(:){faint} %m%n${LOG_EXCEPTION_CONVERSION_WORD:-%wEx}}"/>
   <property name="CONSOLE_LOG_CHARSET" value="${CONSOLE_LOG_CHARSET:-${file.encoding:-UTF-8}}"/>
   <property name="FILE_LOG_PATTERN" value="${FILE_LOG_PATTERN:-%d{${LOG_DATEFORMAT_PATTERN:-yyyy-MM-dd HH:mm:ss.SSS}} ${LOG_LEVEL_PATTERN:-%5p} ${PID:- } --- [%t] %-40.40logger{39} : %m%n${LOG_EXCEPTION_CONVERSION_WORD:-%wEx}}"/>
   <property name="FILE_LOG_CHARSET" value="${FILE_LOG_CHARSET:-${file.encoding:-UTF-8}}"/>

   <logger name="org.apache.catalina.startup.DigesterFactory" level="ERROR"/>
   <logger name="org.apache.catalina.util.LifecycleBase" level="ERROR"/>
   <logger name="org.apache.coyote.http11.Http11NioProtocol" level="WARN"/>
   <logger name="org.apache.sshd.common.util.SecurityUtils" level="WARN"/>
   <logger name="org.apache.tomcat.util.net.NioSelectorPool" level="WARN"/>
   <logger name="org.eclipse.jetty.util.component.AbstractLifeCycle" level="ERROR"/>
   <logger name="org.hibernate.validator.internal.util.Version" level="WARN"/>
   <logger name="org.springframework.boot.actuate.endpoint.jmx" level="WARN"/>
</included>

导入后,我们利用预设的日志格式创建一个控制台日志打印:
<?xml version="1.0" encoding="UTF-8"?>
<configuration>
    <!--  导入其他配置文件,作为预设  -->
    <include resource="org/springframework/boot/logging/logback/defaults.xml" />

    <!--  Appender作为日志打印器配置,这里命名随意  -->
    <!--  ch.qos.logback.core.ConsoleAppender是专用于控制台的Appender  -->
    <appender name="CONSOLE" class="ch.qos.logback.core.ConsoleAppender">
        <encoder>
            <pattern>${CONSOLE_LOG_PATTERN}</pattern>
            <charset>${CONSOLE_LOG_CHARSET}</charset>
        </encoder>
    </appender>

    <!--  指定日志输出级别,以及启用的Appender,这里就使用了我们上面的ConsoleAppender  -->
    <root level="INFO">
        <appender-ref ref="CONSOLE"/>
    </root>
</configuration>
配置完成后,我们发现控制台已经可以正常打印日志信息了。

接着我们来看看如何开启文件打印,我们只需要配置一个对应的 Appender 即可:
<!--  ch.qos.logback.core.rolling.RollingFileAppender用于文件日志记录,它支持滚动  -->
<appender name="FILE" class="ch.qos.logback.core.rolling.RollingFileAppender">
    <encoder>
        <pattern>${FILE_LOG_PATTERN}</pattern>
        <charset>${FILE_LOG_CHARSET}</charset>
    </encoder>
    <!--  自定义滚动策略,防止日志文件无限变大,也就是日志文件写到什么时候为止,重新创建一个新的日志文件开始写  -->
    <rollingPolicy class="ch.qos.logback.core.rolling.SizeAndTimeBasedRollingPolicy">
        <!--  文件保存位置以及文件命名规则,这里用到了%d{yyyy-MM-dd}表示当前日期,%i表示这一天的第N个日志  -->
        <FileNamePattern>log/%d{yyyy-MM-dd}-spring-%i.log</FileNamePattern>
        <!--  到期自动清理日志文件  -->
        <cleanHistoryOnStart>true</cleanHistoryOnStart>
        <!--  最大日志保留时间  -->
        <maxHistory>7</maxHistory>
        <!--  最大单个日志文件大小  -->
        <maxFileSize>10MB</maxFileSize>
    </rollingPolicy>
</appender>

<!--  指定日志输出级别,以及启用的Appender,这里就使用了我们上面的ConsoleAppender  -->
<root level="INFO">
    <appender-ref ref="CONSOLE"/>
    <appender-ref ref="FILE"/>
</root>
配置完成后,我们可以看到日志文件也能自动生成了。


我们也可以魔改官方提供的日志格式,官方文档:https://logback.qos.ch/manual/layouts.html
这里需要提及的是 MDC 机制,Logback 内置的日志字段还是比较少,如果我们需要打印有关业务的更多的内容,包括自定义的一些数据,需要借助 logback MDC 机制,MDC 为“Mapped Diagnostic Context”(映射诊断上下文),即将一些运行时的上下文数据通过 logback 打印出来;此时我们需要借助 org.sl4j.MDC 类。
比如我们现在需要记录是哪个用户访问我们网站的日志,只要是此用户访问我们网站,都会在日志中携带该用户的 ID,我们希望每条日志中都携带这样一段信息文本,而官方提供的字段无法实现此功能,这时就需要使用 MDC 机制:
@ResponseBody
@GetMapping("/test")
public User test(HttpServletRequest request){
   MDC.put("reqId", request.getSession().getId());
   log.info("用户访问了一次测试数据");
   return mapper.findUserById(1);
}
通过这种方式,我们就可以向日志中传入自定义参数了,我们日志中添加这样一个占位符%X{键值},名字保持一致:
这样当我们向 MDC 中添加信息后,只要是当前线程(本质是 ThreadLocal 实现)下输出的日志,都会自动替换占位符。

自定义 Banner 展示
我们在之前发现,实际上 Banner 部分和日志部分是独立的,SpringBoot 启动后,会先打印 Banner 部分,那么这个 Banner 部分是否可以自定义呢?答案是可以的。
我们可以直接来配置文件所在目录下创建一个名为banner.txt的文本文档,内容随便你:
//                          _ooOoo_                               //
//                         o8888888o                              //
//                         88" . "88                              //
//                         (| ^_^ |)                              //
//                         O\  =  /O                              //
//                      ____/`---'\____                           //
//                    .'  \\|     |//  `.                         //
//                   /  \\|||  :  |||//  \                        //
//                  /  _||||| -:- |||||-  \                       //
//                  |   | \\\  -  /// |   |                       //
//                  | \_|  ''\---/''  |   |                       //
//                  \  .-\__  `-`  ___/-. /                       //
//                ___`. .'  /--.--\  `. . ___                     //
//              ."" '<  `.___\_<|>_/___.'  >'"".                  //
//            | | :  `- \`.;`\ _ /`;.`/ - ` : | |                 //
//            \  \ `-.   \_ __\ /__ _/   .-` /  /                 //
//      ========`-.____`-.___\_____/___.-`____.-'========         //
//                           `=---='                              //
//      ^^^^^^^^^^^^^^^^^^^^^^^^^^^^^^^^^^^^^^^^^^^^^^^^^^        //
//             佛祖保佑          永无BUG         永不修改             //
可以使用在线生成网站进行生成自己的个性 Banner:https://www.bootschool.net/ascii
我们甚至还可以使用颜色代码来为文本切换颜色:
也可以获取一些常用的变量信息:
前面忘了,后面忘了,狠狠赚一笔!

https://manytools.org/hacker-tools/convert-images-to-ascii-art/#google_vignette
                                                ...
                                               ./...
                                             ./**,,..
                          ,.,.         */***(((/*///*.
                           ,*.,,*,#(((/((((#//(/**,,,/*
                           (##**/###%####%#(###(#/((///((.
                            (#%%&(%%##%(*(#(#%#%&@&@@@@&%#
                            #(#&%&%%%&(,(#%%&&&%%&&&@&&%&&%.
                             (#%&%&&%%&&@@@@@%%%&&&@&&#&%#*#%.
                            .%%&&@&@&&@@@@@@&&&&&@@@@&&&%(,*,/,
                            #%%@@@&@@@@@@@@%%&@&&@@@@@@%,*/**,,
                             *##%%%&@@@&,%##&%%#%%@@@@@#,*(//*,,
                              ,%%####&&######%####%%#%&%&%((//**
                               /&&#((#####((####&&&&&@&&&(///,,
                            ,(%%%&##(######(#%%%%@@@#&&&%#***.*
                    ((#%%%%&&&&&&&#&&&#####%%#%#%%%%@@@@&/**/*,
                 (%%&&&&&&&&&@@@@@@@&%%%##############(((//**,,
               *##%%&&&@@&&&&@@@&@&@@@&&%%######((#((((//,/*,**
             *%&&&&&@@@&@@&&&@&@@@&@@@&&%&&###(##((((((/********,
           /%%&&@@&&&&&@@@@@@&@&@@&@@&&%&&%#%%%###((((/,,,**//*,,.
         %&&&@@&&&@@&@@@@@@@@@@&&&@@@@&&&########((((/**,,*,,,,,**
       %&&&&@&&&@@@@@@@@@@@@@@@&&&@@@@&&&%#(((((((///**,....,,..,,*.
      %&@&@@@@@@@@@@@@&&&@@@&&@&&&@@@&&&&&&%#%###(((/*,,....,,,.,***
     #@&@@@@@@@@@@@&&&@@&@@@@&&&&&&&&&&&%%%%%%#(((//**,..,..,,,,,**,.
   (&@@@@@@@@@@@@@@@&&@@@@@&@@@&&&&&&%%%#####((*(////*****,,,,,*****
 %%&&@@@@@@@@@@@@@@@@@@@&&&@@@@&&&&&&%((##//*//*/##(((////*,,,,,***,,,
 #%&@@@@@@@@@@@@@@@@@@@@@@@@&@@&&&&&&&#(#((((/((((((((((//**,..***,*,
 ,&&@@@@@@@@@@@@@@@@@@@@@&@@@&@&&&%%%#(((////*//((/(/((//*/**,,,,,,,,,
  &&&&@@@@@@@@@@@@@@@@@@@@&@&&&&%%#%%&&&%#/(/*(((((((////*//*,,.,,,,.,,
  .&@&&@&@@@@@@@@@@@@@@@&@@&%&&&&%&&&%(%#/**/*(#((((((((/(//*,,.*,,.....,
   (&&&&@@&&%&&&&&&&&&&&&&&%&%&%&&&%%%%##(,*,/((####(#(((((//(,**....,..,**
    %&#&&%%%&&%%###%%%&&&&&&%%%%&(%##((/,**,,,.,,*(####%%%##(**.,.,,,,,,,**.
    .&%%%%&%%%#%%#%%##%#%%%%%&&%%%%%%%###*...,**/#%%#%%%&%##((/*,,,,,,....,
    %&&&%#%%##%#####%%%%%%%%%%%&%%%%%%//*,.**,.*/#%       .%%##((/*,,.,,......
    %&%&&#%&&%#%%%###%%##%%%&&%&%%%%%##*(*,*,,,***/*        ,##(((*(,,...,.....,
      *&%&&@%&&%#&&##%%#%%%#%%#%%%%#%%###.**.,,../%%           .//(*,....,.,. .,
        .&&%&&@&&@&&%&%%&%#%###%%%%#%####//*,,.,,,,                   *,//*.,,*,
           ,%&&&@&%&&&&&&&&%%&&%%%%%######(/,*.....
                            (%&%%&%#%%###/**,.,......
                              &%%%###%#*/***,/*,......,,
                              .%%##(####(,*//***,.....,.,*.
                              ##(#%(%%###/.(((/,,,,,.,,,,,,,
                                *#%%%%%%/%#/##(#(/.,/*,,./
                                                 *%@(#/%/(
多环境配置
在日常开发中,我们项目会有多个环境。例如开发环境(develop)也就是我们研发过程中疯狂敲代码修 BUG 阶段,生产环境(production )项目开发得差不多了,可以放在服务器上跑了。不同的环境下,可能我们的配置文件也存在不同,但是我们不可能切换环境的时候又去重新写一次配置文件,所以我们可以将多个环境的配置文件提前写好,进行自由切换。
由于 SpringBoot 只会读取application.properties或是application.yml文件,那么怎么才能实现自由切换呢?SpringBoot 给我们提供了一种方式,我们可以通过配置文件指定:
接着我们分别创建两个环境的配置文件,application-dev.yml和application-prod.yml分别表示开发环境和生产环境的配置文件,比如开发环境我们使用的服务器端口为 8080,而生产环境下可能就需要设置为 80 或是 443 端口,那么这个时候就需要不同环境下的配置文件进行区分:
这样我们就可以灵活切换生产环境和开发环境下的配置文件了。

SpringBoot 自带的 Logback 日志系统也是支持多环境配置的,比如我们想在开发环境下输出日志到控制台,而生产环境下只需要输出到文件即可,这时就需要进行环境配置:
<springProfile name="dev">
    <root level="INFO">
        <appender-ref ref="CONSOLE"/>
        <appender-ref ref="FILE"/>
    </root>
</springProfile>

<springProfile name="prod">
    <root level="INFO">
        <appender-ref ref="FILE"/>
    </root>
</springProfile>
注意springProfile是区分大小写的!


那如果我们希望生产环境中不要打包开发环境下的配置文件呢,我们目前虽然可以切换开发环境,但是打包的时候依然是所有配置文件全部打包,这样总感觉还欠缺一点完美,因此,打包的问题就只能找 Maven 解决了,Maven 也可以设置多环境:
<!--分别设置开发,生产环境-->
<profiles>
    <!-- 开发环境 -->
    <profile>
        <id>dev</id>
        <activation>
            <activeByDefault>true</activeByDefault>
        </activation>
        <properties>
            <environment>dev</environment>
        </properties>
    </profile>
    <!-- 生产环境 -->
    <profile>
        <id>prod</id>
        <activation>
            <activeByDefault>false</activeByDefault>
        </activation>
        <properties>
            <environment>prod</environment>
        </properties>
    </profile>
</profiles>

接着,我们需要根据环境的不同,排除其他环境的配置文件:
<resources>
<!--排除配置文件-->
    <resource>
        <directory>src/main/resources</directory>
        <!--先排除所有的配置文件-->
        <excludes>
            <!--使用通配符,当然可以定义多个exclude标签进行排除-->
            <exclude>application*.yml</exclude>
        </excludes>
    </resource>

    <!--根据激活条件引入打包所需的配置和文件-->
    <resource>
        <directory>src/main/resources</directory>
        <!--引入所需环境的配置文件-->
        <filtering>true</filtering>
        <includes>
            <include>application.yml</include>
            <!--根据maven选择环境导入配置文件-->
            <include>application-${environment}.yml</include>
        </includes>
    </resource>
</resources>
接着,我们可以直接将 Maven 中的environment属性,传递给 SpringBoot 的配置文件,在构建时替换为对应的值:
这样,根据我们 Maven 环境的切换,SpringBoot 的配置文件也会进行对应的切换。
最后我们打开 Maven 栏目,就可以自由切换了,直接勾选即可,注意切换环境之后要重新加载一下 Maven 项目,不然不会生效!


常用框架介绍
前面我们介绍了 SpringBoot 项目的基本搭建,相信各位小伙伴已经体验到 SpringBoot 3 带来的超强便捷性了,不过光靠这些还不够,我们还需要了解更多框架来丰富我们的网站,通过了解其他的 SpringBoot 整合框架,我们就可以在我们自己的 Web 服务器上实现更多更高级的功能,同时也是为了给我们后续学习前后端分离项目做准备。
邮件发送模块
都什么年代了,还在发传统邮件,我们来看看电子邮件。
我们在注册很多的网站时,都会遇到邮件或是手机号验证,也就是通过你的邮箱或是手机短信去接受网站发给你的注册验证信息,填写验证码之后,就可以完成注册了,同时,网站也会绑定你的手机号或是邮箱。
那么,像这样的功能,我们如何实现呢?SpringBoot 已经给我们提供了封装好的邮件模块使用:
<dependency>
    <groupId>org.springframework.boot</groupId>
    <artifactId>spring-boot-starter-mail</artifactId>
</dependency>
在学习邮件发送之前,我们需要先了解一下什么是电子邮件。
电子邮件也是一种通信方式,是互联网应用最广的服务。通过网络的电子邮件系统,用户可以以非常低廉的价格(不管发送到哪里,都只需负担网费,实际上就是把信息发送到对方服务器而已)、非常快速的方式,与世界上任何一个地方的电子邮箱用户联系。
虽说方便倒是方便,虽然是曾经的霸主,不过现在这个时代,QQ 微信横行,手机短信和电子邮箱貌似就只剩收验证码这一个功能了。
要在 Internet 上提供电子邮件功能,必须有专门的电子邮件服务器。例如现在 Internet 很多提供邮件服务的厂商:新浪、搜狐、163、QQ 邮箱等,他们都有自己的邮件服务器。这些服务器类似于现实生活中的邮局,它主要负责接收用户投递过来的邮件,并把邮件投递到邮件接收者的电子邮箱中。
所有的用户都可以在电子邮件服务器上申请一个账号用于邮件发送和接收,那么邮件是以什么样的格式发送的呢?实际上和 Http 一样,邮件发送也有自己的协议,也就是约定邮件数据长啥样以及如何通信。
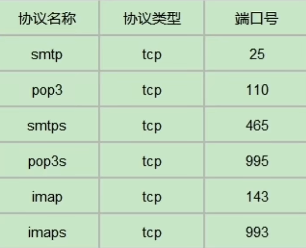
比较常用的协议有两种:
- SMTP 协议(主要用于发送邮件 Simple Mail Transfer Protocol)
- POP3 协议(主要用于接收邮件 Post Office Protocol 3)
整个发送/接收流程大致如下:
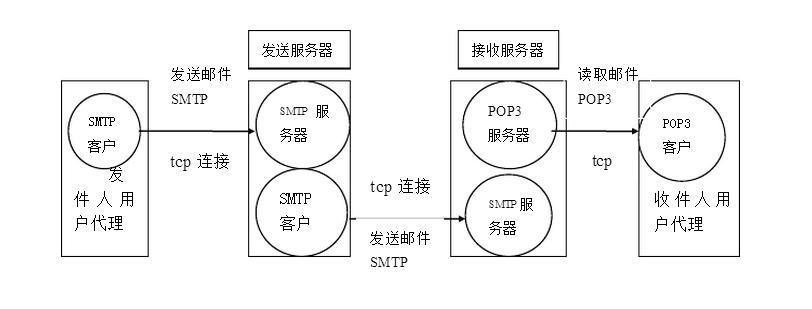
实际上每个邮箱服务器都有一个 smtp 发送服务器和 pop3 接收服务器,比如要从 QQ 邮箱发送邮件到 163 邮箱,那么我们只需要通过 QQ 邮箱客户端告知 QQ 邮箱的 smtp 服务器我们需要发送邮件,以及邮件的相关信息,然后 QQ 邮箱的 smtp 服务器就会帮助我们发送到 163 邮箱的 pop3 服务器上,163 邮箱会通过 163 邮箱客户端告知对应用户收到一封新邮件。
而我们如果想要实现给别人发送邮件,那么就需要连接到对应电子邮箱的 smtp 服务器上,并告知其我们要发送邮件。而 SpringBoot 已经帮助我们将最基本的底层通信全部实现了,我们只需要关心 smtp 服务器的地址以及我们要发送的邮件长啥样即可。
这里以 163 邮箱 https://mail.163.com 为例,我们需要在配置文件中告诉 SpringBootMail 我们的 smtp 服务器的地址以及你的邮箱账号和密码,首先我们要去设置中开启 smtp/pop3 服务才可以,开启后会得到一个随机生成的密钥,这个就是我们的密码。
spring:
  mail:
    # 163邮箱的地址为smtp.163.com,直接填写即可
    host: smtp.163.com
    # 你申请的163邮箱
    username: javastudy111@163.com
    # 注意密码是在开启smtp/pop3时自动生成的,记得保存一下,不然就找不到了
    password: AZJTOAWZESLMHTNI
配置完成后,接着我们来进行一下测试:
@SpringBootTest
class SpringBootTestApplicationTests {

      //JavaMailSender是专门用于发送邮件的对象,自动配置类已经提供了Bean
    @Autowired
    JavaMailSender sender;

    @Test
    void contextLoads() {
          //SimpleMailMessage是一个比较简易的邮件封装,支持设置一些比较简单内容
        SimpleMailMessage message = new SimpleMailMessage();
          //设置邮件标题
        message.setSubject("【电子科技大学教务处】关于近期学校对您的处分决定");
          //设置邮件内容
        message.setText("XXX同学您好,经监控和教务巡查发现,您近期存在旷课、迟到、早退、上课刷抖音行为," +
                "现已通知相关辅导员,请手写5000字书面检讨,并在2022年4月1日17点前交到辅导员办公室。");
          //设置邮件发送给谁,可以多个,这里就发给你的QQ邮箱
        message.setTo("你的QQ号@qq.com");
          //邮件发送者,这里要与配置文件中的保持一致
        message.setFrom("javastudy111@163.com");
          //OK,万事俱备只欠发送
        sender.send(message);
    }

}
如果需要添加附件等更多功能,可以使用 MimeMessageHelper 来帮助我们完成:
@Test
void contextLoads() throws MessagingException {
      //创建一个MimeMessage
    MimeMessage message = sender.createMimeMessage();
      //使用MimeMessageHelper来帮我们修改MimeMessage中的信息
    MimeMessageHelper helper = new MimeMessageHelper(message, true);
    helper.setSubject("Test");
    helper.setText("lbwnb");
    helper.setTo("你的QQ号@qq.com");
    helper.setFrom("javastudy111@163.com");
      //发送修改好的MimeMessage
    sender.send(message);
}


最后,我们来尝试为我们的网站实现一个邮件注册功能,首先明确验证流程:请求验证码 -> 生成验证码(临时有效,注意设定过期时间) -> 用户输入验证码并填写注册信息 -> 验证通过注册成功!
接着我们就来着手写一下。
<?xml version="1.0" encoding="UTF-8"?>
<project xmlns="http://maven.apache.org/POM/4.0.0" xmlns:xsi="http://www.w3.org/2001/XMLSchema-instance"
         xsi:schemaLocation="http://maven.apache.org/POM/4.0.0 https://maven.apache.org/xsd/maven-4.0.0.xsd">
    <modelVersion>4.0.0</modelVersion>
    <parent>
        <groupId>org.springframework.boot</groupId>
        <artifactId>spring-boot-starter-parent</artifactId>
        <version>3.3.0</version>
        <relativePath/> <!-- lookup parent from repository -->
    </parent>
    <groupId>com.example</groupId>
    <artifactId>SpringBootStudy</artifactId>
    <version>0.0.1-SNAPSHOT</version>
    <name>SpringBootStudy</name>
    <description>SpringBootStudy</description>
<!--    <packaging>war</packaging>-->
    <properties>
        <java.version>17</java.version>
    </properties>
    <dependencies>
        <dependency>
            <groupId>org.springframework.boot</groupId>
            <artifactId>spring-boot-starter-web</artifactId>
        </dependency>
        <dependency>
            <groupId>org.springframework.boot</groupId>
            <artifactId>spring-boot-starter-thymeleaf</artifactId>
        </dependency>
        <dependency>
            <groupId>jakarta.servlet</groupId>
            <artifactId>jakarta.servlet-api</artifactId>
            <scope>provided</scope>
        </dependency>

        <dependency>
            <groupId>org.projectlombok</groupId>
            <artifactId>lombok</artifactId>
            <optional>true</optional>
        </dependency>
        <dependency>
            <groupId>org.springframework.boot</groupId>
            <artifactId>spring-boot-starter-test</artifactId>
            <scope>test</scope>
        </dependency>
        <dependency>
            <groupId>org.springframework.boot</groupId>
            <artifactId>spring-boot-starter-security</artifactId>
        </dependency>
        <dependency>
            <groupId>org.springframework.boot</groupId>
            <artifactId>spring-boot-starter-thymeleaf</artifactId>
        </dependency>
        <dependency>
            <groupId>org.mybatis.spring.boot</groupId>
            <artifactId>mybatis-spring-boot-starter</artifactId>
            <version>3.0.3</version>
        </dependency>
        <dependency>
            <groupId>com.mysql</groupId>
            <artifactId>mysql-connector-j</artifactId>
            <scope>runtime</scope>
        </dependency>
        <dependency>
            <groupId>org.springframework.boot</groupId>
            <artifactId>spring-boot-starter-mail</artifactId>
        </dependency>

    </dependencies>
    <profiles>
        <profile>
            <id>dev</id>
            <activation>
                <activeByDefault>true</activeByDefault>
            </activation>
            <properties>
                <environment>dev</environment>
            </properties>
        </profile>
        <profile>
            <id>prod</id>
            <activation>
                <activeByDefault>false</activeByDefault>
            </activation>
            <properties>
                <environment>prod</environment>
            </properties>
        </profile>
    </profiles>
    <build>
        <plugins>
            <plugin>
                <groupId>org.graalvm.buildtools</groupId>
                <artifactId>native-maven-plugin</artifactId>
            </plugin>
            <plugin>
                <groupId>org.springframework.boot</groupId>
                <artifactId>spring-boot-maven-plugin</artifactId>
                <configuration>
                    <excludes>
                        <exclude>
                            <groupId>org.project.lombok</groupId>
                            <artifactId>lombok</artifactId>
                        </exclude>
                    </excludes>
                </configuration>
            </plugin>
        </plugins>
        <resources>
            <resource>
                <directory>src/main/resources</directory>
                <excludes>
                    <exclude>application*.yml</exclude>
                </excludes>
            </resource>

            <resource>
                <directory>src/main/resources</directory>
                <filtering>true</filtering>
                <includes>
                    <include>application.yml</include>
                    <include>application-${environment}.yml</include>
                </includes>
            </resource>
        </resources>
    </build>

</project>
                                <div class="ad-auth-feilds mb-30">
                                    <input type="text" placeholder="Email Address" class="ad-input">
                                    <div class="ad-auth-icon">
                                        <svg xmlns="http://www.w3.org/2000/svg" viewbox="0 0 483.3 483.3"><path d="M424.3,57.75H59.1c-32.6,0-59.1,26.5-59.1,59.1v249.6c0,32.6,26.5,59.1,59.1,59.1h365.1c32.6,0,59.1-26.5,59.1-59.1    v-249.5C483.4,84.35,456.9,57.75,424.3,57.75z M456.4,366.45c0,17.7-14.4,32.1-32.1,32.1H59.1c-17.7,0-32.1-14.4-32.1-32.1v-249.5    c0-17.7,14.4-32.1,32.1-32.1h365.1c17.7,0,32.1,14.4,32.1,32.1v249.5H456.4z" data-original="#000000" class="active-path" data-old_color="#000000" fill="#9abeed"></path><path d="M304.8,238.55l118.2-106c5.5-5,6-13.5,1-19.1c-5-5.5-13.5-6-19.1-1l-163,146.3l-31.8-28.4c-0.1-0.1-0.2-0.2-0.2-0.3    c-0.7-0.7-1.4-1.3-2.2-1.9L78.3,112.35c-5.6-5-14.1-4.5-19.1,1.1c-5,5.6-4.5,14.1,1.1,19.1l119.6,106.9L60.8,350.95    c-5.4,5.1-5.7,13.6-0.6,19.1c2.7,2.8,6.3,4.3,9.9,4.3c3.3,0,6.6-1.2,9.2-3.6l120.9-113.1l32.8,29.3c2.6,2.3,5.8,3.4,9,3.4    c3.2,0,6.5-1.2,9-3.5l33.7-30.2l120.2,114.2c2.6,2.5,6,3.7,9.3,3.7c3.6,0,7.1-1.4,9.8-4.2c5.1-5.4,4.9-14-0.5-19.1L304.8,238.55z" data-original="#000000" class="active-path" data-old_color="#000000" fill="#9abeed"></path></svg>
                                    </div>
                                </div>
                                <div class="ad-auth-feilds mb-30" style="display: inline-flex">
                                    <input type="text" placeholder="Verification code" class="ad-input" >
                                    <div class="ad-auth-btn mb-auto">
                                        <a href="javascript:void(0);" class="ad-btn ad-login-member">Get Code</a>
                                    </div>
                                </div>
Spring security 会比较麻烦 这边就没有使用了
register.html:
<!DOCTYPE html>
<!--[if IE 8]> <html lang="en" class="ie8 no-js"> <![endif]-->
<!--[if IE 9]> <html lang="en" class="ie9 no-js"> <![endif]-->
<!--[if !IE]><!-->
<html lang="zxx">
<!--<![endif]-->
<!-- Begin Head -->

<head>
    <title>SplashDash</title>
    <meta charset="utf-8">
    <meta content="width=device-width, initial-scale=1.0" name="viewport">
    <meta name="description" content="">
    <meta name="keywords" content="">
    <meta name="author" content="">
    <meta name="MobileOptimized" content="320">
    <!--Start Style -->
    <link rel="stylesheet" type="text/css" href="static/css/fonts.css">
    <link rel="stylesheet" type="text/css" href="static/css/bootstrap.min.css">
    <link rel="stylesheet" type="text/css" href="static/css/auth.css">
    <script src="https://unpkg.com/axios@1.1.2/dist/axios.min.js"></script>
</head>

<body>
    <div class="ad-auth-wrapper">
        <div class="ad-auth-box">
            <div class="row align-items-center">
                <div class="col-xl-6 col-lg-6 col-md-12 col-sm-12 col-12">
                    <div class="ad-auth-img">
                        <img src="static/picture/auth-img1.png" alt="">
                    </div>
                </div>
                <div class="col-xl-6 col-lg-6 col-md-12 col-sm-12 col-12">
                    <div class="ad-auth-content">
                        <form>
                            <a href="index.html" class="ad-auth-logo">
                                <img src="static/picture/logo2.png" alt="">
                            </a>
                            <h2><span class="primary">Hello,</span>Welcome!</h2>
                            <p>Please Enter Your Details Below to Continue</p>
                            <div class="ad-auth-form">
                                <div class="ad-auth-feilds mb-30">
                                    <input id="username" type="text" placeholder="Enter Name" class="ad-input">
                                    <div class="ad-auth-icon">
                                        <svg xmlns="http://www.w3.org/2000/svg" xmlns:xlink="http://www.w3.org/1999/xlink" width="16px" height="16px">
                                        <path fill-rule="evenodd" fill="rgb(154, 190, 237)" d="M13.696,9.759 C12.876,8.942 11.901,8.337 10.837,7.971 C11.989,7.180 12.742,5.850 12.725,4.349 C12.698,1.961 10.713,0.031 8.318,0.062 C5.946,0.093 4.026,2.026 4.026,4.398 C4.026,5.879 4.774,7.189 5.914,7.971 C4.850,8.337 3.875,8.942 3.055,9.759 C1.786,11.025 1.026,12.663 0.878,14.426 C0.849,14.768 1.117,15.063 1.462,15.063 L1.466,15.063 C1.772,15.063 2.024,14.827 2.050,14.523 C2.325,11.285 5.057,8.734 8.375,8.734 C11.694,8.734 14.425,11.285 14.701,14.523 C14.727,14.827 14.979,15.063 15.285,15.063 L15.289,15.063 C15.634,15.063 15.902,14.768 15.873,14.426 C15.725,12.663 14.965,11.025 13.696,9.759 ZM8.375,7.562 C6.625,7.562 5.201,6.143 5.201,4.398 C5.201,2.653 6.625,1.234 8.375,1.234 C10.126,1.234 11.550,2.653 11.550,4.398 C11.550,6.143 10.126,7.562 8.375,7.562 Z"></path>
                                        </svg>
                                    </div>
                                </div>
                                <div class="ad-auth-feilds mb-30">
                                    <input id="email" type="text" placeholder="Email Address" class="ad-input">
                                    <div class="ad-auth-icon">
                                        <svg xmlns="http://www.w3.org/2000/svg" viewbox="0 0 483.3 483.3"><path d="M424.3,57.75H59.1c-32.6,0-59.1,26.5-59.1,59.1v249.6c0,32.6,26.5,59.1,59.1,59.1h365.1c32.6,0,59.1-26.5,59.1-59.1    v-249.5C483.4,84.35,456.9,57.75,424.3,57.75z M456.4,366.45c0,17.7-14.4,32.1-32.1,32.1H59.1c-17.7,0-32.1-14.4-32.1-32.1v-249.5    c0-17.7,14.4-32.1,32.1-32.1h365.1c17.7,0,32.1,14.4,32.1,32.1v249.5H456.4z" data-original="#000000" class="active-path" data-old_color="#000000" fill="#9abeed"></path><path d="M304.8,238.55l118.2-106c5.5-5,6-13.5,1-19.1c-5-5.5-13.5-6-19.1-1l-163,146.3l-31.8-28.4c-0.1-0.1-0.2-0.2-0.2-0.3    c-0.7-0.7-1.4-1.3-2.2-1.9L78.3,112.35c-5.6-5-14.1-4.5-19.1,1.1c-5,5.6-4.5,14.1,1.1,19.1l119.6,106.9L60.8,350.95    c-5.4,5.1-5.7,13.6-0.6,19.1c2.7,2.8,6.3,4.3,9.9,4.3c3.3,0,6.6-1.2,9.2-3.6l120.9-113.1l32.8,29.3c2.6,2.3,5.8,3.4,9,3.4    c3.2,0,6.5-1.2,9-3.5l33.7-30.2l120.2,114.2c2.6,2.5,6,3.7,9.3,3.7c3.6,0,7.1-1.4,9.8-4.2c5.1-5.4,4.9-14-0.5-19.1L304.8,238.55z" data-original="#000000" class="active-path" data-old_color="#000000" fill="#9abeed"></path></svg>
                                    </div>
                                </div>
                                <div class="ad-auth-feilds mb-30" style="display: flex">
                                    <input id="code" type="text" placeholder="Verification code" class="ad-input" >
                                    <div class="ad-auth-btn">
                                        <a href="javascript:getCode();" class="ad-btn ad-login-member">Get Code</a>
                                    </div>
                                </div>
                                <div class="ad-auth-feilds">
                                    <input id="password" type="password" placeholder="Password" class="ad-input">
                                    <div class="ad-auth-icon">
                                        <svg xmlns="http://www.w3.org/2000/svg" viewbox="0 0 482.8 482.8"><path d="M395.95,210.4h-7.1v-62.9c0-81.3-66.1-147.5-147.5-147.5c-81.3,0-147.5,66.1-147.5,147.5c0,7.5,6,13.5,13.5,13.5    s13.5-6,13.5-13.5c0-66.4,54-120.5,120.5-120.5c66.4,0,120.5,54,120.5,120.5v62.9h-275c-14.4,0-26.1,11.7-26.1,26.1v168.1    c0,43.1,35.1,78.2,78.2,78.2h204.9c43.1,0,78.2-35.1,78.2-78.2V236.5C422.05,222.1,410.35,210.4,395.95,210.4z M395.05,404.6    c0,28.2-22.9,51.2-51.2,51.2h-204.8c-28.2,0-51.2-22.9-51.2-51.2V237.4h307.2L395.05,404.6L395.05,404.6z" data-original="#000000" class="active-path" data-old_color="#000000" fill="#9abeed"></path><path d="M241.45,399.1c27.9,0,50.5-22.7,50.5-50.5c0-27.9-22.7-50.5-50.5-50.5c-27.9,0-50.5,22.7-50.5,50.5    S213.55,399.1,241.45,399.1z M241.45,325c13,0,23.5,10.6,23.5,23.5s-10.5,23.6-23.5,23.6s-23.5-10.6-23.5-23.5    S228.45,325,241.45,325z" data-original="#000000" class="active-path" data-old_color="#000000" fill="#9abeed"></path></svg>
                                    </div>
                                </div>
                            </div>

                            <div class="ad-auth-btn">
                                <a href="javascript:register();" class="ad-btn ad-login-member">Sign up</a>
                            </div>
                            <p class="ad-register-text">Already have an account ? <a href="login.html">Login</a></p>
                        </form>
                    </div>
                </div>
            </div>
            <div class="ad-notifications ad-error">
                <p><span>Duhh!</span>Something Went Wrong</p>
            </div>
        </div>
    </div>
</body>

</html>

<script>
    function getCode(){
        axios.post('/code', {
            email: document.getElementById('email').value
        },{
            headers: {
                'Content-Type': 'application/x-www-form-urlencoded'
            }
        }).then(({data}) => {
            alert(data)
        })
    }

    function register(){
        axios.post('/register', {
            email: document.getElementById('email').value,
            username: document.getElementById('username').value,
            password: document.getElementById('password').value,
            code: document.getElementById('code').value
        },{
            headers: {
                'Content-Type': 'application/x-www-form-urlencoded'
            }
        }).then(({data}) => {
            alert(data)
        })
    }
</script>
RegisterController.java:
package com.example.springbootstudy.controller;

import com.example.springbootstudy.entity.User;
import com.example.springbootstudy.mapper.UserMapper;
import jakarta.annotation.Resource;
import jakarta.servlet.http.HttpSession;
import org.springframework.mail.SimpleMailMessage;
import org.springframework.mail.javamail.JavaMailSender;
import org.springframework.web.bind.annotation.GetMapping;
import org.springframework.web.bind.annotation.PostMapping;
import org.springframework.web.bind.annotation.RequestParam;
import org.springframework.web.bind.annotation.RestController;

import java.util.Random;

@RestController
public class RegisterController {

    @Resource
    JavaMailSender sender;

    @PostMapping("/code")
    public String getCode(@RequestParam String email, HttpSession session){
        Random random = new Random();
        int code = random.nextInt(900000) + 100000;
        session.setAttribute("code", code);
        session.setAttribute("email", email);
        SimpleMailMessage message = new SimpleMailMessage();
        message.setSubject("Verification Code");
        message.setText("Your verification code is " + code);
        message.setFrom("byleve2023@gmail.com");
        message.setTo(email);
        sender.send(message);
        return "success";
    }

    @Resource
    UserMapper mapper;

    @PostMapping("/register")
    public String register(@RequestParam String username,
                           @RequestParam String email,
                           @RequestParam int code,
                           @RequestParam String password,
                           HttpSession session){
        Integer sessionCode = (Integer) session.getAttribute("code");
        String sessionEmail = (String) session.getAttribute("email");
        if (sessionCode == null){
            return "Please get the verification code first.";
        }
        if (code != sessionCode){
            return "Verification code is wrong.";
        }
        if (!sessionEmail.equals(email)){
            return "Email is wrong.";
        }
        mapper.createUser(username, email, password);
        return "Register success";

    }
}
PageController.java:
package com.example.springbootstudy.controller;

import org.springframework.stereotype.Controller;
import org.springframework.web.bind.annotation.GetMapping;

@Controller
public class PageController {

    @GetMapping("/")
    public String redirect(){
        return "register";
    }

}
UserMapper.java:
package com.example.springbootstudy.mapper;

import com.example.springbootstudy.entity.User;
import org.apache.ibatis.annotations.Insert;
import org.apache.ibatis.annotations.Mapper;
import org.apache.ibatis.annotations.Select;

@Mapper
public interface UserMapper {
    @Select("select * from user where id = #{id}")
    User getUserById(int id);

    @Insert("insert into user (username, email, password) values(#{username}, #{email}, #{password})")
    void createUser(String username, String email, String password);
}
application.yml:
##spring.application.name=SpringBootStudy
#server:
#  port: 8080
spring:
  mail:
    host: smtp.gmail.com
    port: 587
    username: byleve2023@gmail.com
    password: jvyytdpjbfqspece
    properties:
      mail:
        smtp:
          auth: true
          starttls:
            enable: true
            required: true
  datasource:
    url: jdbc:mysql://localhost:3306/test2
    username: root
    password: Eve123456
    driver-class-name: com.mysql.cj.jdbc.Driver
#  mvc:
#    static-path-pattern: /static/**
#  security:
#    user:
#      name: "admin"
#      password: "123456"
#      roles:
#          - ADMIN
#          - USER
pom.xml:
<?xml version="1.0" encoding="UTF-8"?>
<project xmlns="http://maven.apache.org/POM/4.0.0" xmlns:xsi="http://www.w3.org/2001/XMLSchema-instance"
         xsi:schemaLocation="http://maven.apache.org/POM/4.0.0 https://maven.apache.org/xsd/maven-4.0.0.xsd">
    <modelVersion>4.0.0</modelVersion>
    <parent>
        <groupId>org.springframework.boot</groupId>
        <artifactId>spring-boot-starter-parent</artifactId>
        <version>3.3.0</version>
        <relativePath/> <!-- lookup parent from repository -->
    </parent>
    <groupId>com.example</groupId>
    <artifactId>SpringBootStudy</artifactId>
    <version>0.0.1-SNAPSHOT</version>
    <name>SpringBootStudy</name>
    <description>SpringBootStudy</description>
<!--    <packaging>war</packaging>-->
    <properties>
        <java.version>17</java.version>
    </properties>
    <dependencies>
        <dependency>
            <groupId>org.springframework.boot</groupId>
            <artifactId>spring-boot-starter-web</artifactId>
        </dependency>
        <dependency>
            <groupId>org.springframework.boot</groupId>
            <artifactId>spring-boot-starter-thymeleaf</artifactId>
        </dependency>
        <dependency>
            <groupId>jakarta.servlet</groupId>
            <artifactId>jakarta.servlet-api</artifactId>
            <scope>provided</scope>
        </dependency>

        <dependency>
            <groupId>org.projectlombok</groupId>
            <artifactId>lombok</artifactId>
            <optional>true</optional>
        </dependency>
        <dependency>
            <groupId>org.springframework.boot</groupId>
            <artifactId>spring-boot-starter-test</artifactId>
            <scope>test</scope>
        </dependency>
<!--        <dependency>-->
<!--            <groupId>org.springframework.boot</groupId>-->
<!--            <artifactId>spring-boot-starter-security</artifactId>-->
<!--        </dependency>-->
        <dependency>
            <groupId>org.springframework.boot</groupId>
            <artifactId>spring-boot-starter-thymeleaf</artifactId>
        </dependency>
        <dependency>
            <groupId>org.mybatis.spring.boot</groupId>
            <artifactId>mybatis-spring-boot-starter</artifactId>
            <version>3.0.3</version>
        </dependency>
        <dependency>
            <groupId>com.mysql</groupId>
            <artifactId>mysql-connector-j</artifactId>
            <scope>runtime</scope>
        </dependency>
        <dependency>
            <groupId>org.springframework.boot</groupId>
            <artifactId>spring-boot-starter-mail</artifactId>
        </dependency>

    </dependencies>
    <profiles>
        <profile>
            <id>dev</id>
            <activation>
                <activeByDefault>true</activeByDefault>
            </activation>
            <properties>
                <environment>dev</environment>
            </properties>
        </profile>
        <profile>
            <id>prod</id>
            <activation>
                <activeByDefault>false</activeByDefault>
            </activation>
            <properties>
                <environment>prod</environment>
            </properties>
        </profile>
    </profiles>
    <build>
        <plugins>
            <plugin>
                <groupId>org.graalvm.buildtools</groupId>
                <artifactId>native-maven-plugin</artifactId>
            </plugin>
            <plugin>
                <groupId>org.springframework.boot</groupId>
                <artifactId>spring-boot-maven-plugin</artifactId>
                <configuration>
                    <excludes>
                        <exclude>
                            <groupId>org.project.lombok</groupId>
                            <artifactId>lombok</artifactId>
                        </exclude>
                    </excludes>
                </configuration>
            </plugin>
        </plugins>
        <resources>
            <resource>
                <directory>src/main/resources</directory>
                <excludes>
                    <exclude>application*.yml</exclude>
                </excludes>
            </resource>

            <resource>
                <directory>src/main/resources</directory>
                <filtering>true</filtering>
                <includes>
                    <include>application.yml</include>
                    <include>application-${environment}.yml</include>
                </includes>
            </resource>
        </resources>
    </build>

</project>


接口规则校验
通常我们在使用 SpringMvc 框架编写接口时,很有可能用户发送的数据存在一些问题,比如下面这个接口:
@ResponseBody
@PostMapping("/submit")
public String submit(String username,
                     String password){
    System.out.println(username.substring(3));
    System.out.println(password.substring(2, 10));
    return "请求成功!";
}
这个接口中,我们需要将用户名和密码分割然后打印,在正常情况下,因为用户名长度规定不小于 5,如果用户发送的数据是没有问题的,那么就可以正常运行,这也是我们所希望的情况,但是如果用户发送的数据并不是按照规定的,那么就会直接报错:


这个时候,我们就需要在请求进来之前进行校验了,最简单的办法就是判断一下:
@ResponseBody
@PostMapping("/submit")
public String submit(String username,
                     String password){
    if(username.length() > 3 && password.length() > 10) {
        System.out.println(username.substring(3));
        System.out.println(password.substring(2, 10));
        return "请求成功!";
    } else {
        return "请求失败";
    }
}


虽然这样就能直接解决问题,但是如果我们的每一个接口都需要这样去进行配置,那么是不是太麻烦了一点?SpringBoot 为我们提供了很方便的接口校验框架:
<dependency>
    <groupId>org.springframework.boot</groupId>
    <artifactId>spring-boot-starter-validation</artifactId>
</dependency>
现在,我们可以直接使用注解完成全部接口的校验:
@Slf4j
@Validated   //首先在Controller上开启接口校验
@Controller
public class TestController {

    ...

    @ResponseBody
    @PostMapping("/submit")
    public String submit(@Length(min = 3) String username,  //使用@Length注解一步到位
                         @Length(min = 10) String password){
        System.out.println(username.substring(3));
        System.out.println(password.substring(2, 10));
        return "请求成功!";
    }
}


现在,我们的接口校验就可以快速进行配置了,一个接口就能搞定:

不过这样依然会抛出一个异常,对用户不太友好,我们可以稍微处理一下,这里我们可以直接使用之前在 SSM 阶段中学习的异常处理 Controller 来自行处理这类异常:
@ControllerAdvice
public class ValidationController {

    @ResponseBody
    @ExceptionHandler(ConstraintViolationException.class)
    public String error(ValidationException e){
        return e.getMessage();   //出现异常直接返回消息
    }
}


除了@Length 之外,我们也可以使用其他的接口来实现各种数据校验:
| 验证注解 | 验证的数据类型 | 说明 |
|---|---|---|
| @AssertFalse | Boolean,boolean | 值必须是 false |
| @AssertTrue | Boolean,boolean | 值必须是 true |
| @NotNull | 任意类型 | 值不能是 null |
| @Null | 任意类型 | 值必须是 null |
| @Min | BigDecimal、BigInteger、byte、short、int、long、double 以及任何 Number 或 CharSequence 子类型 | 大于等于@Min 指定的值 |
| @Max | 同上 | 小于等于@Max 指定的值 |
| @DecimalMin | 同上 | 大于等于@DecimalMin 指定的值(超高精度) |
| @DecimalMax | 同上 | 小于等于@DecimalMax 指定的值(超高精度) |
| @Digits | 同上 | 限制整数位数和小数位数上限 |
| @Size | 字符串、Collection、Map、数组等 | 长度在指定区间之内,如字符串长度、集合大小等 |
| @Past | 如 java.util.Date, java.util.Calendar 等日期类型 | 值必须比当前时间早 |
| @Future | 同上 | 值必须比当前时间晚 |
| @NotBlank | CharSequence 及其子类 | 值不为空,在比较时会去除字符串的首位空格 |
| @Length | CharSequence 及其子类 | 字符串长度在指定区间内 |
| @NotEmpty | CharSequence 及其子类、Collection、Map、数组 | 值不为 null 且长度不为空(字符串长度不为 0,集合大小不为 0) |
| @Range | BigDecimal、BigInteger、CharSequence、byte、short、int、long 以及原子类型和包装类型 | 值在指定区间内 |
| CharSequence 及其子类 | 值必须是邮件格式 | |
| @Pattern | CharSequence 及其子类 | 值需要与指定的正则表达式匹配 |
| @Valid | 任何非原子类型 | 用于验证对象属性 |
虽然这样已经很方便了,但是在遇到对象的时候,依然不太方便,比如:
@ResponseBody
@PostMapping("/submit")
public String submit(Account account){   //直接使用对象接收
    System.out.println(account.getUsername().substring(3));
    System.out.println(account.getPassword().substring(2, 10));
    return "请求成功!";
}
此时接口是以对象形式接收前端发送的表单数据的,这个时候就没办法向上面一样编写对应的校验规则了,那么现在又该怎么做呢?
对应对象类型,我们也可以进行验证,方法如下:
@ResponseBody
@PostMapping("/submit")  //在参数上添加@Valid注解表示需要验证
public String submit(@Valid Account account){
    System.out.println(account.getUsername().substring(3));
    System.out.println(account.getPassword().substring(2, 10));
    return "请求成功!";
}
@Data
public class Account {
    @Length(min = 3)   //只需要在对应的字段上添加校验的注解即可
    String username;
    @Length(min = 10)
    String password;
}
这样当受到请求时,就会对对象中的字段进行校验了,这里我们稍微修改一下 ValidationController 的错误处理,对于实体类接收参数的验证,会抛出 MethodArgumentNotValidException 异常,这里也进行一下处理:
@ResponseBody
@ExceptionHandler({ConstraintViolationException.class, MethodArgumentNotValidException.class})
public String error(Exception e){
    if(e instanceof ConstraintViolationException exception) {
        return exception.getMessage();
    } else if(e instanceof MethodArgumentNotValidException exception){
        if (exception.getFieldError() == null) return "未知错误";
        return exception.getFieldError().getDefaultMessage();
    }
    return "未知错误";
}
这样就可以正确返回对应的错误信息了。


接口文档生成(选学)
在后续学习前后端分离开发中,前端现在由专业的人来做,而我们往往只需要关心后端提供什么接口给前端人员调用,我们的工作被进一步细分了,这个时候为前端开发人员提供一个可以参考的文档是很有必要的。
但是这样的一个文档,我们也不可能单独写一个项目去进行维护,并且随着我们的后端项目不断更新,文档也需要跟随更新,这显然是很麻烦的一件事情,那么有没有一种比较好的解决方案呢?
当然有,那就是丝袜哥:Swagger
Swagger 的主要功能如下:
- 支持 API 自动生成同步的在线文档:使用 Swagger 后可以直接通过代码生成文档,不再需要自己手动编写接口文档了,对程序员来说非常方便,可以节约写文档的时间去学习新技术。
- 提供 Web 页面在线测试 API:光有文档还不够,Swagger 生成的文档还支持在线测试。参数和格式都定好了,直接在界面上输入参数对应的值即可在线测试接口。
结合 Spring 框架(Spring-doc,官网:https://springdoc.org/),Swagger可以很轻松地利用注解以及扫描机制,来快速生成在线文档,以实现当我们项目启动之后,前端开发人员就可以打开Swagger提供的前端页面,查看和测试接口。依赖如下:
<dependency>
    <groupId>org.springdoc</groupId>
    <artifactId>springdoc-openapi-starter-webmvc-ui</artifactId>
    <version>2.1.0</version>
</dependency>
项目启动之后,我们可以直接访问:http://localhost:8080/swagger-ui/index.html,就能看到我们的开发文档了:
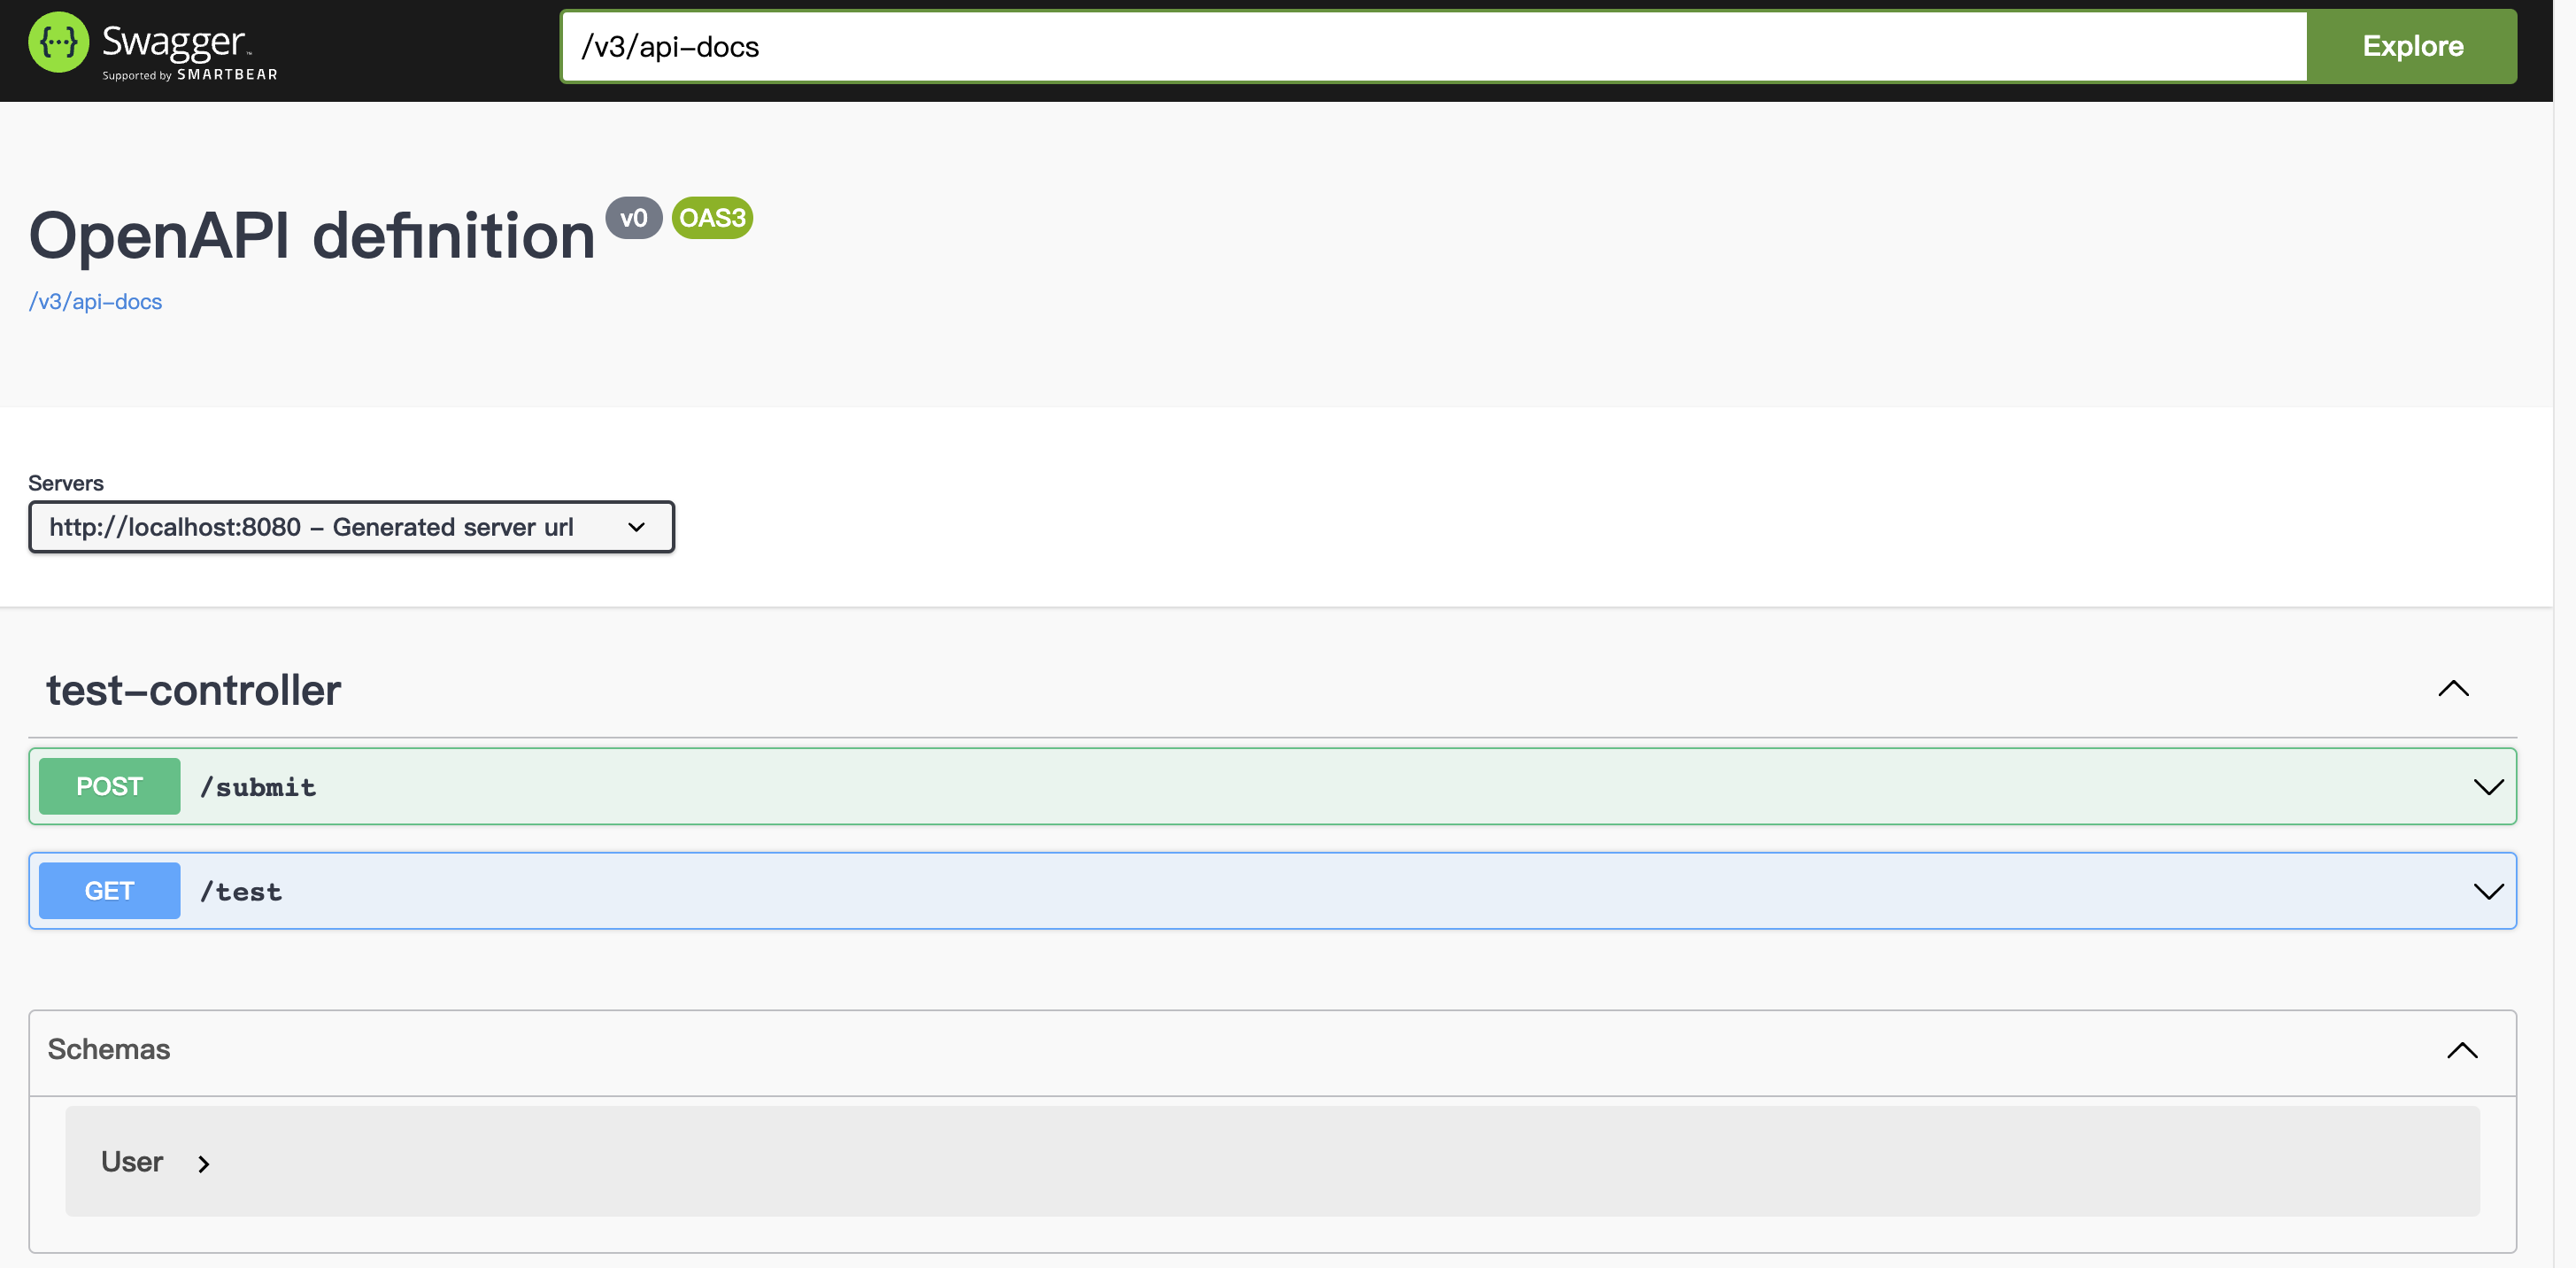
可以看到这个开发文档中自动包含了我们定义的接口,并且还有对应的实体类也放在了下面。这个页面不仅仅是展示接口,也可以直接在上面进行调试:

这就非常方便了,不仅前端人员可以快速查询接口定义,我们自己也可以在线进行接口测试,直接抛弃 PostMan 之类的软件了。

虽然 Swagger 的 UI 界面已经可以很好地展示后端提供的接口信息了,但是非常的混乱,我们来看看如何配置接口的一些描述信息。首先我们的页面肯定要展示一下这个文档的一些信息,只需要一个 Bean 就能搞定:
@Bean
public OpenAPI springDocOpenAPI() {
        return new OpenAPI().info(new Info()
                        .title("图书管理系统 - 在线API接口文档")   //设置API文档网站标题
                        .description("这是一个图书管理系统的后端API文档,欢迎前端人员查阅!") //网站介绍
                        .version("2.0")   //当前API版本
                        .license(new License().name("我的B站个人主页")  //遵循的协议,这里拿来写其他的也行
                                .url("https://space.bilibili.com/37737161")));
}
这样我们的页面中就会展示自定义的文本信息了:


接着我们来看看如何为一个 Controller 编写 API 描述信息:
//使用@Tag注解来添加Controller描述信息
@Tag(name = "账户验证相关", description = "包括用户登录、注册、验证码请求等操作。")
public class TestController {
    ...
}
我们可以直接在类名称上面添加@Tag注解,并填写相关信息,来为当前的 Controller 设置描述信息。接着我们可以为所有的请求映射配置描述信息:
@ApiResponses({
       @ApiResponse(responseCode = "200", description = "测试成功"),
       @ApiResponse(responseCode = "500", description = "测试失败")   //不同返回状态码描述
})
@Operation(summary = "请求用户数据测试接口")   //接口功能描述
@ResponseBody
@GetMapping("/hello")
//请求参数描述和样例
public String hello(@Parameter(description = "测试文本数据", example = "KFCvivo50") @RequestParam String text) {
    return "Hello World";
}


对于那些不需要展示在文档中的接口,我们也可以将其忽略掉:


对于实体类,我们也可以编写对应的 API 接口文档:
@Data
@Schema(description = "用户信息实体类")
public class User {
    @Schema(description = "用户编号")
    int id;
    @Schema(description = "用户名称")
    String name;
    @Schema(description = "用户邮箱")
    String email;
    @Schema(description = "用户密码")
    String password;
}
这样,我们就可以在文档中查看实体类简介以及各个属性的介绍了。
不过,这种文档只适合在开发环境下生成,如果是生产环境,我们需要关闭文档:
这样就可以关闭了。


Project Runtime Monitoring 项目运行监控 ✅
After the completion of our project development, it will eventually need to be deployed and run online. During the project's operation, we may need to monitor it in order to observe its running status in real-time and make corresponding adjustments when issues arise. Therefore, integrating project runtime monitoring is essential.
我们的项目开发完成之后,肯定是需要上线运行的,不过在项目的运行过程中,我们可能需要对其进行监控,从而实时观察其运行状态,并在发生问题时做出对应调整,因此,集成项目运行监控就很有必要了。
The Spring Boot framework provides the spring-boot-starter-actuator module to achieve this monitoring functionality:
SpringBoot 框架提供了
spring-boot-starter-actuator模块来实现监控效果:
<dependency>
   <groupId>org.springframework.boot</groupId>
   <artifactId>spring-boot-starter-actuator</artifactId>
</dependency>
Once added, Actuator will automatically register several endpoints that can be used to check the current status of the Spring Boot application. You can find the official documentation here: Spring Boot Actuator API Documentation
添加好之后,Actuator 会自动注册一些接口用于查询当前 SpringBoot 应用程序的状态,官方文档如下:https://docs.spring.io/spring-boot/docs/3.1.1/actuator-api/htmlsingle/#overview

By default, all Actuator endpoints are registered with the path format /actuator/{id} (this can be modified in the configuration file). For example, if we want to check the current health status of the server, we can access this endpoint: http://localhost:8080/actuator/health. The result will be returned to us in JSON format.
默认情况下,所有 Actuator 自动注册的接口路径都是
/actuator/{id}格式的(可在配置文件中修改),比如我们想要查询当前服务器的健康状态,就可以访问这个接口:http://localhost:8080/actuator/health,结果会以 JSON 格式返回给我们:


By directly accessing the root path http://localhost:8080/actuator, you can view all the currently enabled endpoints. By default, only the following endpoints are enabled:
直接访问:http://localhost:8080/actuator 根路径,可以查看当前已经开启的所有接口,默认情况下只开启以下接口:
{
  "_links": {
    "self": { "href": "http://localhost:8080/actuator", "templated": false }, //actuator自己的信息
    "health-path": {
      "href": "http://localhost:8080/actuator/health/{*path}",
      "templated": true
    },
    "health": {
      "href": "http://localhost:8080/actuator/health",
      "templated": false
    } //应用程序健康情况监控
  }
}

We can modify the configuration file to expose all the endpoints:
我们可以来修改一下配置文件,让其暴露全部接口:
management:
  endpoints:
    web:
      exposure:
        include: "*" #使用*表示暴露全部接口  using `*` to indicate that all endpoints should be exposed


After restarting the server, you can retrieve the available endpoints again and see all the information. Here, we won't list all of them but will highlight some of the commonly used ones:
重启服务器,再次获取可用接口就可以看到全部的信息了,这里就不全部搬出来了,只列举一些常用的:
{
  "_links": {
    //包含Actuator自己的信息 // Contains Actuator's own information
    "self": {"href":"http://localhost:8080/actuator","templated":false},
    //已注册的Bean信息 // Information about registered Beans
    "beans":{"href":"http://localhost:8080/actuator/beans","templated":false},
    //应用程序健康情况监控 // Application health status monitoring
    "health":{"href":"http://localhost:8080/actuator/health","templated":false},
    "health-path":{"href":"http://localhost:8080/actuator/health/{*path}","templated":true},
    //应用程序运行信息 // Application runtime information
    "info":{"href":"http://localhost:8080/actuator/info","templated":false},
    //系统环境相关信息 // Information related to the system environment
    "env": {"href":"http://localhost:8080/actuator/env","templated":false},
    "env-toMatch":{"href":"http://localhost:8080/actuator/env/{toMatch}","templated":true},
    //日志相关信息 // Information related to logging
    "loggers":{"href":"http://localhost:8080/actuator/loggers","templated":false},
    "loggers-name":{"href":"http://localhost:8080/actuator/loggers/{name}","templated":true},
    //快速获取JVM堆转储文件 // Quick access to JVM heap dump files
    "heapdump":{"href":"http://localhost:8080/actuator/heapdump","templated":false},
    //快速获取JVM线程转储信息 // Quick access to JVM thread dump information
    "threaddump":{"href":"http://localhost:8080/actuator/threaddump","templated":false},
    //计划任务相关信息 // Information related to scheduled tasks
    "scheduledtasks":{"href":"http://localhost:8080/actuator/scheduledtasks","templated":false},
    //请求映射相关信息 // Information related to request mappings
    "mappings":{"href":"http://localhost:8080/actuator/mappings","templated":false},
    ...
  }
}
For example, we can use the http://localhost:8080/actuator/info endpoint to view the current system runtime environment information.
比如我们可以通过 http://localhost:8080/actuator/info 接口查看当前系统运行环境信息:


We notice that the data retrieved here is empty. This is because we still need to enable the corresponding module separately to access this information.
我们发现,这里得到的数据是一个空的,这是因为我们还需要单独开启对应模块才可以:
management:
  endpoints:
    web:
      exposure:
        include: "*"
  #开启某些默认为false的信息
  info:
    env:
      enabled: true
    os:
      enabled: true
    java:
      enabled: true
After enabling the module and making the request again, you will be able to obtain runtime environment information, such as the Java version, JVM details, operating system information, and more.
再次请求,就能获得运行环境相关信息了,比如这里的 Java 版本、JVM 信息、操作系统信息等:


We can also make the health endpoint display more detailed system status information. Let's enable the following configuration:
我们也可以让 health 显示更加详细的系统状态信息,这里我们开启一下配置:
Now, you can view detailed information about the current system usage, such as disk space, database status, and more.
现在就能查看当前系统占用相关信息了,比如下面的磁盘占用、数据库等信息:

包括完整的系统环境信息,比如我们配置的服务器 8080 端口:

By using these endpoints, we can quickly obtain the current runtime information of the application.
For more advanced analysis, features like thread dump and heap memory dump file generation are available, which are useful for analyzing the running state of a Java application. For example, we can obtain a heap memory dump file by accessing http://localhost:8080/actuator/heapdump. Once the file is downloaded, you can open it directly with IntelliJ IDEA for further analysis.
我们只需要通过这些接口就能快速获取到当前应用程序的运行信息了。
高级一点的还有线程转储和堆内存转储文件直接生成,便于我们对 Java 程序的运行情况进行分析,这里我们获取一下堆内存转储文件:http://localhost:8080/actuator/heapdump,文件下载之后直接使用 IDEA 就能打开:


We can see that the number of created byte[] array objects has reached 72,020, while our own TestController object has only one instance.
可以看到其中创建的 byte 数组对象计数达到了 72020 个,其中我们自己的 TestController 对象只有有一个:

Additionally, you can obtain the corresponding thread dump information by accessing http://localhost:8080/actuator/threaddump directly.
以及对应的线程转储信息,也可以通过 http://localhost:8080/actuator/threaddump 直接获取:

实现原理探究(选学)
我们在前面的学习中切实感受到了 SpringBoot 为我们带来的便捷,那么它为何能够实现如此快捷的开发模式,starter 又是一个怎样的存在,它是如何进行自动配置的,我们现在就开始研究。
启动原理与实现
首先我们来看看,SpringBoot 项目启动之后,做了什么事情,SpringApplication 中的静态run方法:
public static ConfigurableApplicationContext run(Class<?> primarySource, String... args) {
    return run(new Class[]{primarySource}, args);
}
套娃如下:
public static ConfigurableApplicationContext run(Class<?>[] primarySources, String[] args) {
    return (new SpringApplication(primarySources)).run(args);
}
我们发现,这里直接 new 了一个新的 SpringApplication 对象,传入我们的主类作为构造方法参数,并调用了非 static 的run方法,我们先来看看构造方法里面做了什么事情:
public SpringApplication(ResourceLoader resourceLoader, Class<?>... primarySources) {
    ...
    //资源加载器默认根据前面判断,这里为null
    this.resourceLoader = resourceLoader;
    //设置主要源,也就是我们的启动主类
    Assert.notNull(primarySources, "PrimarySources must not be null");
    this.primarySources = new LinkedHashSet(Arrays.asList(primarySources));
    //这里是关键,这里会判断当前SpringBoot应用程序是否为Web项目,并返回当前的项目类型
    //deduceFromClasspath是根据类路径下判断是否包含SpringBootWeb依赖,如果不包含就是NONE类型,包含就是SERVLET类型
    this.webApplicationType = WebApplicationType.deduceFromClasspath();
    this.bootstrapRegistryInitializers = new ArrayList(this.getSpringFactoriesInstances(BootstrapRegistryInitializer.class));
    //获取并设置所有ApplicationContextInitializer实现,这些都是应用程序上下文初始化器
    //这个接口用于在 Spring 容器执行 onRefresh 方法刷新之前执行一个回调函数
        //通常用于向 SpringBoot 启动的容器中注入一些属性,比如ContextIdApplicationContextInitializer就是
    //将配置中定义的 spring.application.name 属性值设定为应用程序上下文的ID
    this.setInitializers(this.getSpringFactoriesInstances(ApplicationContextInitializer.class));
    //设置应用程序监听器
    this.setListeners(this.getSpringFactoriesInstances(ApplicationListener.class));
    //找到并设定当前的启动主类
    this.mainApplicationClass = this.deduceMainApplicationClass();
}
static WebApplicationType deduceFromClasspath() {
    //这里的ClassUtils.isPresent是通过反射机制判断类路径下是否存在对应的依赖
        if (ClassUtils.isPresent(WEBFLUX_INDICATOR_CLASS, null) && !ClassUtils.isPresent(WEBMVC_INDICATOR_CLASS, null)
                && !ClassUtils.isPresent(JERSEY_INDICATOR_CLASS, null)) {
            return WebApplicationType.REACTIVE;   //判断出存在WebFlux依赖且其他不存在,返回WebFlux类型
        }
    //如果不包含WebFlux相关依赖,就找找有没有Servlet相关依赖,只要发现缺失直接返回NONE普通类型
        for (String className : SERVLET_INDICATOR_CLASSES) {
            if (!ClassUtils.isPresent(className, null)) {
                return WebApplicationType.NONE;
            }
        }
        return WebApplicationType.SERVLET; //否则就是Servlet环境了,返回SERVLET类型(也就是我们之前用到的)
}
通过阅读上面的源码,我们发现getSpringFactoriesInstances这个方法可以一次性获取指定类型已注册的实现类,我们先来研究一下它是怎么做到的。这里就要提到spring.factories文件了,它是 Spring 仿造 Java SPI 实现的一种类加载机制。它在 META-INF/spring.factories 文件中配置接口的实现类名称,然后在程序中读取这些配置文件并实例化。这种自定义的 SPI 机制是 Spring Boot Starter 实现的基础。
SPI 的常见例子:
- 数据库驱动加载接口实现类的加载:JDBC 加载不同类型数据库的驱动
- 日志门面接口实现类加载:SLF4J 加载不同提供商的日志实现类
说白了就是人家定义接口,但是实现可能有很多种,但是核心只提供接口,需要我们按需选择对应的实现,这种方式是高度解耦的。
我们可以来看看spring-boot-starter依赖中怎么定义的,其中有一个很关键的点:
<dependency>
   <groupId>org.springframework.boot</groupId>
   <artifactId>spring-boot-autoconfigure</artifactId>
   <version>3.1.1</version>
   <scope>compile</scope>
</dependency>
这个spring-boot-autoconfigure是什么东西?实际上这个就是我们整个依赖实现自动配置的关键。打开这个依赖内部,可以看到这里确实有一个spring.factories文件:

这个里面定义了很多接口的实现类,比如我们刚刚看到的ApplicationContextInitializer接口:

不仅仅是spring-boot-starter存在这样的文件,其他很多依赖,比如spring-boot-start-test也有着对应的autoconfigure模块,只不过大部分 SpringBoot 维护的组件,都默认将其中的spring.factories信息统一写到了spring-boot-autoconfigure和spring-boot-starter中,方便后续维护。
现在我们清楚,原来这些都是通过一个单独的文件定义的,所以我们来看看getSpringFactoriesInstances方法做了什么:
private <T> List<T> getSpringFactoriesInstances(Class<T> type) {
    return this.getSpringFactoriesInstances(type, (SpringFactoriesLoader.ArgumentResolver)null);
}

private <T> List<T> getSpringFactoriesInstances(Class<T> type, SpringFactoriesLoader.ArgumentResolver argumentResolver) {
    //这里通过SpringFactoriesLoader加载类路径下的文件
    return SpringFactoriesLoader.forDefaultResourceLocation(this.getClassLoader()).load(type, argumentResolver);
}
public static SpringFactoriesLoader forDefaultResourceLocation(@Nullable ClassLoader classLoader) {
    //查找所有依赖下的META-INF/spring.factories文件,解析并得到最终的SpringFactoriesLoader对象
    return forResourceLocation("META-INF/spring.factories", classLoader);
}
所以getSpringFactoriesInstances其实就是通过读取所有META-INF/spring.factories文件得到的列表,然后实例化指定类型下读取到的所有实现类并返回,这样,我们就清楚 SpringBoot 这一大堆参与自动配置的类是怎么加载进来的了。
现在我们回到一开始的地方,目前 SpringApplication 对象已经构造好了,继续来看看run方法做了什么:
public ConfigurableApplicationContext run(String... args) {
    long startTime = System.nanoTime();
    DefaultBootstrapContext bootstrapContext = this.createBootstrapContext();
    ConfigurableApplicationContext context = null;
    this.configureHeadlessProperty();
    //获取所有的SpringApplicationRunListener,并通知启动事件,默认只有一个实现类EventPublishingRunListener
    //EventPublishingRunListener会将初始化各个阶段的事件转发给所有监听器
    SpringApplicationRunListeners listeners = this.getRunListeners(args);
    listeners.starting(bootstrapContext, this.mainApplicationClass);
    try {
        //环境配置,包括我们之前配置的多环境选择
        ApplicationArguments applicationArguments = new DefaultApplicationArguments(args);
        ConfigurableEnvironment environment = this.prepareEnvironment(listeners, bootstrapContext, applicationArguments);
        //打印Banner,从这里开始我们就可以切切实实看到运行状了
        Banner printedBanner = this.printBanner(environment);
        //创建ApplicationContext,也就是整个Spring应用程序的IoC容器,SSM阶段已经详细介绍过,注意这里会根据构造时得到的类型,创建不同的ApplicationContext实现类(比如Servlet环境下就是Web容器)
        context = this.createApplicationContext();
        context.setApplicationStartup(this.applicationStartup);
        //对ApplicationContext进行前置处理,这里会将创建对象时设定的所有ApplicationContextInitializer拿来执行一次initialize方法,这也验证了我们之前的说法,这一步确实是在刷新容器之前进行的
        this.prepareContext(bootstrapContext, context, environment, listeners, applicationArguments, printedBanner);
        //执行ApplicationContext的refresh方法,刷新容器初始化所有的Bean,这个也在SSM阶段详细介绍过了
        this.refreshContext(context);
        this.afterRefresh(context, applicationArguments);
        Duration timeTakenToStartup = Duration.ofNanos(System.nanoTime() - startTime);
        if (this.logStartupInfo) {
            (new StartupInfoLogger(this.mainApplicationClass)).logStarted(this.getApplicationLog(), timeTakenToStartup);
        }
        listeners.started(context, timeTakenToStartup);
        //因为所有的Bean都已经加载,这里就可以调用全部的自定义Runner实现了
        this.callRunners(context, applicationArguments);
    ...
    //结束
    return context;
}
至此,SpringBoot 项目就正常启动了。
我们发现,即使是 SpringBoot,也是离不开 Spring 最核心的 ApplicationContext 容器,因为它再怎么也是一个 Spring 项目,即使玩得再高级不还是得围绕 IoC 容器来进行么。所以说,SSM 阶段学习的内容才是真正的核心,而 SpringBoot 仅仅是对 Spring 进行的一层强化封装,便于快速创建 Spring 项目罢了,这也是为什么一直强调不能跳过 SSM 先学 SpringBoot 的原因。
既然都谈到这里了,我们不妨再来看一下这里的 ApplicationContext 是怎么来的,打开createApplicationContext方法:
protected ConfigurableApplicationContext createApplicationContext() {
    return this.applicationContextFactory.create(this.webApplicationType); //这个类型已经在new的时候确定了
}
我们发现在构造方法中applicationContextFactory直接使用的是 DEFAULT:
我们继续向下扒 DefaultApplicationContextFactory 的源码create方法部分:
public ConfigurableApplicationContext create(WebApplicationType webApplicationType) {
    try {
        return (ConfigurableApplicationContext)this.getFromSpringFactories(webApplicationType, ApplicationContextFactory::create, this::createDefaultApplicationContext);  //套娃获取ConfigurableApplicationContext实现
    } catch (Exception var3) {
        throw new IllegalStateException("Unable create a default ApplicationContext instance, you may need a custom ApplicationContextFactory", var3);
    }
}

private <T> T getFromSpringFactories(WebApplicationType webApplicationType,
            BiFunction<ApplicationContextFactory, WebApplicationType, T> action, Supplier<T> defaultResult) {
    //可以看到,这里又是通过SpringFactoriesLoader获取到所有候选的ApplicationContextFactory实现
  for (ApplicationContextFactory candidate : SpringFactoriesLoader.loadFactories(ApplicationContextFactory.class,
                getClass().getClassLoader())) {
            T result = action.apply(candidate, webApplicationType);
            if (result != null) {
                return result;   //如果是Servlet环境,这里会找到实现,直接返回
            }
        }
    //如果是普通的SpringBoot项目,连Web环境都没有,那么就直接创建普通的ApplicationContext
        return (defaultResult != null) ? defaultResult.get() : null;
}
既然这里又是 SpringFactoriesLoader 加载 ApplicationContextFactory 实现,我们就直接去看有些啥:

我们也不出意外地在spring.factories中找到了这两个实现,因为目前是 Servlet 环境,所以在返回时得到最终的结果,也就是生成的 AnnotationConfigServletWebServerApplicationContext 对象,也就是说到这里为止,Spring 的容器就基本已经确定了,差不多可以开始运行了,下一个部分我们将继续介绍 SpringBoot 是如何实现自动扫描以及自动配置的。
自动配置原理
既然主类已经在初始阶段注册为 Bean,那么在加载时,就会根据注解定义,进行更多的额外操作。所以我们来看看主类上的@SpringBootApplication注解做了什么事情。
@Target({ElementType.TYPE})
@Retention(RetentionPolicy.RUNTIME)
@Documented
@Inherited
@SpringBootConfiguration
@EnableAutoConfiguration
@ComponentScan(
    excludeFilters = {@Filter(
    type = FilterType.CUSTOM,
    classes = {TypeExcludeFilter.class}
), @Filter(
    type = FilterType.CUSTOM,
    classes = {AutoConfigurationExcludeFilter.class}
)}
)
public @interface SpringBootApplication {
  ...
我们发现,@SpringBootApplication上添加了@ComponentScan注解,此注解我们此前已经认识过了,但是这里并没有配置具体扫描的包,因此它会自动将声明此接口的类所在的包作为 basePackage,所以,当添加@SpringBootApplication之后也就等于直接开启了自动扫描,我们所有的配置都会自动加载,但是一定注意不能在主类之外的包进行 Bean 定义,否则无法扫描到,需要手动配置。
我们自己类路径下的配置、还有各种 Bean 定义如何读取的问题解决了,接着我们来看第二个注解@EnableAutoConfiguration,它就是其他 Starter 自动配置的核心了,我们来看看它是如何定义的:
@Target({ElementType.TYPE})
@Retention(RetentionPolicy.RUNTIME)
@Documented
@Inherited
@AutoConfigurationPackage
@Import({AutoConfigurationImportSelector.class})
public @interface EnableAutoConfiguration {
  ...
这里就是 SSM 阶段我们认识的老套路了,直接一手@Import,通过这种方式来将一些外部的类进行加载。我们来看看 AutoConfigurationImportSelector 做了什么事情:
public class AutoConfigurationImportSelector implements DeferredImportSelector, BeanClassLoaderAware, ResourceLoaderAware, BeanFactoryAware, EnvironmentAware, Ordered {
        ...
}
我们看到它实现了很多接口,包括大量的 Aware 接口,我们在 SSM 阶段也介绍过,实际上就是为了感知某些必要的对象,在加载时将其存到当前类中。
其中最核心的是DeferredImportSelector接口,它是ImportSelector的子类,它定义了selectImports方法,用于返回需要加载的类名称,在 Spring 加载 ImportSelector 时,会调用此方法来获取更多需要加载的类,并将这些类全部注册为 Bean:
public interface ImportSelector {
    String[] selectImports(AnnotationMetadata importingClassMetadata);

    @Nullable
    default Predicate<String> getExclusionFilter() {
        return null;
    }
}
到目前为止,我们了解了两种使用@Import有特殊机制的接口:ImportSelector(这里用到的)和 ImportBeanDefinitionRegistrar(之前 SSM 阶段源码有讲)当然还有普通的@Configuration配置类。
为了后续更好理解我们可以来阅读一下ConfigurationClassPostProcessor的源码,实际上这个后置处理器是 Spring 中提供的,这是专门用于处理配置类的后置处理器,其中ImportBeanDefinitionRegistrar,还有这里的ImportSelector都是靠它来处理,不过当时 Spring 阶段没有深入讲解,我们来看看它到底是如何处理@Import的:
@Override
public void postProcessBeanDefinitionRegistry(BeanDefinitionRegistry registry) {
        ...
        processConfigBeanDefinitions(registry);   //常规套娃
}
public void processConfigBeanDefinitions(BeanDefinitionRegistry registry) {
    //注意这个后置处理器继承自BeanDefinitionRegistryPostProcessor
    //所以这个阶段仅仅是已经完成扫描了所有的Bean,得到了所有的BeanDefinition,但是还没有进行任何处理
    //candidate是候选者的意思,一会会将标记了@Configuration的类作为ConfigurationClass加入到configCandidates中
    List<BeanDefinitionHolder> configCandidates = new ArrayList<>();
    //直接取出所有已注册Bean的名称
    String[] candidateNames = registry.getBeanDefinitionNames();
    for (String beanName : candidateNames) {
       //依次拿到对应的Bean定义,然后进行判断
       BeanDefinition beanDef = registry.getBeanDefinition(beanName);
       if (beanDef.getAttribute(ConfigurationClassUtils.CONFIGURATION_CLASS_ATTRIBUTE) != null) {
          ...
       }
       else if (ConfigurationClassUtils.checkConfigurationClassCandidate(beanDef, this.metadataReaderFactory)) {   //判断是否为打了 @Configuration 的配置类,如果是就加入到候选列表中
          configCandidates.add(new BeanDefinitionHolder(beanDef, beanName));
       }
    }
    // 如果一个打了 @Configuration 的类都没发现,直接返回
    if (configCandidates.isEmpty()) {
       return;
    }
    // 对所有的配置类依据 @Order 进行排序
    configCandidates.sort((bd1, bd2) -> {
       int i1 = ConfigurationClassUtils.getOrder(bd1.getBeanDefinition());
       int i2 = ConfigurationClassUtils.getOrder(bd2.getBeanDefinition());
       return Integer.compare(i1, i2);
    });
    ...
    // 这里使用do-while语句依次解析所有的配置类
    ConfigurationClassParser parser = new ConfigurationClassParser(
          this.metadataReaderFactory, this.problemReporter, this.environment,
          this.resourceLoader, this.componentScanBeanNameGenerator, registry);
    Set<BeanDefinitionHolder> candidates = new LinkedHashSet<>(configCandidates);
    Set<ConfigurationClass> alreadyParsed = new HashSet<>(configCandidates.size());
    do {
       StartupStep processConfig = this.applicationStartup.start("spring.context.config-classes.parse");
       //这里就会通过Parser解析配置类中大部分内容,包括我们之前遇到的@Import注解
             parser.parse(candidates);
             parser.validate();
       //解析完成后读取到所有的配置类
       Set<ConfigurationClass> configClasses = new LinkedHashSet<>(parser.getConfigurationClasses());
             configClasses.removeAll(alreadyParsed);
       ...
       //将上面读取的配置类加载为Bean
       this.reader.loadBeanDefinitions(configClasses);
       ...
    }
    while (!candidates.isEmpty());
    ...
}
我们就接着来看,ConfigurationClassParser是如何进行解析的,直接进入parse方法的关键部分:
protected void processConfigurationClass(ConfigurationClass configClass, Predicate<String> filter) throws IOException {
      //处理 @Conditional 相关注解处理,后面会讲
    if (!this.conditionEvaluator.shouldSkip(configClass.getMetadata(), ConfigurationPhase.PARSE_CONFIGURATION)) {
        ...
        }
        ConfigurationClassParser.SourceClass sourceClass = this.asSourceClass(configClass, filter);
        do {
            //这里就是最核心了
            sourceClass = this.doProcessConfigurationClass(configClass, sourceClass, filter);
        } while(sourceClass != null);

        this.configurationClasses.put(configClass, configClass);
    }
}
最后我们再来看最核心的doProcessConfigurationClass方法:
protected final SourceClass doProcessConfigurationClass(ConfigurationClass configClass, SourceClass sourceClass)
    ...
    processImports(configClass, sourceClass, getImports(sourceClass), true);    // 处理Import注解
    ...
    return null;
}
private void processImports(ConfigurationClass configClass, SourceClass currentSourceClass,
            Collection<SourceClass> importCandidates, Predicate<String> exclusionFilter,
            boolean checkForCircularImports) {
            ...
        if (checkForCircularImports && isChainedImportOnStack(configClass)) {
            //检查是否存在循环导入情况
            this.problemReporter.error(new CircularImportProblem(configClass, this.importStack));
        }
        else {
            this.importStack.push(configClass);
            try {
                //依次遍历所有@Import注解中添加的类
                for (SourceClass candidate : importCandidates) {
                    if (candidate.isAssignable(ImportSelector.class)) {
                        // 如果是ImportSelector类型,则加载类,并完成实例化
                        Class<?> candidateClass = candidate.loadClass();
                        ImportSelector selector = ParserStrategyUtils.instantiateClass(candidateClass, ImportSelector.class, this.environment, this.resourceLoader, this.registry);
                        ...
                        // 如果是DeferredImportSelector(延迟导入)则通过deferredImportSelectorHandler进行处理
                        if (selector instanceof DeferredImportSelector deferredImportSelector) {
                            this.deferredImportSelectorHandler.handle(configClass, deferredImportSelector);
                        }
                        else {
                        // 如果是普通的ImportSelector则直接执行selectImports方法得到需要额外导入的类名称
                            String[] importClassNames = selector.selectImports(currentSourceClass.getMetadata());
                            Collection<SourceClass> importSourceClasses = asSourceClasses(importClassNames, exclusionFilter);
                            //递归处理这里得到的全部类
                            processImports(configClass, currentSourceClass, importSourceClasses, exclusionFilter, false);
                        }
                    }
                    else if (candidate.isAssignable(ImportBeanDefinitionRegistrar.class)) {
                        // 判断是否为ImportBeanDefinitionRegistrar类型,SSM阶段已经讲解过了
                        Class<?> candidateClass = candidate.loadClass();
                        ImportBeanDefinitionRegistrar registrar =
                                ParserStrategyUtils.instantiateClass(candidateClass, ImportBeanDefinitionRegistrar.class, this.environment, this.resourceLoader, this.registry);
                        //往configClass丢ImportBeanDefinitionRegistrar信息进去,之后再处理
                        configClass.addImportBeanDefinitionRegistrar(registrar, currentSourceClass.getMetadata());
                    }
                    else {
                        // 如果以上类型都不是,则不使用特殊机制,单纯导入为普通的配置类进行处理
                        this.importStack.registerImport(
                                currentSourceClass.getMetadata(), candidate.getMetadata().getClassName());
                        processConfigurationClass(candidate.asConfigClass(configClass), exclusionFilter);
                    }
                }
            }
            ...
        }
    }
}
不难注意到,虽然这里特别处理了ImportSelector对象,但是还针对ImportSelector的子接口DeferredImportSelector进行了额外处理,Deferred 是延迟的意思,它是一个延迟执行的ImportSelector,并不会立即进处理,而是丢进 DeferredImportSelectorHandler,并且在我们上面提到的parse方法的最后进行处理:
public void parse(Set<BeanDefinitionHolder> configCandidates) {
     ...
    this.deferredImportSelectorHandler.process();  //执行DeferredImportSelector的process方法,这里依然会进行上面的processImports操作,只不过被延迟到这个位置执行了
}
我们接着来看DeferredImportSelector正好就有一个process方法:
ublic interface DeferredImportSelector extends ImportSelector {
    @Nullable
    default Class<? extends DeferredImportSelector.Group> getImportGroup() {
        return null;
    }

    public interface Group {
        void process(AnnotationMetadata metadata, DeferredImportSelector selector);

        Iterable<DeferredImportSelector.Group.Entry> selectImports();

        public static class Entry {
          ...
最后经过 ConfigurationClassParser 处理完成后,通过parser.getConfigurationClasses()就能得到通过配置类导入那些额外的配置类或是特殊的类。最后将这些配置类全部注册 BeanDefinition,然后就可以交给接下来的 Bean 初始化过程去处理了:
最后我们再去看loadBeanDefinitions是如何运行的:
public void loadBeanDefinitions(Set<ConfigurationClass> configurationModel) {
    ConfigurationClassBeanDefinitionReader.TrackedConditionEvaluator trackedConditionEvaluator = new ConfigurationClassBeanDefinitionReader.TrackedConditionEvaluator();
    Iterator var3 = configurationModel.iterator();
    while(var3.hasNext()) {
        ConfigurationClass configClass = (ConfigurationClass)var3.next();
        this.loadBeanDefinitionsForConfigurationClass(configClass, trackedConditionEvaluator);
    }
}

private void loadBeanDefinitionsForConfigurationClass(ConfigurationClass configClass, ConfigurationClassBeanDefinitionReader.TrackedConditionEvaluator trackedConditionEvaluator) {
    if (trackedConditionEvaluator.shouldSkip(configClass)) {
        ...
    } else {
        if (configClass.isImported()) {
            this.registerBeanDefinitionForImportedConfigurationClass(configClass);  //注册配置类自己
        }
        Iterator var3 = configClass.getBeanMethods().iterator();
        while(var3.hasNext()) {
            BeanMethod beanMethod = (BeanMethod)var3.next();
            this.loadBeanDefinitionsForBeanMethod(beanMethod); //注册@Bean注解标识的方法
        }
        //注册@ImportResource引入的XML配置文件中读取的bean定义
        this.loadBeanDefinitionsFromImportedResources(configClass.getImportedResources());
        //注册configClass中经过解析后保存的所有ImportBeanDefinitionRegistrar,注册对应的BeanDefinition
        this.loadBeanDefinitionsFromRegistrars(configClass.getImportBeanDefinitionRegistrars());
    }
}
这样,整个@Configuration配置类的底层配置流程我们就大致了解了。接着我们来看 AutoConfigurationImportSelector 是如何实现自动配置的,可以看到内部类 AutoConfigurationGroup 的 process 方法,它是父接口的实现,因为父接口是DeferredImportSelector,根据前面的推导,很容易得知,实际上最后会调用process方法获取所有的自动配置类:
public void process(AnnotationMetadata annotationMetadata, DeferredImportSelector deferredImportSelector) {
    Assert.state(deferredImportSelector instanceof AutoConfigurationImportSelector, () -> {
        return String.format("Only %s implementations are supported, got %s", AutoConfigurationImportSelector.class.getSimpleName(), deferredImportSelector.getClass().getName());
    });
    //获取所有的Entry,其实就是读取来查看有哪些自动配置类
    AutoConfigurationImportSelector.AutoConfigurationEntry autoConfigurationEntry = ((AutoConfigurationImportSelector)deferredImportSelector).getAutoConfigurationEntry(annotationMetadata);
    this.autoConfigurationEntries.add(autoConfigurationEntry);
    Iterator var4 = autoConfigurationEntry.getConfigurations().iterator();

    while(var4.hasNext()) {
        String importClassName = (String)var4.next();
        this.entries.putIfAbsent(importClassName, annotationMetadata);
    }
    //这里结束之后,entries中就有上面获取到的自动配置类了
}
我们接着来看getAutoConfigurationEntry方法:
protected AutoConfigurationImportSelector.AutoConfigurationEntry getAutoConfigurationEntry(AnnotationMetadata annotationMetadata) {
    //这里判断是否开启了自动配置,你想的没错,自动配置是可以关的
    if (!this.isEnabled(annotationMetadata)) {
        return EMPTY_ENTRY;
    } else {
        //根据注解定义获取一些属性
        AnnotationAttributes attributes = this.getAttributes(annotationMetadata);
        //获取所有需要自动配置的类
        List<String> configurations = this.getCandidateConfigurations(annotationMetadata, attributes);
        //移除掉重复的自动配置类
        configurations = removeDuplicates(configurations);
        //获取需要排除掉的自动配置类
            Set<String> exclusions = getExclusions(annotationMetadata, attributes);
            checkExcludedClasses(configurations, exclusions);
            configurations.removeAll(exclusions);
        ...
            return new AutoConfigurationEntry(configurations, exclusions);
    }
}
我们接着往里面看:
protected List<String> getCandidateConfigurations(AnnotationMetadata metadata, AnnotationAttributes attributes) {
            //这里继续套娃
        List<String> configurations = ImportCandidates.load(AutoConfiguration.class, this.getBeanClassLoader()).getCandidates();
        ...
}
到这里终于找到了:
public static ImportCandidates load(Class<?> annotation, ClassLoader classLoader) {
        Assert.notNull(annotation, "'annotation' must not be null");
        ClassLoader classLoaderToUse = decideClassloader(classLoader);
            //这里直接获取 META-INF/spring/注解类名.imports 中的所有内容
        String location = String.format("META-INF/spring/%s.imports", annotation.getName());
        ...
}
我们可以直接找到:

可以看到有很多自动配置类,实际上 SpringBoot 的 starter 都是依靠自动配置类来实现自动配置的,我们可以随便看一个,比如用于自动配置 Mybatis 框架的 MybatisAutoConfiguration 自动配置类:
@Configuration
@ConditionalOnClass({SqlSessionFactory.class, SqlSessionFactoryBean.class})
@ConditionalOnSingleCandidate(DataSource.class)
@EnableConfigurationProperties({MybatisProperties.class})
@AutoConfigureAfter({DataSourceAutoConfiguration.class, MybatisLanguageDriverAutoConfiguration.class})
public class MybatisAutoConfiguration implements InitializingBean {
    ...

    @Bean
    @ConditionalOnMissingBean
    public SqlSessionFactory sqlSessionFactory(DataSource dataSource) throws Exception {
        ...
    }

    @Bean
    @ConditionalOnMissingBean
    public SqlSessionTemplate sqlSessionTemplate(SqlSessionFactory sqlSessionFactory) {
        ...
    }

    ...
}
可以看到里面直接将 SqlSessionFactory 和 SqlSessionTemplate 注册为 Bean 了,由于这个自动配置类在上面的一套流程中已经加载了,这样就不需要我们手动进行注册这些 Bean 了。不过这里有一个非常有意思的 @Conditional 注解,它可以根据条件来判断是否注册这个 Bean,比如 @ConditionalOnMissingBean 注解就是当这个 Bean 不存在的时候,才会注册,如果这个 Bean 已经被其他配置类给注册了,那么这里就不进行注册。
经过这一套流程,简而言之就是 SpringBoot 读取META-INF/spring/org.springframework.boot.autoconfigure.AutoConfiguration.imports文件来确定要加载哪些自动配置类来实现的全自动化,真正做到添加依赖就能够直接完成配置和运行,至此,SpringBoot 的原理部分就探究完毕了。
自定义 Starter 项目
我们仿照 Mybatis 来编写一个自己的 starter,Mybatis 的 starter 包含两个部分:
<project xmlns="http://maven.apache.org/POM/4.0.0" xmlns:xsi="http://www.w3.org/2001/XMLSchema-instance" xsi:schemaLocation="http://maven.apache.org/POM/4.0.0 http://maven.apache.org/xsd/maven-4.0.0.xsd">
  <modelVersion>4.0.0</modelVersion>
  <parent>
    <groupId>org.mybatis.spring.boot</groupId>
    <artifactId>mybatis-spring-boot</artifactId>
    <version>2.2.0</version>
  </parent>
  <!--  starter本身只做依赖集中管理,不编写任何代码  -->
  <artifactId>mybatis-spring-boot-starter</artifactId>
  <name>mybatis-spring-boot-starter</name>
  <properties>
    <module.name>org.mybatis.spring.boot.starter</module.name>
  </properties>
  <dependencies>
    <dependency>
      <groupId>org.springframework.boot</groupId>
      <artifactId>spring-boot-starter</artifactId>
    </dependency>
    <dependency>
      <groupId>org.springframework.boot</groupId>
      <artifactId>spring-boot-starter-jdbc</artifactId>
    </dependency>
    <!--  编写的专用配置模块   -->
    <dependency>
      <groupId>org.mybatis.spring.boot</groupId>
      <artifactId>mybatis-spring-boot-autoconfigure</artifactId>
    </dependency>
    <dependency>
      <groupId>org.mybatis</groupId>
      <artifactId>mybatis</artifactId>
    </dependency>
    <dependency>
      <groupId>org.mybatis</groupId>
      <artifactId>mybatis-spring</artifactId>
    </dependency>
  </dependencies>
</project>
因此我们也将我们自己的 starter 这样设计,我们设计三个模块:
- spring-boot-hello:基础业务功能模块
- spring-boot-starter-hello:启动器
- spring-boot-autoconifgurer-hello:自动配置依赖


首先是基础业务功能模块,这里我们随便创建一个类就可以了:

启动器主要做依赖管理,这里就不写任何代码,只写 pom 文件:
<dependency>
<groupId>org.example</groupId>
<artifactId>spring-boot-autoconifgurer-hello</artifactId>
<version>0.0.1-SNAPSHOT</version>
</dependency>
<dependency>
<groupId>org.example</groupId>
<artifactId>spring-boot-hello</artifactId>
<version>0.0.1-SNAPSHOT</version>
</dependency>

导入 autoconfigurer 模块作为依赖即可,接着我们去编写 autoconfigurer 模块,首先导入依赖:
<dependencies>
<dependency>
<groupId>org.springframework.boot</groupId>
<artifactId>spring-boot-autoconfigure</artifactId>
</dependency>
<dependency>
<groupId>org.springframework.boot</groupId>
<artifactId>spring-boot-configuration-processor</artifactId>
<optional>true</optional>
</dependency>
<dependency>
<groupId>org.example</groupId>
<artifactId>spring-boot-hello</artifactId>
<version>0.0.1-SNAPSHOT</version>
</dependency>
</dependencies>
接着创建一个 HelloWorldAutoConfiguration 作为自动配置类:
@Configuration(proxyBeanMethods = false)
@ConditionalOnWebApplication
@EnableConfigurationProperties(HelloWorldProperties.class)
public class HelloWorldAutoConfiguration {
Logger logger = Logger.getLogger(this.getClass().getName());
@Autowired
HelloWorldProperties properties;
@Bean
@ConditionalOnMissingBean
public HelloWorldService helloWorldService(){
logger.info("自定义starter项目已启动!");
logger.info("读取到自定义配置:"+properties.getValue());
return new HelloWorldService();
}
}
对应的配置读取类:
@ConfigurationProperties("hello.world")
public class HelloWorldProperties {
private String value;
public void setValue(String value) {
this.value = value;
}
public String getValue() {
return value;
}
}
接着再编写META-INF/spring/org.springframework.boot.autoconfigure.AutoConfiguration.imports文件,并将我们的自动配置类添加即可:
最后再 Maven 根项目执行install安装到本地仓库,完成。接着就可以在其他项目中使用我们编写的自定义 starter 了。
spring-boot-autoconfigurer-hello:
HelloWorldAutoConfiguration.java:
package com.test.autoconfigure;
import com.test.HelloWorldService;
import org.springframework.beans.factory.annotation.Autowired;
import org.springframework.boot.autoconfigure.condition.ConditionalOnMissingBean;
import org.springframework.boot.autoconfigure.condition.ConditionalOnWebApplication;
import org.springframework.boot.context.properties.EnableConfigurationProperties;
import org.springframework.context.annotation.Bean;
import org.springframework.context.annotation.Configuration;
import java.util.logging.Logger;
@Configuration(proxyBeanMethods = false)
@ConditionalOnWebApplication
@EnableConfigurationProperties(HelloWorldProperties.class)
public class HelloWorldAutoConfiguration {
Logger logger = Logger.getLogger(this.getClass().getName());
@Autowired
HelloWorldProperties properties;
@Bean
@ConditionalOnMissingBean
public HelloWorldService helloWorldService(){
logger.info("stater init...");
logger.info("read:"+properties.getValue());
return new HelloWorldService();
}
}
HelloWorldProperties.java:
package com.test.autoconfigure;
import org.springframework.boot.context.properties.ConfigurationProperties;
@ConfigurationProperties("hello.world")
public class HelloWorldProperties {
private String value;
public void setValue(String value) {
this.value = value;
}
public String getValue() {
return value;
}
}
pom.xml:
<?xml version="1.0" encoding="UTF-8"?>
<project xmlns="http://maven.apache.org/POM/4.0.0"
xmlns:xsi="http://www.w3.org/2001/XMLSchema-instance"
xsi:schemaLocation="http://maven.apache.org/POM/4.0.0 http://maven.apache.org/xsd/maven-4.0.0.xsd">
<modelVersion>4.0.0</modelVersion>
<parent>
<groupId>com.example</groupId>
<artifactId>demo4</artifactId>
<version>0.0.1-SNAPSHOT</version>
</parent>
<groupId>org.example</groupId>
<artifactId>spring-boot-autoconfigurer-hello</artifactId>
<version>0.0.1-SNAPSHOT</version>
<properties>
<maven.compiler.source>17</maven.compiler.source>
<maven.compiler.target>17</maven.compiler.target>
<project.build.sourceEncoding>UTF-8</project.build.sourceEncoding>
</properties>
<dependencies>
<dependency>
<groupId>org.springframework.boot</groupId>
<artifactId>spring-boot-autoconfigure</artifactId>
</dependency>
<dependency>
<groupId>org.springframework.boot</groupId>
<artifactId>spring-boot-configuration-processor</artifactId>
<optional>true</optional>
</dependency>
<dependency>
<groupId>org.example</groupId>
<artifactId>spring-boot-hello</artifactId>
<version>0.0.1-SNAPSHOT</version>
</dependency>
</dependencies>
</project>
spring-boot-hello:
HelloWorldService.jav:
package com.test;
public class HelloWorldService {
    public void test(){
        System.out.println("Hello World!");
    }
}
pom.xml
<?xml version="1.0" encoding="UTF-8"?>
<project xmlns="http://maven.apache.org/POM/4.0.0"
         xmlns:xsi="http://www.w3.org/2001/XMLSchema-instance"
         xsi:schemaLocation="http://maven.apache.org/POM/4.0.0 http://maven.apache.org/xsd/maven-4.0.0.xsd">
    <modelVersion>4.0.0</modelVersion>
    <parent>
        <groupId>com.example</groupId>
        <artifactId>demo4</artifactId>
        <version>0.0.1-SNAPSHOT</version>
    </parent>

    <groupId>org.example</groupId>
    <artifactId>spring-boot-hello</artifactId>
    <version>0.0.1-SNAPSHOT</version>

    <properties>
        <maven.compiler.source>17</maven.compiler.source>
        <maven.compiler.target>17</maven.compiler.target>
        <project.build.sourceEncoding>UTF-8</project.build.sourceEncoding>
    </properties>

</project>
spring-boot-starter-hello
pom.xml:
<?xml version="1.0" encoding="UTF-8"?>
<project xmlns="http://maven.apache.org/POM/4.0.0"
         xmlns:xsi="http://www.w3.org/2001/XMLSchema-instance"
         xsi:schemaLocation="http://maven.apache.org/POM/4.0.0 http://maven.apache.org/xsd/maven-4.0.0.xsd">
    <modelVersion>4.0.0</modelVersion>
    <parent>
        <groupId>com.example</groupId>
        <artifactId>demo4</artifactId>
        <version>0.0.1-SNAPSHOT</version>
    </parent>

    <groupId>org.example</groupId>
    <artifactId>spring-boot-starter-hello</artifactId>

    <properties>
        <maven.compiler.source>17</maven.compiler.source>
        <maven.compiler.target>17</maven.compiler.target>
        <project.build.sourceEncoding>UTF-8</project.build.sourceEncoding>
    </properties>
    <dependencies>
        <dependency>
            <groupId>org.example</groupId>
            <artifactId>spring-boot-autoconfigurer-hello</artifactId>
            <version>0.0.1-SNAPSHOT</version>
        </dependency>

        <dependency>
            <groupId>org.example</groupId>
            <artifactId>spring-boot-hello</artifactId>
            <version>0.0.1-SNAPSHOT</version>
        </dependency>
    </dependencies>

</project>
demo4
pom.xml
<?xml version="1.0" encoding="UTF-8"?>
<project xmlns="http://maven.apache.org/POM/4.0.0" xmlns:xsi="http://www.w3.org/2001/XMLSchema-instance"
         xsi:schemaLocation="http://maven.apache.org/POM/4.0.0 https://maven.apache.org/xsd/maven-4.0.0.xsd">
    <modelVersion>4.0.0</modelVersion>
    <parent>
        <groupId>org.springframework.boot</groupId>
        <artifactId>spring-boot-starter-parent</artifactId>
        <version>3.3.0</version>
        <relativePath/> <!-- lookup parent from repository -->
    </parent>
    <groupId>com.example</groupId>
    <artifactId>demo4</artifactId>
    <version>0.0.1-SNAPSHOT</version>
    <packaging>pom</packaging>
    <name>demo4</name>
    <description>demo4</description>
    <modules>
        <module>spring-boot-hello</module>
        <module>spring-boot-starter-hello</module>
        <module>spring-boot-autoconfigurer-hello</module>
    </modules>
    <properties>
        <java.version>17</java.version>
    </properties>

</project>


