SpringMVC基础
MVC理论基础
在之前,我们给大家讲解了三层架构,包括:
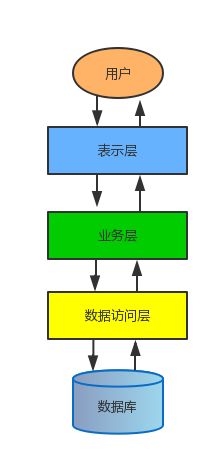
每一层都有着各自的职责,其中最关键的当属表示层,因为它相当于就是直接与用户的浏览器打交道的一层,并且所有的请求都会经过它进行解析,然后再告知业务层进行处理,任何页面的返回和数据填充也全靠表示层来完成,因此它实际上是整个三层架构中最关键的一层,而在之前的实战开发中,我们编写了大量的Servlet(也就是表示层实现)来处理来自浏览器的各种请求,但是我们发现,仅仅是几个很小的功能,以及几个很基本的页面,我们都要编写将近十个Servlet,如果是更加大型的网站系统,比如淘宝、B站,光是一个页面中可能就包含了几十甚至上百个功能,想想那样的话写起来得多恐怖。
因此,SpringMVC正是为了解决这种问题而生的,它是一个非常优秀的表示层框架,采用MVC思想设计实现。
MVC详细解释如下:
- M是指业务模型(Model):通俗的讲就是我们之前用于封装数据传递的实体类。
- V是指用户界面(View):一般指的是前端页面。
- C则是控制器(Controller):控制器就相当于Servlet的基本功能,处理请求,返回响应。
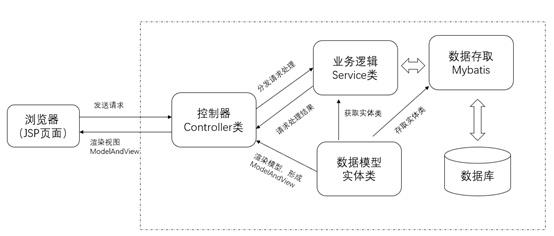
SpringMVC正是希望这三者之间进行解耦,实现各干各的,更加精细地划分对应的职责。最后再将View和Model进行渲染,得到最终的页面并返回给前端(就像之前使用Thymeleaf那样,把实体数据对象和前端页面都给到Thymeleaf,然后它会将其进行整合渲染得到最终有数据的页面,而本教程也会使用Thymeleaf作为视图解析器进行讲解)
配置环境并搭建项目
这里我们继续使用之前的Tomcat10服务器,Spring6之后要求必须使用Tomcat10或更高版本,跟之前一样,我们直接创建一个新的JakartaEE项目。

创建完成后会自动生成相关文件,但是还是请注意检查运行配置中的URL和应用程序上下文名称是否一致。


传统XML配置形式
SpringMvc项目依然支持多种配置形式,这里我们首先讲解最传统的XML配置形式。
首先我们需要添加Mvc相关依赖:
<dependency>
    <groupId>org.springframework</groupId>
    <artifactId>spring-webmvc</artifactId>
    <version>6.0.10</version>
</dependency>

接着我们需要配置一下web.xml,将DispatcherServlet替换掉Tomcat自带的Servlet,这里url-pattern需要写为/,即可完成替换:
<?xml version="1.0" encoding="UTF-8"?>
<web-app xmlns="https://jakarta.ee/xml/ns/jakartaee"
         xmlns:xsi="http://www.w3.org/2001/XMLSchema-instance"
         xsi:schemaLocation="https://jakarta.ee/xml/ns/jakartaee https://jakarta.ee/xml/ns/jakartaee/web-app_5_0.xsd"
         version="5.0">
    <servlet>
        <servlet-name>mvc</servlet-name>
        <servlet-class>org.springframework.web.servlet.DispatcherServlet</servlet-class>
    </servlet>
    <servlet-mapping>
        <servlet-name>mvc</servlet-name>
        <url-pattern>/</url-pattern>
    </servlet-mapping>
</web-app>

接着需要为整个Web应用程序配置一个Spring上下文环境(也就是容器),因为SpringMVC是基于Spring开发的,它直接利用Spring提供的容器来实现各种功能,那么第一步依然跟之前一样,需要编写一个配置文件:
<?xml version="1.0" encoding="UTF-8"?>
<beans xmlns="http://www.springframework.org/schema/beans"
       xmlns:xsi="http://www.w3.org/2001/XMLSchema-instance"
       xsi:schemaLocation="http://www.springframework.org/schema/beans
        https://www.springframework.org/schema/beans/spring-beans.xsd">
</beans>

接着我们需要为DispatcherServlet配置一些初始化参数来指定刚刚创建的配置文件:
<servlet>
    <servlet-name>mvc</servlet-name>
    <servlet-class>org.springframework.web.servlet.DispatcherServlet</servlet-class>
    <init-param>
        <!--     指定我们刚刚创建在类路径下的XML配置文件       -->
        <param-name>contextConfigLocation</param-name>
        <param-value>classpath:application.xml</param-value>
    </init-param>
</servlet>

这样我们就完成了基本的配置,现在我们可以来测试一下是否配置正确,我们删除项目自带的Servlet类,创建一个Mvc中使用的Controller类,现在还没学没关系,跟着写就行了,这里我们只是测试一下:
@Controller
public class HelloController {
    @ResponseBody
    @RequestMapping("/")
    public String hello(){
        return "HelloWorld!";
    }
}
接着我们需要将这个类注册为Bean才能正常使用,我们来编写一下Spring的配置文件,这里我们直接配置包扫描,XML下的包扫描需要这样开启:
<?xml version="1.0" encoding="UTF-8"?>
<beans xmlns="http://www.springframework.org/schema/beans"
       xmlns:xsi="http://www.w3.org/2001/XMLSchema-instance"
       xmlns:context="http://www.springframework.org/schema/context"
       xsi:schemaLocation="http://www.springframework.org/schema/beans
        https://www.springframework.org/schema/beans/spring-beans.xsd http://www.springframework.org/schema/context https://www.springframework.org/schema/context/spring-context.xsd">
    <!-- 需要先引入context命名空间,然后直接配置base-package属性就可以了 -->
    <context:component-scan base-package="com.example"/>
</beans>
如果可以成功在浏览器中出现HelloWorld则说明配置成功:

聪明的小伙伴可能已经发现了,实际上我们上面编写的Controller就是负责Servlet基本功能的,比如这里我们返回的是HelloWorld字符串,那么我们在访问这个地址的时候,的到的就是这里返回的字符串,可以看到写法非常简洁,至于这是怎么做到的的,怎么使用,我们会在本章进行详细介绍。


全注解配置形式
如果你希望完完全全丢弃配置文件,使用纯注解开发,可以直接添加一个类,Tomcat会在类路径中查找实现ServletContainerInitializer 接口的类,如果发现的话,就用它来配置Servlet容器,Spring提供了这个接口的实现类 SpringServletContainerInitializer , 通过@HandlesTypes(WebApplicationInitializer.class)设置,这个类反过来会查找实现WebApplicationInitializer 的类,并将配置的任务交给他们来完成,因此直接实现接口即可:
public class MainInitializer extends AbstractAnnotationConfigDispatcherServletInitializer {

    @Override
    protected Class<?>[] getRootConfigClasses() {
        return new Class[]{WebConfiguration.class};   //基本的Spring配置类,一般用于业务层配置
    }

    @Override
    protected Class<?>[] getServletConfigClasses() {
        return new Class[0];  //配置DispatcherServlet的配置类、主要用于Controller等配置,这里为了教学简单,就不分这么详细了,只使用上面的基本配置类
    }

    @Override
    protected String[] getServletMappings() {
        return new String[]{"/"};    //匹配路径,与上面一致
    }
}
接着我们需要再配置类中添加一些必要的注解:
@Configuration
@EnableWebMvc   //快速配置SpringMvc注解,如果不添加此注解会导致后续无法通过实现WebMvcConfigurer接口进行自定义配置
@ComponentScan("com.example.controller")
public class WebConfiguration {
}
这样我们同样可以正常访问:

之后为了方便,我们就统一使用全注解形式编写。
如果日志科技有报错无法显示Mvc相关的日志,请添加以下依赖:
<dependency>
      <groupId>org.slf4j</groupId>
      <artifactId>slf4j-api</artifactId>
      <version>1.7.33</version>
</dependency>
<dependency>
      <groupId>org.slf4j</groupId>
      <artifactId>slf4j-jdk14</artifactId>
      <version>1.7.33</version>
</dependency>
添加后就可以正常打印日志了:


Controller控制器
有了SpringMVC之后,我们不必再像之前那样一个请求地址创建一个Servlet了,它使用DispatcherServlet替代Tomcat为我们提供的默认的静态资源Servlet,也就是说,现在所有的请求(除了jsp,因为Tomcat还提供了一个jsp的Servlet)都会经过DispatcherServlet进行处理。
那么DispatcherServlet会帮助我们做什么呢?
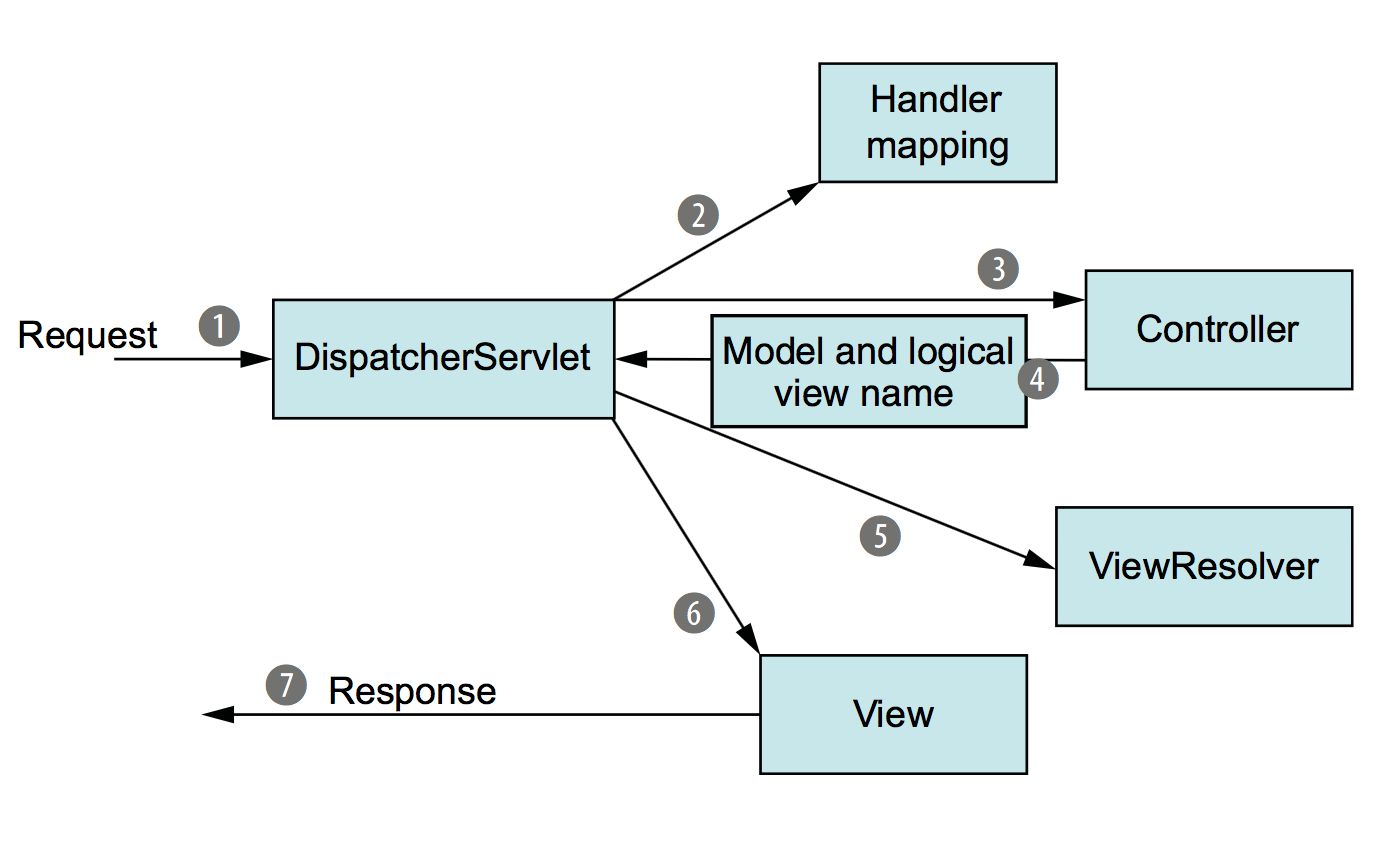
根据图片我们可以了解,我们的请求到达Tomcat服务器之后,会交给当前的Web应用程序进行处理,而SpringMVC使用DispatcherServlet来处理所有的请求,也就是说它被作为一个统一的访问点,所有的请求全部由它来进行调度。
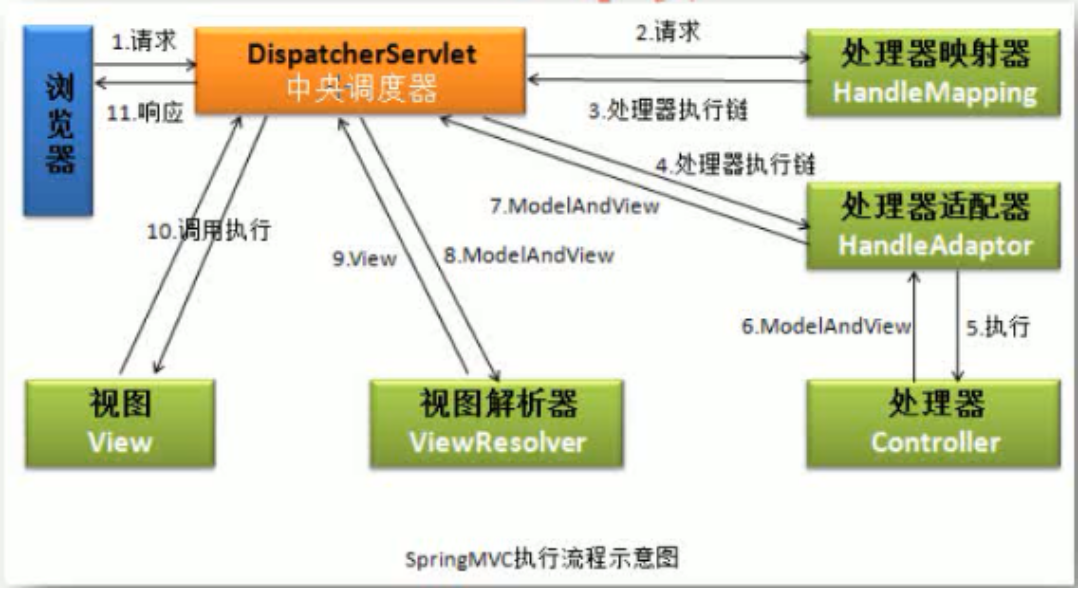
当一个请求经过DispatcherServlet之后,会先走HandlerMapping,它会将请求映射为HandlerExecutionChain,依次经过HandlerInterceptor有点类似于之前我们所学的过滤器,不过在SpringMVC中我们使用的是拦截器,然后再交给HandlerAdapter,根据请求的路径选择合适的控制器进行处理,控制器处理完成之后,会返回一个ModelAndView对象,包括数据模型和视图,通俗的讲就是页面中数据和页面本身(只包含视图名称即可)。
返回ModelAndView之后,会交给ViewResolver(视图解析器)进行处理,视图解析器会对整个视图页面进行解析,SpringMVC自带了一些视图解析器,但是只适用于JSP页面,我们也可以像之前一样使用Thymeleaf作为视图解析器,这样我们就可以根据给定的视图名称,直接读取HTML编写的页面,解析为一个真正的View。
解析完成后,就需要将页面中的数据全部渲染到View中,最后返回给DispatcherServlet一个包含所有数据的成形页面,再响应给浏览器,完成整个过程。
因此,实际上整个过程我们只需要编写对应请求路径的的Controller以及配置好我们需要的ViewResolver即可,之后还可以继续补充添加拦截器,而其他的流程已经由SpringMVC帮助我们完成了。
配置视图解析器和控制器
首先我们需要实现最基本的页面解析并返回,第一步就是配置视图解析器,这里我们使用Thymeleaf为我们提供的视图解析器,导入需要的依赖:
<dependency>
    <groupId>org.thymeleaf</groupId>
    <artifactId>thymeleaf-spring6</artifactId>
    <version>3.1.1.RELEASE</version>
</dependency>
配置视图解析器非常简单,我们只需要将对应的ViewResolver注册为Bean即可,这里我们直接在配置类中编写:
@Configuration
@EnableWebMvc
@ComponentScan("com.example.controller")
public class WebConfiguration {
    //我们需要使用ThymeleafViewResolver作为视图解析器,并解析我们的HTML页面
    @Bean
    public ThymeleafViewResolver thymeleafViewResolver(SpringTemplateEngine springTemplateEngine){
        ThymeleafViewResolver resolver = new ThymeleafViewResolver();
        resolver.setOrder(1);   //可以存在多个视图解析器,并且可以为他们设定解析顺序
        resolver.setCharacterEncoding("UTF-8");   //编码格式是重中之重
        resolver.setTemplateEngine(springTemplateEngine);   //和之前JavaWeb阶段一样,需要使用模板引擎进行解析,所以这里也需要设定一下模板引擎
        return resolver;
    }

    //配置模板解析器
    @Bean
    public SpringResourceTemplateResolver templateResolver(){
        SpringResourceTemplateResolver resolver = new SpringResourceTemplateResolver();
        resolver.setSuffix(".html");   //需要解析的后缀名称
        resolver.setPrefix("/");   //需要解析的HTML页面文件存放的位置,默认是webapp目录下,如果是类路径下需要添加classpath:前缀
        return resolver;
    }

    //配置模板引擎Bean
    @Bean
    public SpringTemplateEngine springTemplateEngine(ITemplateResolver resolver){
        SpringTemplateEngine engine = new SpringTemplateEngine();
        engine.setTemplateResolver(resolver);   //模板解析器,默认即可
        return engine;
    }
}
现在我们就完成了视图解析器的配置,我们接着来创建一个Controller,创建Controller也非常简单,只需在一个类上添加一个@Controller注解即可,它会被Spring扫描并自动注册为Controller类型的Bean,然后我们只需要在类中编写方法用于处理对应地址的请求即可:
@Controller   //直接添加注解即可
public class HelloController {

    @RequestMapping("/index")   //直接填写访问路径
    public ModelAndView index(){
        return new ModelAndView("index");  //返回ModelAndView对象,这里填入了视图的名称
        //返回后会经过视图解析器进行处理
    }
}
接着我们在类路径根目录下创建一个简单html文件:
<!DOCTYPE html>
<html lang="en">
<head>
    <meta charset="UTF-8">
    <title>测试</title>
</head>
<body>
    <p>欢迎来到GayHub全球最大同性交友网站</p>
</body>
</html>
我们会发现,打开浏览器之后就可以直接访问我们的HTML页面了:


也可以不用webapp 直接用resources, 需要改下
WebConfiguration.java, 中
我们在之前,使用Thymeleaf解析后端的一些数据时,需要通过Context进行传递,而使用SpringMvc后,数据我们可以直接向Model模型层进行提供:
@RequestMapping(value = "/index")
public ModelAndView index(){
    ModelAndView modelAndView = new ModelAndView("index");
    modelAndView.getModel().put("name", "啊这");   //将name传递给Model
    return modelAndView;
}
这样Thymeleaf就能收到我们传递的数据进行解析:
<!DOCTYPE html>
<html lang="en" xmlns:th="http://www.thymeleaf.org">
<head>
    <meta charset="UTF-8">
    <title>Title</title>
    <script src="static/test.js"></script>
</head>
<body>
    HelloWorld!
    <div th:text="${name}"></div>
</body>
</html>


当然,为了简便,我们可以直接返回View名称,SpringMVC会将其自动包装为ModelAndView对象:


我们还可以单独添加一个Model作为形参进行设置,SpringMVC通过依赖注入会自动帮助我们传递实例对象:
@RequestMapping(value = "/index")
public String index(Model model){  //这里不仅仅可以是Model,还可以是Map、ModelMap
    model.addAttribute("name", "yyds");
    return "index";
}


有了Spring框架的加持,相比我们之前编写的Web应用程序,简直方便了一个层次,你就说你爱不爱吧,你爱不爱。
注意,一定要保证视图名称下面出现横线并且按住Ctrl可以跳转,配置才是正确的(最新版IDEA)
我们的页面中可能还会包含一些静态资源,比如js、css,因此这里我们还需要配置一下,让静态资源通过Tomcat提供的默认Servlet进行解析,我们需要让配置类实现一下WebMvcConfigurer接口,这样在Web应用程序启动时,会根据我们重写方法里面的内容进行进一步的配置:
@Override
public void configureDefaultServletHandling(DefaultServletHandlerConfigurer configurer) {
    configurer.enable();   //开启默认的Servlet
}

@Override
public void addResourceHandlers(ResourceHandlerRegistry registry) {
    registry.addResourceHandler("/static/**").addResourceLocations("/static/");
    //配置静态资源的访问路径
}
我们编写一下前端内容:
<!DOCTYPE html>
<html lang="en" xmlns:th="http://www.thymeleaf.org">
<head>
    <meta charset="UTF-8">
    <title>测试</title>
    <!-- 引用静态资源,这里使用Thymeleaf的网址链接表达式,Thymeleaf会自动添加web应用程序的名称到链接前面 -->
    <script th:src="@{/static/test.js}"></script>
</head>
<body>
    <p>欢迎来到GayHub全球最大同性交友网站</p>
</body>
</html>
创建test.js并编写如下内容:
最后访问页面,页面在加载时就会显示一个弹窗,这样我们就完成了最基本的页面配置。相比之前的方式,这样就简单很多了,直接避免了编写大量的Servlet来处理请求。


@RequestMapping详解
前面我们已经了解了如何创建一个控制器来处理我们的请求,接着我们只需要在控制器添加一个方法用于处理对应的请求即可,之前我们需要完整地编写一个Servlet来实现,而现在我们只需要添加一个@RequestMapping即可实现,其实从它的名字我们也能得知,此注解就是将请求和处理请求的方法建立一个映射关系,当收到请求时就可以根据映射关系调用对应的请求处理方法,那么我们就来先聊聊@RequestMapping吧,注解定义如下:
@Mapping
public @interface RequestMapping {
    String name() default "";

    @AliasFor("path")
    String[] value() default {};

    @AliasFor("value")
    String[] path() default {};

    RequestMethod[] method() default {};

    String[] params() default {};

    String[] headers() default {};

    String[] consumes() default {};

    String[] produces() default {};
}
其中最关键的是path属性(等价于value),它决定了当前方法处理的请求路径,注意路径必须全局唯一,任何路径只能有一个方法进行处理,它是一个数组,也就是说此方法不仅仅可以只用于处理某一个请求路径,我们可以使用此方法处理多个请求路径:
@RequestMapping({"/index", "/test"})
public ModelAndView index(){
    return new ModelAndView("index");
}
现在我们访问/index或是/test都会经过此方法进行处理。


我们也可以直接将@RequestMapping添加到类名上,表示为此类中的所有请求映射添加一个路径前缀,比如:
@Controller
@RequestMapping("/yyds")
public class MainController {

    @RequestMapping({"/index", "/test"})
    public ModelAndView index(){
        return new ModelAndView("index");
    }
}
那么现在我们需要访问/yyds/index或是/yyds/test才可以得到此页面。我们可以直接在IDEA下方的端点板块中查看当前Web应用程序定义的所有请求映射,并且可以通过IDEA为我们提供的内置Web客户端直接访问某个路径。


路径还支持使用通配符进行匹配:
- ?:表示任意一个字符,比如
@RequestMapping("/index/x?")可以匹配/index/xa、/index/xb等等。 - *:表示任意0-n个字符,比如
@RequestMapping("/index/*")可以匹配/index/lbwnb、/index/yyds等。 - **:表示当前目录或基于当前目录的多级目录,比如
@RequestMapping("/index/**")可以匹配/index、/index/xxx等。


我们接着来看下一个method属性,顾名思义,它就是请求的方法类型,我们可以限定请求方式,比如:
@RequestMapping(value = "/index", method = RequestMethod.POST)
public ModelAndView index(){
    return new ModelAndView("index");
}
现在我们如果直接使用浏览器访问此页面,会显示405方法不支持,因为浏览器默认是直接使用GET方法获取页面,而我们这里指定为POST方法访问此地址,所以访问失败,我们现在再去端点中用POST方式去访问,成功得到页面。


我们也可以使用衍生注解直接设定为指定类型的请求映射:
这里使用了@PostMapping直接指定为POST请求类型的请求映射,同样的,还有@GetMapping可以直接指定为GET请求方式,这里就不一一列举了。

我们可以使用params属性来指定请求必须携带哪些请求参数,比如:
@RequestMapping(value = "/index", params = {"username", "password"})
public ModelAndView index(){
    return new ModelAndView("index");
}


比如这里我们要求请求中必须携带username和password属性,否则无法访问。它还支持表达式,比如我们可以这样编写:
@RequestMapping(value = "/index", params = {"!username", "password"})
public ModelAndView index(){
    return new ModelAndView("index");
}
在username之前添加一个感叹号表示请求的不允许携带此参数,否则无法访问,我们甚至可以直接设定一个固定值:
@RequestMapping(value = "/index", params = {"username!=test", "password=123"})
public ModelAndView index(){
    return new ModelAndView("index");
}
这样,请求参数username不允许为test,并且password必须为123,否则无法访问。
header属性用法与params一致,但是它要求的是请求头中需要携带什么内容,比如:
@RequestMapping(value = "/index", headers = "!Connection")
public ModelAndView index(){
    return new ModelAndView("index");
}
那么,如果请求头中携带了Connection属性,将无法访问。其他两个属性:
- consumes: 指定处理请求的提交内容类型(Content-Type),例如application/json, text/html;
- produces: 指定返回的内容类型,仅当request请求头中的(Accept)类型中包含该指定类型才返回;
@RequestParam和@RequestHeader详解
我们接着来看,如何获取到请求中的参数。
我们只需要为方法添加一个形式参数,并在形式参数前面添加@RequestParam注解即可:
@RequestMapping(value = "/index")
public ModelAndView index(@RequestParam("username") String username){
    System.out.println("接受到请求参数:"+username);
    return new ModelAndView("index");
}
我们需要在@RequestParam中填写参数名称,参数的值会自动传递给形式参数,我们可以直接在方法中使用,注意,如果参数名称与形式参数名称相同,即使不添加@RequestParam也能获取到参数值。


@RequestParam("username") String username同名的话可以不写
@RequestParam
一旦添加@RequestParam,那么此请求必须携带指定参数,我们也可以将require属性设定为false来将属性设定为非必须:
@RequestMapping(value = "/index")
public ModelAndView index(@RequestParam(value = "username", required = false) String username){
    System.out.println("接受到请求参数:"+username);
    return new ModelAndView("index");
}

我们还可以直接设定一个默认值,当请求参数缺失时,可以直接使用默认值:
@RequestMapping(value = "/index")
public ModelAndView index(@RequestParam(value = "username", required = false, defaultValue = "伞兵一号") String username){
    System.out.println("接受到请求参数:"+username);
    return new ModelAndView("index");
}

如果需要使用Servlet原本的一些类,比如:
@RequestMapping(value = "/index")
public ModelAndView index(HttpServletRequest request){
    System.out.println("接受到请求参数:"+request.getParameterMap().keySet());
    return new ModelAndView("index");
}


直接添加HttpServletRequest为形式参数即可,SpringMVC会自动传递该请求原本的HttpServletRequest对象,同理,我们也可以添加HttpServletResponse作为形式参数,甚至可以直接将HttpSession也作为参数传递:
@RequestMapping(value = "/index")
public ModelAndView index(HttpSession session){
    System.out.println(session.getAttribute("test"));
    session.setAttribute("test", "鸡你太美");
    return new ModelAndView("index");
}


我们还可以直接将请求参数传递给一个实体类:
注意必须携带set方法或是构造方法中包含所有参数,请求参数会自动根据类中的字段名称进行匹配:
@RequestMapping(value = "/index")
public ModelAndView index(User user){
    System.out.println("获取到cookie值为:"+user);
    return new ModelAndView("index");
}
@RequestHeader与@RequestParam用法一致,不过它是用于获取请求头参数的,这里就不再演示了。

@CookieValue和@SessionAttrbutie
通过使用@CookieValue注解,我们也可以快速获取请求携带的Cookie信息:
@RequestMapping(value = "/index")
public ModelAndView index(HttpServletResponse response,
                          @CookieValue(value = "test", required = false) String test){
    System.out.println("获取到cookie值为:"+test);
    response.addCookie(new Cookie("test", "lbwnb"));
    return new ModelAndView("index");
}


同样的,Session也能使用注解快速获取:
@RequestMapping(value = "/index")
public ModelAndView index(@SessionAttribute(value = "test", required = false) String test,
                          HttpSession session){
    session.setAttribute("test", "xxxx");
    System.out.println(test);
    return new ModelAndView("index");
}
可以发现,通过使用SpringMVC框架,整个Web应用程序的开发变得非常简单,大部分功能只需要一个注解就可以搞定了,正是得益于Spring框架,SpringMVC才能大显身手。


    </dependency>
    <dependency>
        <groupId>org.slf4j</groupId>
        <artifactId>slf4j-api</artifactId>
        <version>1.7.33</version>
    </dependency>
    <dependency>
        <groupId>org.slf4j</groupId>
        <artifactId>slf4j-jdk14</artifactId>
        <version>1.7.33</version>
    </dependency>

</dependencies>

<build>
    <plugins>
        <plugin>
            <groupId>org.apache.maven.plugins</groupId>
            <artifactId>maven-war-plugin</artifactId>
            <version>3.3.2</version>
        </plugin>
        <plugin>
            <groupId>org.apache.maven.plugins</groupId>
            <artifactId>maven-compiler-plugin</artifactId>
            <version>3.11.0</version>
            <configuration>
                <compilerArgs>
                    <arg>-parameters</arg>
                </compilerArgs>
            </configuration>
        </plugin>
    </plugins>
</build>
错误log显示
重定向和请求转发
重定向和请求转发也非常简单,我们只需要在视图名称前面添加一个前缀即可,比如重定向:
@RequestMapping("/index")
public String index(){
    return "redirect:home";
}

@RequestMapping("/home")
public String home(){
    return "home";
}

通过添加redirect:前缀,就可以很方便地实现重定向,那么请求转发呢,其实也是一样的,使用forward:前缀表示转发给其他请求映射:
@RequestMapping("/index")
public String index(){
    return "forward:home";
}

@RequestMapping("/home")
public String home(){
    return "home";
}
使用SpringMVC,只需要一个前缀就可以实现重定向和请求转发,非常方便。
forward 内部转发, 浏览器不现实home


Bean的Web作用域
在学习Spring时我们讲解了Bean的作用域,包括singleton和prototype,Bean分别会以单例和多例模式进行创建,而在SpringMVC中,它的作用域被继续细分:
- request:对于每次HTTP请求,使用request作用域定义的Bean都将产生一个新实例,请求结束后Bean也消失。
- session:对于每一个会话,使用session作用域定义的Bean都将产生一个新实例,会话过期后Bean也消失。
- global session:不常用,不做讲解。
这里我们创建一个测试类来试试看:
接着将其注册为Bean,注意这里需要添加@RequestScope或是@SessionScope表示此Bean的Web作用域:
接着我们将其自动注入到Controller中:
@Controller
public class MainController {

    @Resource
    TestBean bean;

    @RequestMapping(value = "/index")
    public ModelAndView index(){
        System.out.println(bean);
        return new ModelAndView("index");
    }
}
我们发现,每次发起得到的Bean实例都不同,接着我们将其作用域修改为@SessionScope,这样作用域就上升到Session,只要清理浏览器的Cookie,那么都会被认为是同一个会话,只要是同一个会话,那么Bean实例始终不变。
实际上,它也是通过代理实现的,我们调用Bean中的方法会被转发到真正的Bean对象去执行。


RestFul风格
中文释义为“表现层状态转换”(名字挺高大上的),它不是一种标准,而是一种设计风格。它的主要作用是充分并正确利用HTTP协议的特性,规范资源获取的URI路径。通俗的讲,RESTful风格的设计允许将参数通过URL拼接传到服务端,目的是让URL看起来更简洁实用,并且我们可以充分使用多种HTTP请求方式(POST/GET/PUT/DELETE),来执行相同请求地址的不同类型操作。
因此,这种风格的连接,我们就可以直接从请求路径中读取参数,比如:
我们可以直接将index的下一级路径作为请求参数进行处理,也就是说现在的请求参数包含在了请求路径中:
@RequestMapping("/index/{str}")
public String index(@PathVariable String str) {
    System.out.println(str);
    return "index";
}
注意请求路径我们可以手动添加类似占位符一样的信息,这样占位符位置的所有内容都会被作为请求参数,而方法的形参列表中必须包括一个与占位符同名的并且添加了@PathVariable注解的参数,或是由@PathVariable注解指定为占位符名称:
@RequestMapping("/index/{str}")
public String index(@PathVariable("str") String text){
    System.out.println(text);
    return "index";
}
如果没有配置正确,方法名称上会出现黄线。


我们可以按照不同功能进行划分:
- POST http://localhost:8080/mvc/index - 添加用户信息,携带表单数据
- GET http://localhost:8080/mvc/index/{id} - 获取用户信息,id直接放在请求路径中
- PUT http://localhost:8080/mvc/index - 修改用户信息,携带表单数据
- DELETE http://localhost:8080/mvc/index/{id} - 删除用户信息,id直接放在请求路径中
我们分别编写四个请求映射:
@Controller
public class MainController {

    @RequestMapping(value = "/index/{id}", method = RequestMethod.GET)
    public String get(@PathVariable("id") String text){
        System.out.println("获取用户:"+text);
        return "index";
    }

    @RequestMapping(value = "/index", method = RequestMethod.POST)
    public String post(String username){
        System.out.println("添加用户:"+username);
        return "index";
    }

    @RequestMapping(value = "/index/{id}", method = RequestMethod.DELETE)
    public String delete(@PathVariable("id") String text){
        System.out.println("删除用户:"+text);
        return "index";
    }

    @RequestMapping(value = "/index", method = RequestMethod.PUT)
    public String put(String username){
        System.out.println("修改用户:"+username);
        return "index";
    }
}
这只是一种设计风格而已,各位小伙伴了解即可。
Interceptor拦截器
拦截器是整个SpringMVC的一个重要内容,拦截器与过滤器类似,都是用于拦截一些非法请求,但是我们之前讲解的过滤器是作用于Servlet之前,只有经过层层的过滤器才可以成功到达Servlet,而拦截器并不是在Servlet之前,它在Servlet与RequestMapping之间,相当于DispatcherServlet在将请求交给对应Controller中的方法之前进行拦截处理,它只会拦截所有Controller中定义的请求映射对应的请求(不会拦截静态资源),这里一定要区分两者的不同。
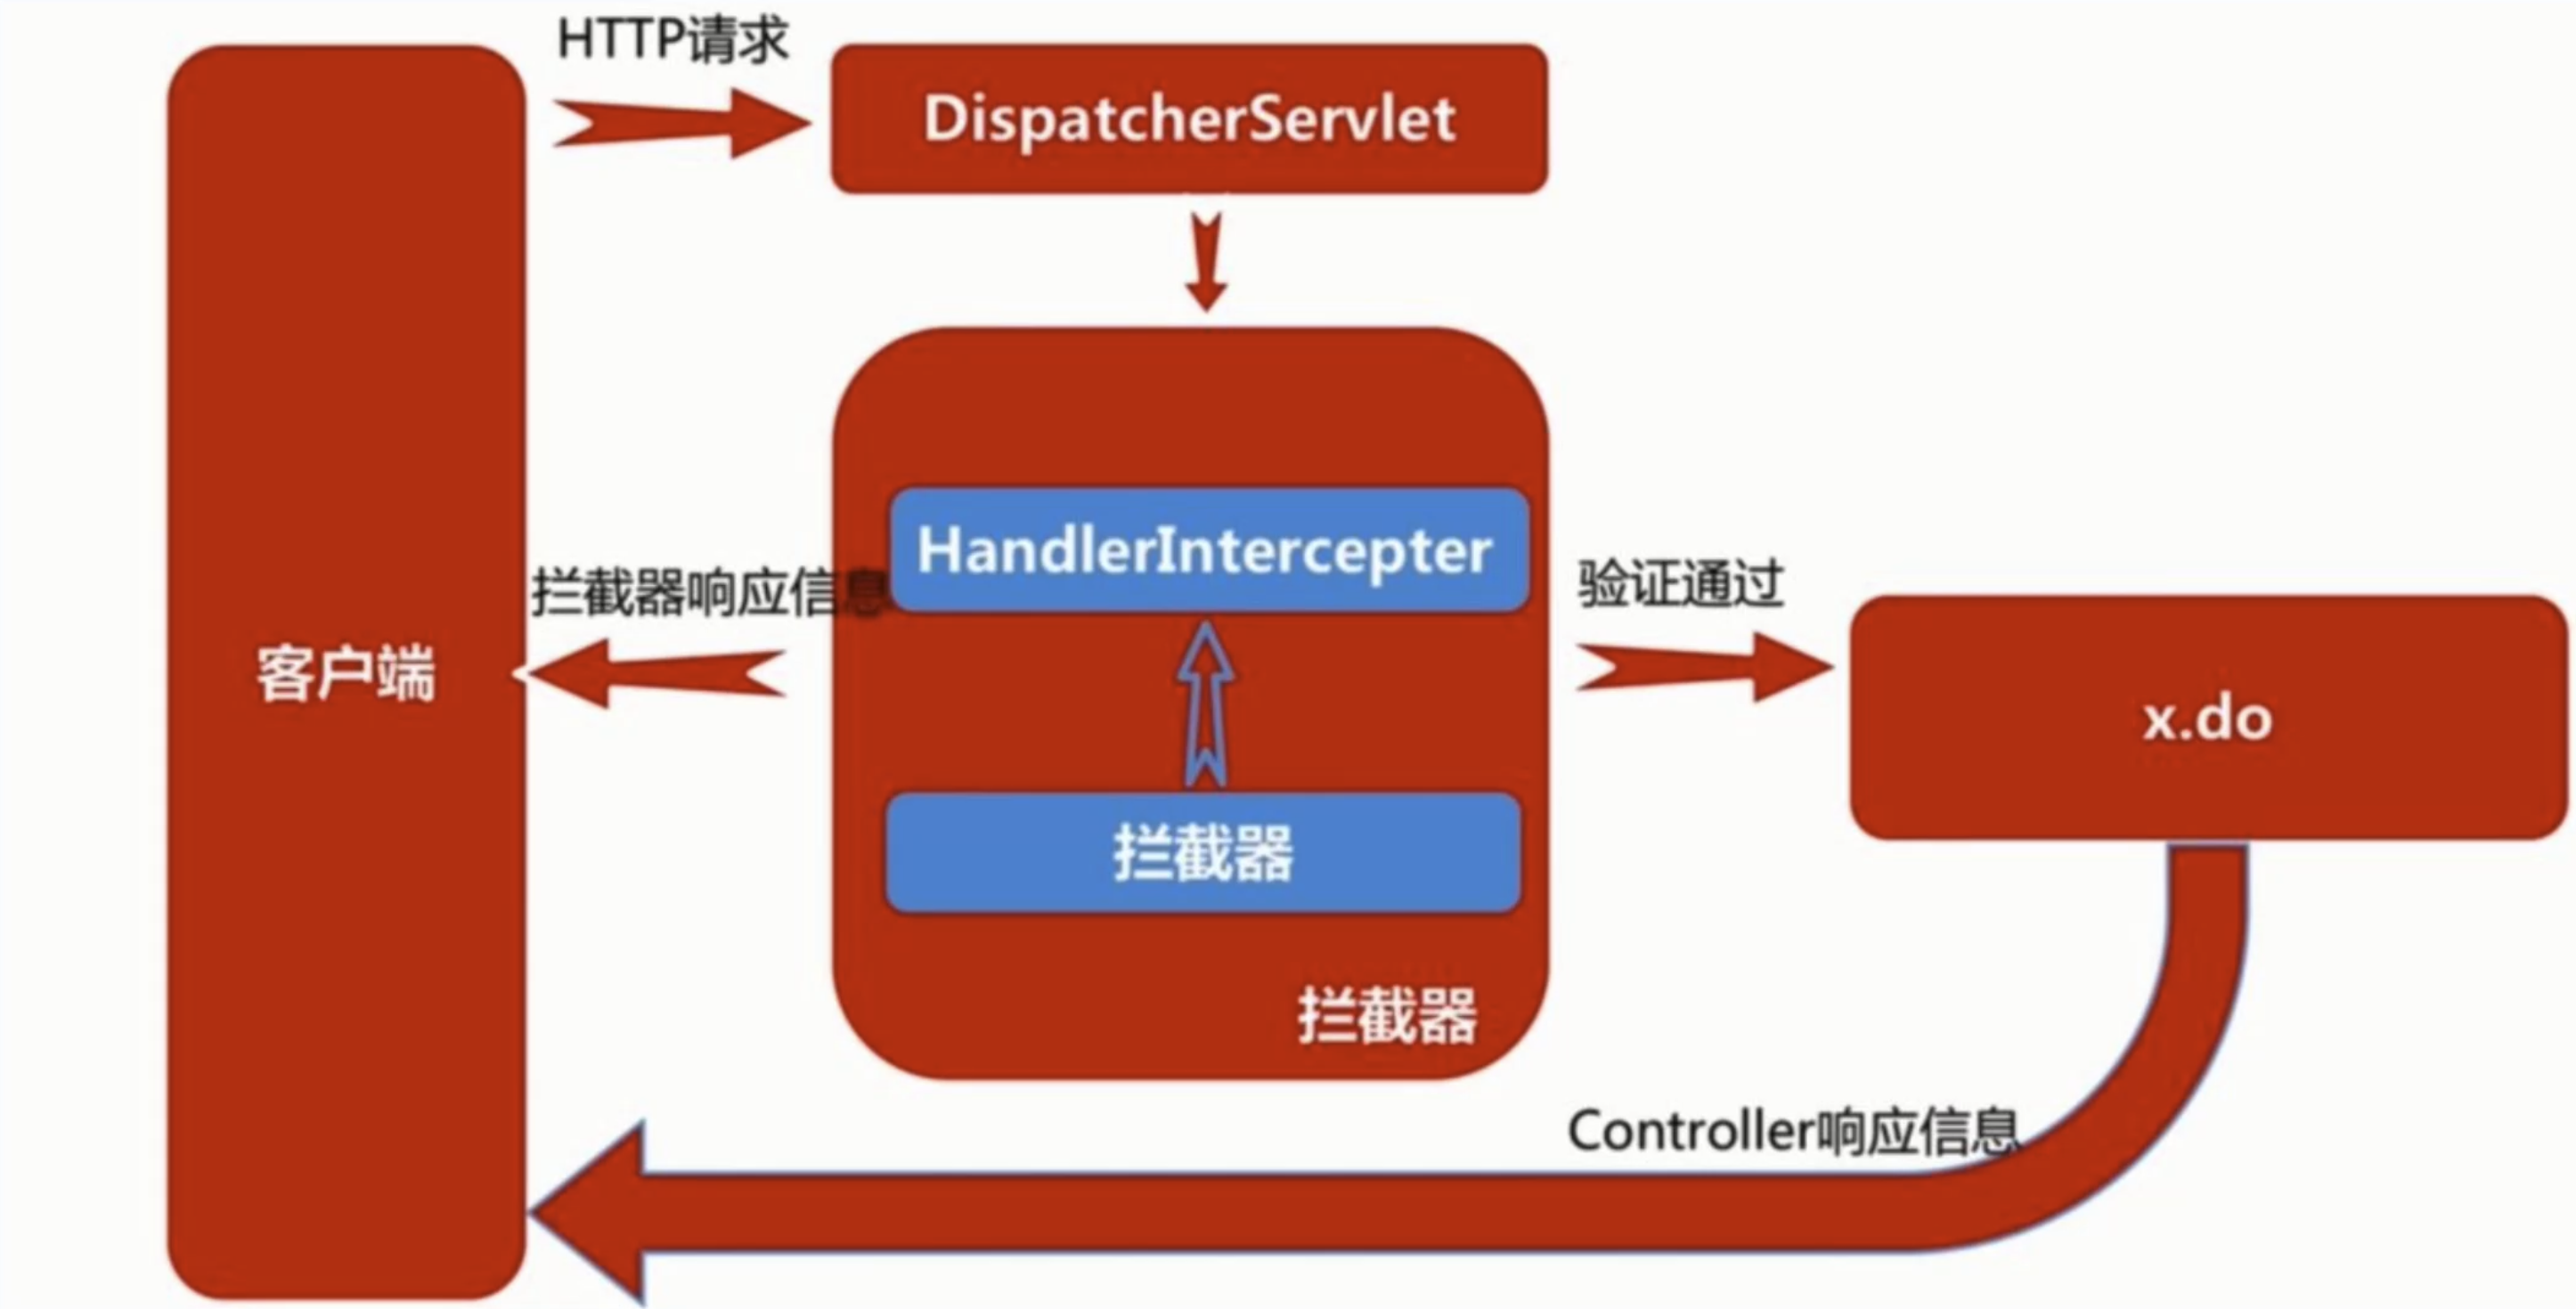
创建拦截器
创建一个拦截器我们需要实现一个HandlerInterceptor接口:
public class MainInterceptor implements HandlerInterceptor {
    @Override
    public boolean preHandle(HttpServletRequest request, HttpServletResponse response, Object handler) throws Exception {
        System.out.println("我是处理之前!");
        return true;   //只有返回true才会继续,否则直接结束
    }

    @Override
    public void postHandle(HttpServletRequest request, HttpServletResponse response, Object handler, ModelAndView modelAndView) throws Exception {
        System.out.println("我是处理之后!");
    }

    @Override
    public void afterCompletion(HttpServletRequest request, HttpServletResponse response, Object handler, Exception ex) throws Exception {
        //在DispatcherServlet完全处理完请求后被调用
        System.out.println("我是完成之后!");
    }
}
接着我们需要在配置类中进行注册:
@Override
public void addInterceptors(InterceptorRegistry registry) {
    registry.addInterceptor(new MainInterceptor())
      .addPathPatterns("/**")    //添加拦截器的匹配路径,只要匹配一律拦截
      .excludePathPatterns("/home");   //拦截器不进行拦截的路径
}
现在我们在浏览器中访问index页面,拦截器已经生效。
得到整理拦截器的执行顺序:
也就是说,处理前和处理后,包含了真正的请求映射的处理,在整个流程结束后还执行了一次afterCompletion方法,其实整个过程与我们之前所认识的Filter类似,不过在处理前,我们只需要返回true或是false表示是否被拦截即可,而不是再去使用FilterChain进行向下传递。


那么我们就来看看,如果处理前返回false,会怎么样:

通过结果发现一旦返回false,之后的所有流程全部取消,那么如果是在处理中发生异常了呢?
@RequestMapping("/index")
public String index(){
    System.out.println("我是处理!");
    if(true) throw new RuntimeException("");
    return "index";
}
结果为:
我们发现如果处理过程中抛出异常,那么久不会执行处理后postHandle方法,但是会执行afterCompletion方法,我们可以在此方法中获取到抛出的异常。

多级拦截器
前面介绍了仅仅只有一个拦截器的情况,我们接着来看如果存在多个拦截器会如何执行,我们以同样的方式创建二号拦截器:
public class SubInterceptor implements HandlerInterceptor {
    @Override
    public boolean preHandle(HttpServletRequest request, HttpServletResponse response, Object handler) throws Exception {
        System.out.println("二号拦截器:我是处理之前!");
        return true;
    }

    @Override
    public void postHandle(HttpServletRequest request, HttpServletResponse response, Object handler, ModelAndView modelAndView) throws Exception {
        System.out.println("二号拦截器:我是处理之后!");
    }

    @Override
    public void afterCompletion(HttpServletRequest request, HttpServletResponse response, Object handler, Exception ex) throws Exception {
        System.out.println("二号拦截器:我是完成之后!");
    }
}
注册二号拦截器:
@Override
public void addInterceptors(InterceptorRegistry registry) {
    //一号拦截器
    registry.addInterceptor(new MainInterceptor()).addPathPatterns("/**").excludePathPatterns("/home");
    //二号拦截器
    registry.addInterceptor(new SubInterceptor()).addPathPatterns("/**");
}
注意拦截顺序就是注册的顺序,因此拦截器会根据注册顺序依次执行,我们可以打开浏览器运行一次:
和多级Filter相同,在处理之前,是按照顺序从前向后进行拦截的,但是处理完成之后,就按照倒序执行处理后方法,而完成后是在所有的postHandle执行之后再同样的以倒序方式执行。

那么如果这时一号拦截器在处理前就返回了false呢?
@Override
public boolean preHandle(HttpServletRequest request, HttpServletResponse response, Object handler) throws Exception {
    System.out.println("一号拦截器:我是处理之前!");
    return false;
}
得到结果如下:
我们发现,与单个拦截器的情况一样,一旦拦截器返回false,那么之后无论有无拦截器,都不再继续。

Exception Handling ✅
When an exception occurs in our request mapping methods, it is directly displayed on the front-end page. This happens because Spring MVC provides a default exception handling page. When an exception occurs, the request is automatically forwarded to a dedicated controller designed to handle exceptions.
We can create a custom exception handling controller so that when a specific exception occurs, it will be redirected to this controller for execution:
当我们的请求映射方法中出现异常时,会直接展示在前端页面,这是因为SpringMVC为我们提供了默认的异常处理页面,当出现异常时,我们的请求会被直接转交给专门用于异常处理的控制器进行处理。
我们可以自定义一个异常处理控制器,一旦出现指定异常,就会转接到此控制器执行:
@ControllerAdvice
public class ErrorController {

    @ExceptionHandler(Exception.class)
    public String error(Exception e, Model model){  //可以直接添加形参来获取异常
        e.printStackTrace();
        model.addAttribute("e", e);
        return "500";
    }
}
Next, let's create a dedicated page to display exceptions:
接着我们编写一个专门显示异常的页面:
<!DOCTYPE html>
<html lang="en">
<head>
    <meta charset="UTF-8">
    <title>Title</title>
</head>
<body>
  500 - 服务器出现了一个内部错误QAQ
  <div th:text="${e}"></div>
</body>
</html>
Next, make the necessary modifications:
接着修改:
@RequestMapping("/index")
public String index(){
    System.out.println("我是处理!");
    if(true) throw new RuntimeException("您的氪金力度不足,无法访问!");
    return "index";
}
After accessing it, we notice that the console outputs the exception details, while the page displayed is our custom error page.
访问后,我们发现控制台会输出异常信息,同时页面也是我们自定义的一个页面。


JSON数据格式与Axios请求
JSON (JavaScript Object Notation, JS 对象简谱) 是一种轻量级的数据交换格式。
我们现在推崇的是前后端分离的开发模式,而不是所有的内容全部交给后端渲染再发送给浏览器,也就是说,整个Web页面的内容在一开始就编写完成了,而其中的数据由前端执行JS代码来向服务器动态获取,再到前端进行渲染(填充),这样可以大幅度减少后端的压力,并且后端只需要传输关键数据即可(在即将到来的SpringBoot阶段,我们将完全采用前后端分离的开发模式)
JSON数据格式
既然要实现前后端分离,那么我们就必须约定一种更加高效的数据传输模式,来向前端页面传输后端提供的数据。因此JSON横空出世,它非常容易理解,并且与前端的兼容性极好,因此现在比较主流的数据传输方式则是通过JSON格式承载的。
一个JSON格式的数据长这样,以学生对象为例:
多个学生可以以数组的形式表示:
嵌套关系可以表示为:
它直接包括了属性的名称和属性的值,与JavaScript的对象极为相似,它到达前端后,可以直接转换为对象,以对象的形式进行操作和内容的读取,相当于以字符串形式表示了一个JS对象,我们可以直接在控制台窗口中测试:
let obj = JSON.parse('{"studentList": [{"name": "杰哥", "age": 18}, {"name": "阿伟", "age": 18}], "count": 2}')
//将JSON格式字符串转换为JS对象
obj.studentList[0].name   //直接访问第一个学生的名称
我们也可以将JS对象转换为JSON字符串:
我们后端就可以以JSON字符串的形式向前端返回数据,这样前端在拿到数据之后,就可以快速获取,非常方便。

那么后端如何快速创建一个JSON格式的数据呢?我们首先需要导入以下依赖:
<dependency>
      <groupId>com.alibaba.fastjson2</groupId>
      <artifactId>fastjson2</artifactId>
      <version>2.0.34</version>
</dependency>
JSON解析框架有很多种,比较常用的是Jackson和FastJSON,这里我们使用阿里巴巴的FastJSON进行解析,这是目前号称最快的JSON解析框架,并且现在已经强势推出FastJSON 2版本。
首先要介绍的是JSONObject,它和Map的使用方法一样,并且是有序的(实现了LinkedHashMap接口),比如我们向其中存放几个数据:
@RequestMapping(value = "/index")
public String index(){
    JSONObject object = new JSONObject();
    object.put("name", "杰哥");
    object.put("age", 18);
    System.out.println(object.toJSONString());   //以JSON格式输出JSONObject字符串
    return "index";
}
最后我们得到的结果为:


实际上JSONObject就是对JSON数据的一种对象表示。同样的还有JSONArray,它表示一个数组,用法和List一样,数组中可以嵌套其他的JSONObject或是JSONArray:
@RequestMapping(value = "/index")
public String index(){
    JSONObject object = new JSONObject();
    object.put("name", "杰哥");
    object.put("age", 18);
    JSONArray array = new JSONArray();
    array.add(object);
    System.out.println(array.toJSONString());
    return "index";
}
得到的结果为:


当出现循环引用时,会按照以下语法来解析:
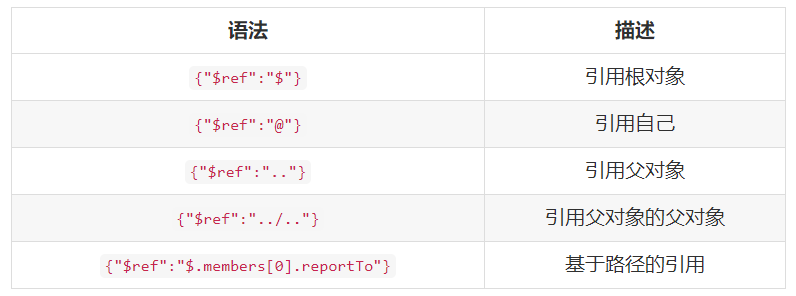
我们可以也直接创建一个实体类,将实体类转换为JSON格式的数据:
@RequestMapping(value = "/index", produces = "application/json")
@ResponseBody
public String data(){
    Student student = new Student();
    student.setName("杰哥");
    student.setAge(18);
    return JSON.toJSONString(student);
}
这里我们修改了produces的值,将返回的内容类型设定为application/json,表示服务器端返回了一个JSON格式的数据(当然不设置也行,也能展示,这样是为了规范)然后我们在方法上添加一个@ResponseBody表示方法返回(也可以在类上添加@RestController表示此Controller默认返回的是字符串数据)的结果不是视图名称而是直接需要返回一个字符串作为页面数据,这样,返回给浏览器的就是我们直接返回的字符串内容。
接着我们使用JSON工具类将其转换为JSON格式的字符串,打开浏览器,得到JSON格式数据。
SpringMVC非常智能,我们可以直接返回一个对象类型,它会被自动转换为JSON字符串格式:
@RequestMapping(value = "/data", produces = "application/json")
@ResponseBody
public Student data(){
    Student student = new Student();
    student.setName("杰哥");
    student.setAge(18);
    return student;
}
注意需要在配置类中添加一下FastJSON转换器,这里需要先添加一个依赖:
<dependency>
    <groupId>com.alibaba.fastjson2</groupId>
    <artifactId>fastjson2-extension-spring6</artifactId>
    <version>2.0.34</version>
</dependency>
然后编写配置:
@Override
public void configureMessageConverters(List<HttpMessageConverter<?>> converters) {
    converters.add(new FastJsonHttpMessageConverter());
}
再次尝试,内容就会自动转换为JSON格式响应给客户端了。


Axios异步请求
前面我们讲解了如何向浏览器发送一个JSON格式的数据,那么我们现在来看看如何向服务器请求数据。
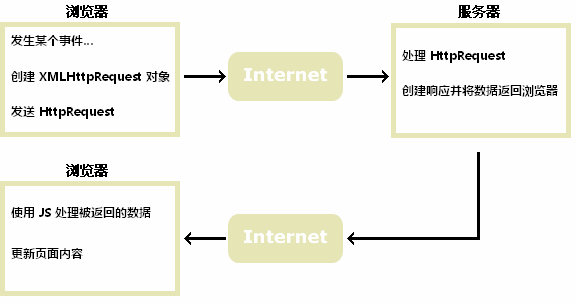
这一部分,我们又要回到前端相关内容的介绍中,当然,我们依然是仅做了解,并不需要详细学习前端项目开发知识。
前端为什么需要用到异步请求,这是因为我们的网页是动态的(这里的动态不是指有动画效果,而是能够实时更新内容)比如我们点击一个按钮会弹出新的内容、或是跳转到新的页面、更新页面中的数据等等,这些都需要通过JS完成异步请求来实现。
前端异步请求指的是在前端中发送请求至服务器或其他资源,并且不阻塞用户界面或其他操作。在传统的同步请求中,当发送请求时,浏览器会等待服务器响应,期间用户无法进行其他操作。而异步请求通过将请求发送到后台,在等待响应的同时,允许用户继续进行其他操作。这种机制能够提升用户体验,并且允许页面进行实时更新。常见的前端异步请求方式包括使用XMLHttpRequest对象、Fetch API、以及使用jQuery库中的AJAX方法,以及目前最常用的Axios框架等。
假设我们后端有一个需要实时刷新的数据(随时间而变化)现在需要再前端实时更新展示,这里我们以axios框架的简单使用为例子,带各位小伙伴体验如何发起异步请求并更新我们页面中的数据。
首先是前端页面,直接抄作业就行:
<!DOCTYPE html>
<html lang="en">
<head>
    <meta charset="UTF-8">
    <title>测试</title>
    <script src="https://unpkg.com/axios@1.1.2/dist/axios.min.js"></script>
</head>
<body>
  <p>欢迎来到GayHub全球最大同性交友网站</p>
  <p>用户名: <span id="username"></span></p>
  <p>密码: <span id="password"></span></p>
</body>
</html>
接着我们使用axios框架直接对后端请求JSON数据:
<script>
    function getInfo() {
        axios.get('/mvc/test').then(({data}) => {
            document.getElementById('username').innerText = data.username
            document.getElementById('password').innerText = data.password
        })
    }
</script>
这样,我们就实现了从服务端获取数据并更新到页面中,前端开发者利用JS发起异步请求,可以实现各种各样的效果,而我们后端开发者只需要关心接口返回正确的数据即可,这就已经有前后端分离开发的雏形了(实际上之前,我们在JavaWeb阶段使用XHR请求也演示过,不过当时是纯粹的数据)


那么我们接着来看,如何向服务端发送一个JS对象数据并进行解析,这里以简单的登录为例:
<!DOCTYPE html>
<html lang="en">
<head>
    <meta charset="UTF-8">
    <title>测试</title>
    <script src="https://unpkg.com/axios@1.1.2/dist/axios.min.js"></script>
</head>
<body>
  <p>欢迎来到GayHub全球最大同性交友网站</p>
  <button onclick="login()">立即登录</button>
</body>
</html>
这里依然使用axios发送POST请求:
<script>
    function login() {
        axios.post('/mvc/test', {
            username: 'test',
            password: '123456'
        }, {
            headers: {
                'Content-Type': 'application/x-www-form-urlencoded'
            }
        }).then(({data}) => {
            if(data.success) {
                alert('登录成功')
            } else {
                alert('登录失败')
            }
        })
    }
</script>
服务器端只需要在请求参数位置添加一个对象接收即可(和前面是一样的,因为这里也是提交的表单数据):
@ResponseBody
@PostMapping(value = "/test", produces = "application/json")
public String hello(String username, String password){
    boolean success = "test".equals(user.getUsername()) && "123456".equals(user.getPassword());
    JSONObject object = new JSONObject();
    object.put("success", success);
    return object.toString();
}
我们也可以将js对象转换为JSON字符串的形式进行传输,这里需要使用ajax方法来处理:
<script>
    function login() {
        axios.post('/mvc/test', {
            username: 'test',
            password: '123456'
        }).then(({data}) => {
            if(data.success) {
                alert('登录成功')
            } else {
                alert('登录失败')
            }
        })
    }
</script>
如果我们需要读取前端发送给我们的JSON格式数据,那么这个时候就需要添加@RequestBody注解:
@ResponseBody
@PostMapping(value = "/test", produces = "application/json")
public String hello(@RequestBody User user){
    boolean success = "test".equals(user.getUsername()) && "123456".equals(user.getPassword());
    JSONObject object = new JSONObject();
    object.put("success", success);
    return object.toString();
}
这样,我们就实现了前后端使用JSON字符串进行通信。


实现文件上传和下载
利用SpringMVC,我们可以很轻松地实现文件上传和下载,我们需要在MainInitializer中添加一个新的方法:
public class MainInitializer extends AbstractAnnotationConfigDispatcherServletInitializer {

    ...

    @Override
    protected void customizeRegistration(ServletRegistration.Dynamic registration) {
        // 直接通过registration配置Multipart相关配置,必须配置临时上传路径,建议选择方便打开的
        // 同样可以设置其他属性:maxFileSize, maxRequestSize, fileSizeThreshold
        registration.setMultipartConfig(new MultipartConfigElement("/Users/nagocoler/Download"));
    }
}
接着我们直接编写Controller即可:
@RequestMapping(value = "/upload", method = RequestMethod.POST)
@ResponseBody
public String upload(@RequestParam MultipartFile file) throws IOException {
    File fileObj = new File("test.png");
    file.transferTo(fileObj);
    System.out.println("用户上传的文件已保存到:"+fileObj.getAbsolutePath());
    return "文件上传成功!";
}
最后在前端添加一个文件的上传点:
<div>
    <form action="upload" method="post" enctype="multipart/form-data">
        <input type="file" name="file">
        <input type="submit">
    </form>
</div>
这样,点击提交之后,文件就会上传到服务器了。


下载其实和我们之前的写法大致一样,直接使用HttpServletResponse,并向输出流中传输数据即可。
@RequestMapping(value = "/download", method = RequestMethod.GET)
@ResponseBody
public void download(HttpServletResponse response){
    response.setContentType("multipart/form-data");
    try(OutputStream stream = response.getOutputStream();
        InputStream inputStream = new FileInputStream("test.png")){
        IOUtils.copy(inputStream, stream);
    }catch (IOException e){
        e.printStackTrace();
    }
}
在前端页面中添加一个下载点:
<dependency>
    <groupId>commons-io</groupId>
    <artifactId>commons-io</artifactId>
    <version>2.5</version>
</dependency>
if IOUtils.copy not work
https://stackoverflow.com/questions/16535032/what-to-import-to-use-ioutils-tostring


解读DispatcherServlet源码
到目前为止,关于SpringMVC的相关内容就学习得差不多了,但是我们在最后还是需要深入了解一下DispatcherServlet底层是如何进行调度的,因此,我们会从源码角度进行讲解。
首先我们需要找到DispatcherServlet的最顶层HttpServletBean,在这里直接继承的HttpServlet,那么我们首先来看一下,它在初始化方法中做了什么:
public final void init() throws ServletException {
    //读取配置参数,并进行配置
    PropertyValues pvs = new HttpServletBean.ServletConfigPropertyValues(this.getServletConfig(), this.requiredProperties);
    if (!pvs.isEmpty()) {
        try {
            BeanWrapper bw = PropertyAccessorFactory.forBeanPropertyAccess(this);
            ResourceLoader resourceLoader = new ServletContextResourceLoader(this.getServletContext());
            bw.registerCustomEditor(Resource.class, new ResourceEditor(resourceLoader, this.getEnvironment()));
            this.initBeanWrapper(bw);
            bw.setPropertyValues(pvs, true);
        } catch (BeansException var4) {
            if (this.logger.isErrorEnabled()) {
                this.logger.error("Failed to set bean properties on servlet '" + this.getServletName() + "'", var4);
            }

            throw var4;
        }
    }
        //此初始化阶段由子类实现,
    this.initServletBean();
}
我们接着来看initServletBean()方法是如何实现的,它是在子类FrameworkServlet中定义的:
protected final void initServletBean() throws ServletException {
    this.getServletContext().log("Initializing Spring " + this.getClass().getSimpleName() + " '" + this.getServletName() + "'");
    if (this.logger.isInfoEnabled()) {
        this.logger.info("Initializing Servlet '" + this.getServletName() + "'");
    }

    long startTime = System.currentTimeMillis();

    try {
        //注意:我们在一开始说了SpringMVC有两个容器,一个是Web容器一个是根容器
        //Web容器只负责Controller等表现层内容
        //根容器就是Spring容器,它负责Service、Dao等,并且它是Web容器的父容器。
        //初始化WebApplicationContext,这个阶段会为根容器和Web容器进行父子关系建立
        this.webApplicationContext = this.initWebApplicationContext();
        this.initFrameworkServlet();
    } catch (RuntimeException | ServletException var4) {
      //...以下内容全是打印日志
}
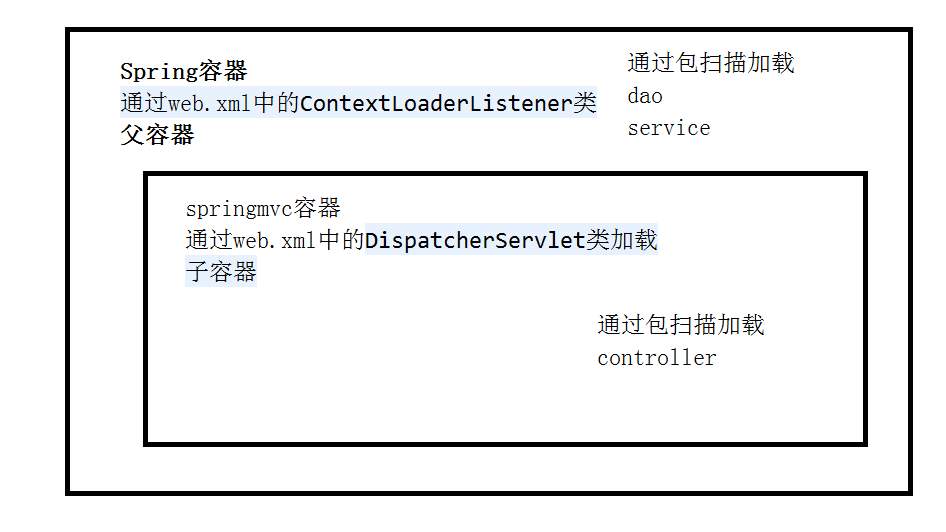
我们来看看initWebApplicationContext是如何进行初始化的:
protected WebApplicationContext initWebApplicationContext() {
    //这里获取的是根容器,一般用于配置Service、数据源等
    WebApplicationContext rootContext = WebApplicationContextUtils.getWebApplicationContext(this.getServletContext());
    WebApplicationContext wac = null;
    if (this.webApplicationContext != null) {
        //如果webApplicationContext在之前已经存在,则直接给到wac
        wac = this.webApplicationContext;
        if (wac instanceof ConfigurableWebApplicationContext) {
            ConfigurableWebApplicationContext cwac = (ConfigurableWebApplicationContext)wac;
            if (!cwac.isActive()) {
                if (cwac.getParent() == null) {
                    //设定根容器为Web容器的父容器
                    cwac.setParent(rootContext);
                }

                this.configureAndRefreshWebApplicationContext(cwac);
            }
        }
    }

    if (wac == null) {
        //如果webApplicationContext是空,那么就从ServletContext找一下有没有初始化上下文
        wac = this.findWebApplicationContext();
    }

    if (wac == null) {
        //如果还是找不到,直接创个新的,并直接将根容器作为父容器
        wac = this.createWebApplicationContext(rootContext);
    }

    if (!this.refreshEventReceived) {
        synchronized(this.onRefreshMonitor) {
            //此方法由DispatcherServlet实现
            this.onRefresh(wac);
        }
    }

    if (this.publishContext) {
        String attrName = this.getServletContextAttributeName();
        //把Web容器丢进ServletContext
        this.getServletContext().setAttribute(attrName, wac);
    }

    return wac;
}
我们接着来看DispatcherServlet中实现的onRefresh()方法:
@Override
protected void onRefresh(ApplicationContext context) {
    initStrategies(context);
}

protected void initStrategies(ApplicationContext context) {
    //初始化各种解析器
    initMultipartResolver(context);
    initLocaleResolver(context);
    initThemeResolver(context);
    //在容器中查找所有的HandlerMapping,放入集合中
    //HandlerMapping保存了所有的请求映射信息(Controller中定义的),它可以根据请求找到处理器Handler,但并不是简单的返回处理器,而是将处理器和拦截器封装,形成一个处理器执行链(类似于之前的Filter)
    initHandlerMappings(context);
    //在容器中查找所有的HandlerAdapter,它用于处理请求并返回ModelAndView对象
    //默认有三种实现HttpRequestHandlerAdapter,SimpleControllerHandlerAdapter和AnnotationMethodHandlerAdapter
    //当HandlerMapping找到处理请求的Controller之后,会选择一个合适的HandlerAdapter处理请求
    //比如我们之前使用的是注解方式配置Controller,现在有一个请求携带了一个参数,那么HandlerAdapter会对请求的数据进行解析,并传入方法作为实参,最后根据方法的返回值将其封装为ModelAndView对象
    initHandlerAdapters(context);
    //其他的内容
    initHandlerExceptionResolvers(context);
    initRequestToViewNameTranslator(context);
    initViewResolvers(context);
    initFlashMapManager(context);
}
DispatcherServlet初始化过程我们已经了解了,那么我们接着来看DispatcherServlet是如何进行调度的,首先我们的请求肯定会经过HttpServlet,然后其交给对应的doGet、doPost等方法进行处理,而在FrameworkServlet中,这些方法都被重写,并且使用processRequest来进行处理:
protected final void doGet(HttpServletRequest request, HttpServletResponse response) throws ServletException, IOException {
    this.processRequest(request, response);
}

protected final void doPost(HttpServletRequest request, HttpServletResponse response) throws ServletException, IOException {
    this.processRequest(request, response);
}
我们来看看processRequest做了什么:
protected final void processRequest(HttpServletRequest request, HttpServletResponse response) throws ServletException, IOException {
    //前期准备工作
    long startTime = System.currentTimeMillis();
    Throwable failureCause = null;
    LocaleContext previousLocaleContext = LocaleContextHolder.getLocaleContext();
    LocaleContext localeContext = this.buildLocaleContext(request);
    RequestAttributes previousAttributes = RequestContextHolder.getRequestAttributes();
    ServletRequestAttributes requestAttributes = this.buildRequestAttributes(request, response, previousAttributes);
    WebAsyncManager asyncManager = WebAsyncUtils.getAsyncManager(request);
    asyncManager.registerCallableInterceptor(FrameworkServlet.class.getName(), new FrameworkServlet.RequestBindingInterceptor());
    this.initContextHolders(request, localeContext, requestAttributes);

    try {
        //重点在这里,这里进行了Service的执行,不过是在DispatcherServlet中定义的
        this.doService(request, response);
    } catch (IOException | ServletException var16) {
        //...
}
请各位一定要耐心,这些大型框架的底层一般都是层层套娃,因为这样写起来层次会更加清晰,那么我们来看看DispatcherServlet中是如何实现的:
protected void doService(HttpServletRequest request, HttpServletResponse response) throws Exception {
   //...
    try {
        //重点在这里,这才是整个处理过程中最核心的部分
        this.doDispatch(request, response);
    } finally {
        //...
}
终于找到最核心的部分了:
protected void doDispatch(HttpServletRequest request, HttpServletResponse response) throws Exception {
    HttpServletRequest processedRequest = request;
    HandlerExecutionChain mappedHandler = null;
    boolean multipartRequestParsed = false;
    WebAsyncManager asyncManager = WebAsyncUtils.getAsyncManager(request);

    try {
        try {
            ModelAndView mv = null;
            Object dispatchException = null;

            try {
                processedRequest = this.checkMultipart(request);
                multipartRequestParsed = processedRequest != request;
                //在HandlerMapping集合中寻找可以处理当前请求的HandlerMapping
                mappedHandler = this.getHandler(processedRequest);
                if (mappedHandler == null) {
                    this.noHandlerFound(processedRequest, response);
                    //找不到HandlerMapping则无法进行处理
                    return;
                }

                //根据HandlerMapping提供的信息,找到可以处理的HandlerAdapter
                HandlerAdapter ha = this.getHandlerAdapter(mappedHandler.getHandler());
                String method = request.getMethod();
                boolean isGet = HttpMethod.GET.matches(method);
                if (isGet || HttpMethod.HEAD.matches(method)) {
                    long lastModified = ha.getLastModified(request, mappedHandler.getHandler());
                    if ((new ServletWebRequest(request, response)).checkNotModified(lastModified) && isGet) {
                        return;
                    }
                }

                //执行所有拦截器的preHandle()方法
                if (!mappedHandler.applyPreHandle(processedRequest, response)) {
                    return;
                }

                //使用HandlerAdapter进行处理(我们编写的请求映射方法在这个位置才真正地执行了)
                //HandlerAdapter会帮助我们将请求的数据进行处理,再来调用我们编写的请求映射方法
                //最后HandlerAdapter会将结果封装为ModelAndView返回给mv
                mv = ha.handle(processedRequest, response, mappedHandler.getHandler());
                if (asyncManager.isConcurrentHandlingStarted()) {
                    return;
                }

                this.applyDefaultViewName(processedRequest, mv);
                //执行所有拦截器的postHandle()方法
                mappedHandler.applyPostHandle(processedRequest, response, mv);
            } catch (Exception var20) {
                dispatchException = var20;
            } catch (Throwable var21) {
                dispatchException = new NestedServletException("Handler dispatch failed", var21);
            }

            //最后处理结果,对视图进行渲染等,如果抛出异常会出现错误页面
            this.processDispatchResult(processedRequest, response, mappedHandler, mv, (Exception)dispatchException);
        } catch (Exception var22) {
            this.triggerAfterCompletion(processedRequest, response, mappedHandler, var22);
        } catch (Throwable var23) {
            this.triggerAfterCompletion(processedRequest, response, mappedHandler, new NestedServletException("Handler processing failed", var23));
        }

    } finally {
        if (asyncManager.isConcurrentHandlingStarted()) {
            if (mappedHandler != null) {
                mappedHandler.applyAfterConcurrentHandlingStarted(processedRequest, response);
            }
        } else if (multipartRequestParsed) {
            this.cleanupMultipart(processedRequest);
        }

    }
}
所以,根据以上源码分析得出最终的流程图:
