Angular
Overview
- 1 Angular as a framework
- 2 Angular CLI
- 3 Decorators
- 4 Binding
- 5 Component Interaction
- 6 Components and Templates
- 7 Component Lifecycle
- 8 Forms
- 9 Pipes
- 10 Observable
- 11 Subject
- 12 RxJS Operators
- 13 Dependency Injection
- 14 Service
- 15 HttpClientModule
- 16 Http Interceptors
- 17 Router Guard
- 18 Feature Module
1 What is Angular?
Angular is a Typescript based free and open-source web application framework led by the Angular Team at Google and by a community of individuals and corporations. -Wikipedia
Angular is a component based framework for building scalable applications consisting of a collection of well integrated libraries that cover a wide variety of features including routing, form management, client-server communication and more. -Angular.io
1.1 Angular Version History
| Version | Release Date |
|---|---|
| AngularJS | October 20th, 2010 |
| Angular 2 | September 14th, 2016 |
| Angular 4 | March 23rd, 2017 |
| Angular 5 | November 1st, 2017 |
| Angular 6 | May 4th, 2019 |
| Angular 14 (Stable) | June 8th, 2022 |
1.2 AOT Compilation
- Browsers can only read and understand JavaScript and HTML
- AOT - Ahead Of Time Compilation refers to how Angular will convert Typescript code into efficient JavaScript code during the build phase before the browser downloads and runs that code.
- JIT - Just In Time Compilation was the default before Angular v8
- AOT - Ahead of Time Compilation became the default starting with Angular v9
2 Angular Command Line Interface
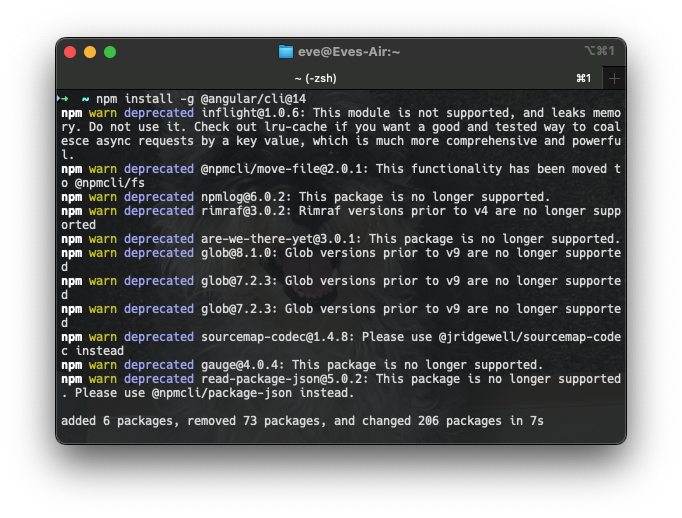
- Install the Angular CLI globally with
npm install -g @angular/cli
a. To install a specific version: i.e. version 14
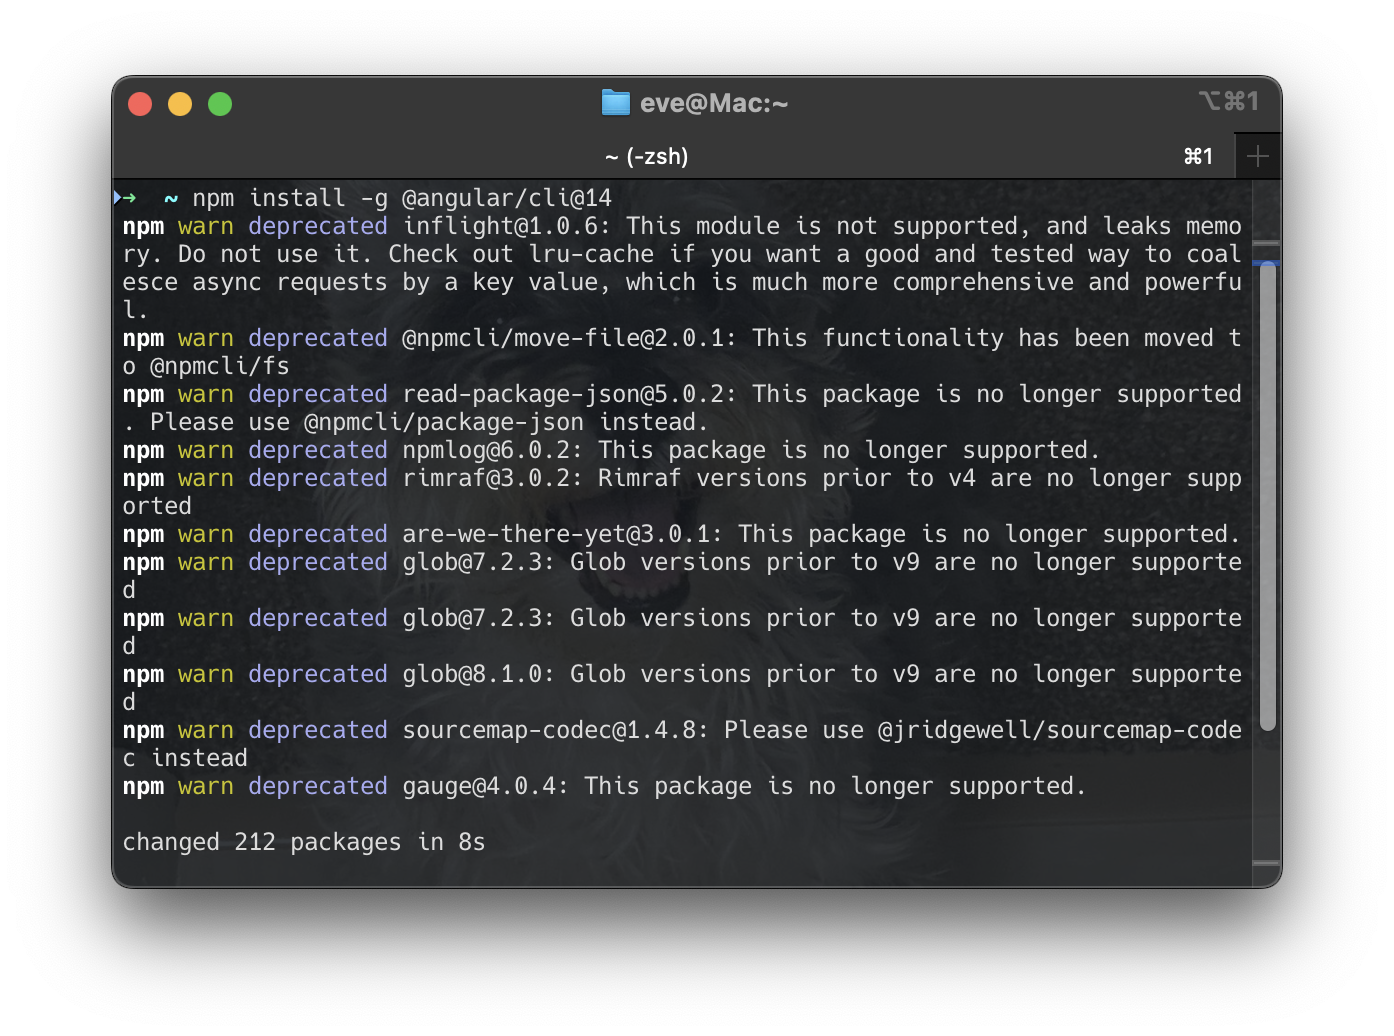
npm install -g @angular/cli@14
- Ng commands
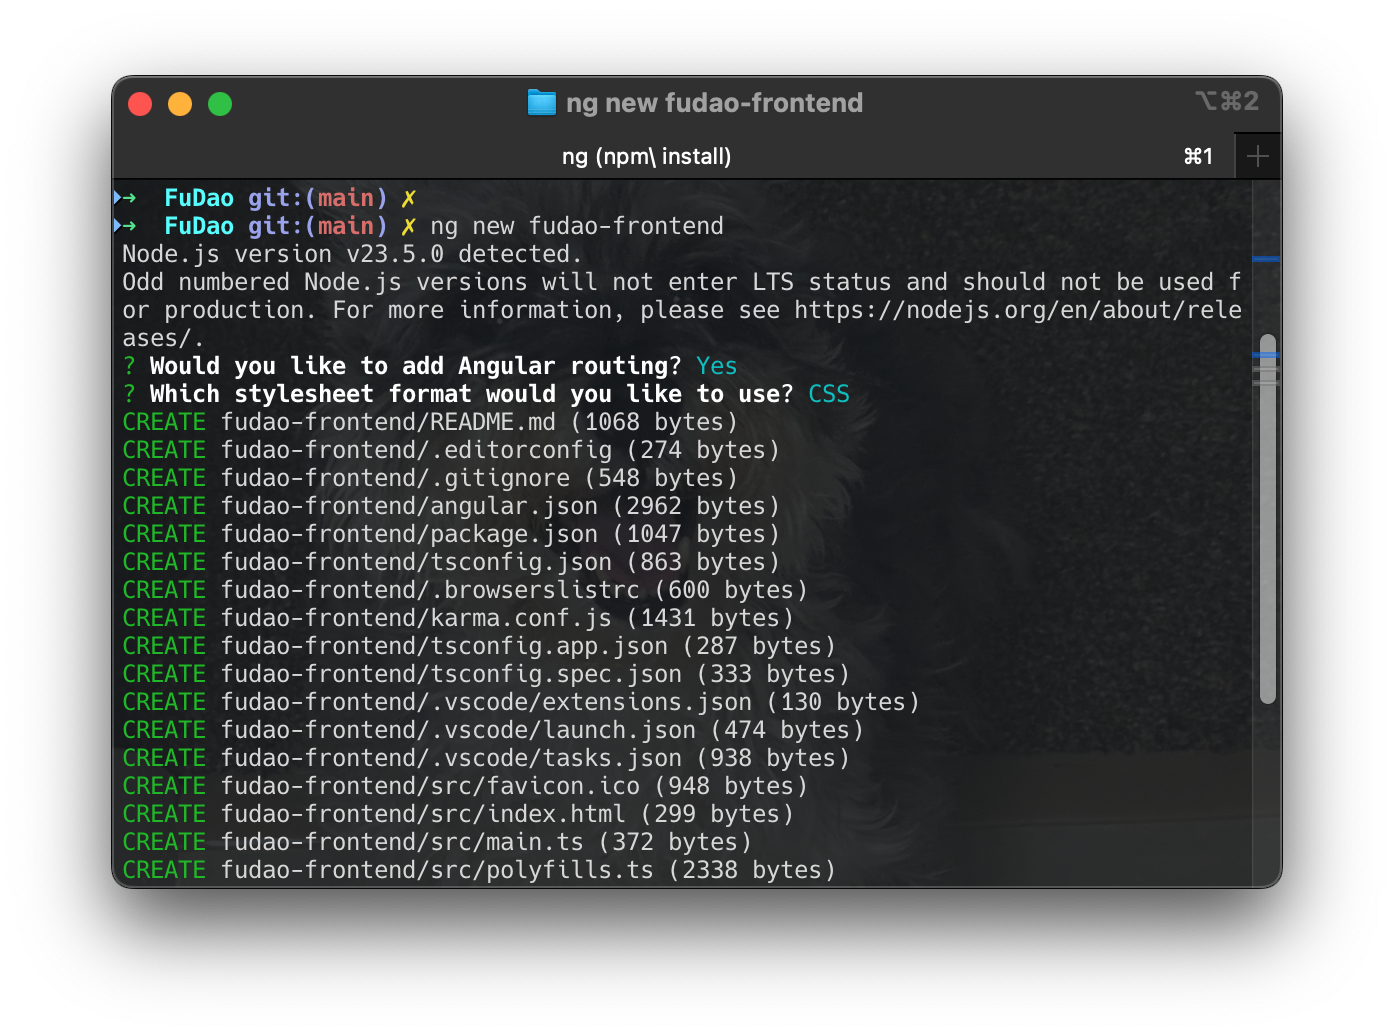
ng new my-project / ng n my-project
ng serve / ng s
ng generate <schematic>/ ng g <schematic>
- https://angular.io/cli
➜  fudao-frontend git:(main) ✗ ng serve
✔ Browser application bundle generation complete.

Initial Chunk Files   | Names         |  Raw Size
vendor.js             | vendor        |   2.12 MB |
polyfills.js          | polyfills     | 317.45 kB |
styles.css, styles.js | styles        | 209.53 kB |
main.js               | main          |  49.86 kB |
runtime.js            | runtime       |   6.53 kB |

                      | Initial Total |   2.69 MB

Build at: 2025-01-16T21:01:41.220Z - Hash: 252d139d50a85d1f - Time: 2004ms

Error: node_modules/@types/node/stream/web.d.ts:487:13 - error TS2502: 'ReadableByteStreamController' is referenced directly or indirectly in its own type annotation.

487         var ReadableByteStreamController: typeof globalThis extends
                ~~~~~~~~~~~~~~~~~~~~~~~~~~~~


Error: node_modules/@types/node/stream/web.d.ts:506:13 - error TS2502: 'ReadableStreamBYOBReader' is referenced directly or indirectly in its own type annotation.

506         var ReadableStreamBYOBReader: typeof globalThis extends { onmessage: any; ReadableStreamBYOBReader: infer T }
                ~~~~~~~~~~~~~~~~~~~~~~~~


Error: node_modules/@types/node/stream/web.d.ts:516:13 - error TS2502: 'ReadableStreamBYOBRequest' is referenced directly or indirectly in its own type annotation.

516         var ReadableStreamBYOBRequest: typeof globalThis extends { onmessage: any; ReadableStreamBYOBRequest: infer T }
                ~~~~~~~~~~~~~~~~~~~~~~~~~


** Angular Live Development Server is listening on localhost:4200, open your browser on http://localhost:4200/ **


✖ Failed to compile.
Solution:
brew link --overwrite node@18
node-v
npm uninstall @types/node
npm install @types/node@18 --save-dev
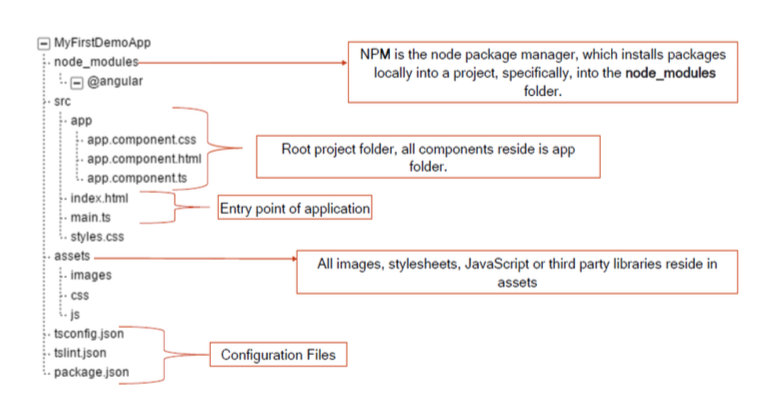
2.1 Angular Project File Tree

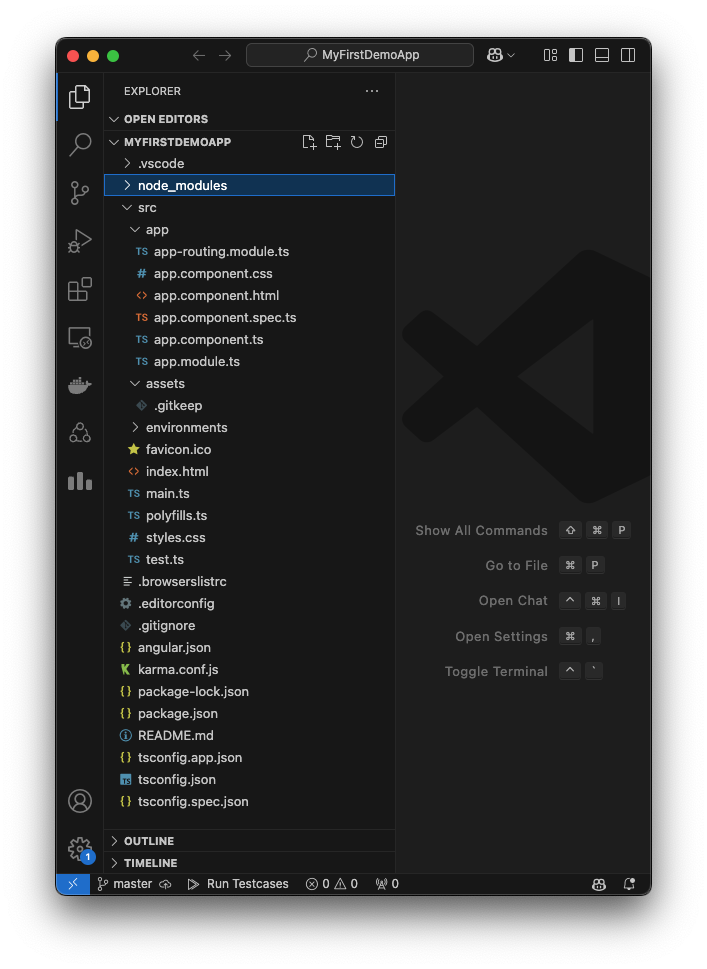
node_moudules: NPM is the node package manager, which installs packages locally into a project, specifically, into the node_modules folder.
src/app: Root project folder, all components reside is app folder.
src/index.html, src/main.ts, src/styles.css : Entry point of application
assets: All images, stylesheets, JavaScript or third party libraries reside in assets
tsconfig.json, package.json: Configuration Files
2.2 Angular Architecture
2.3 Component Based Architecture
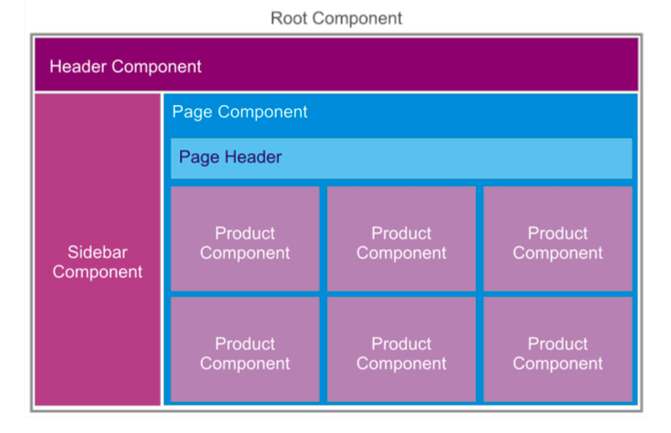
- Angular is a platform and framework for building single-page applications (SPA) using HTML and Typescript. It implements core and optional functionality as a set of Typescript libraries that you import into your applications.
- The basic building blocks of the Angular framework are Angular components that are organized into NgModules
2.4 Running An Angular Application
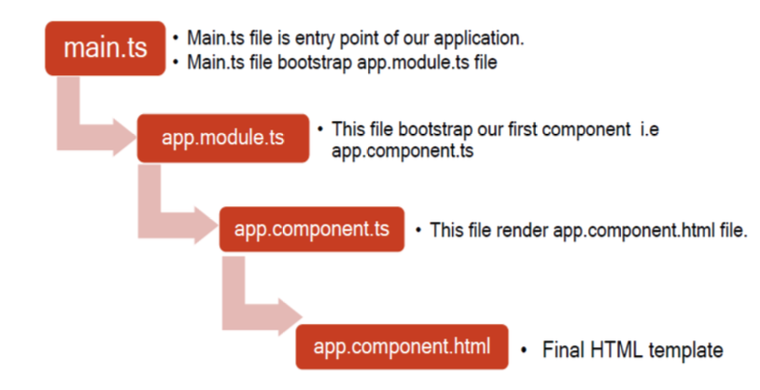
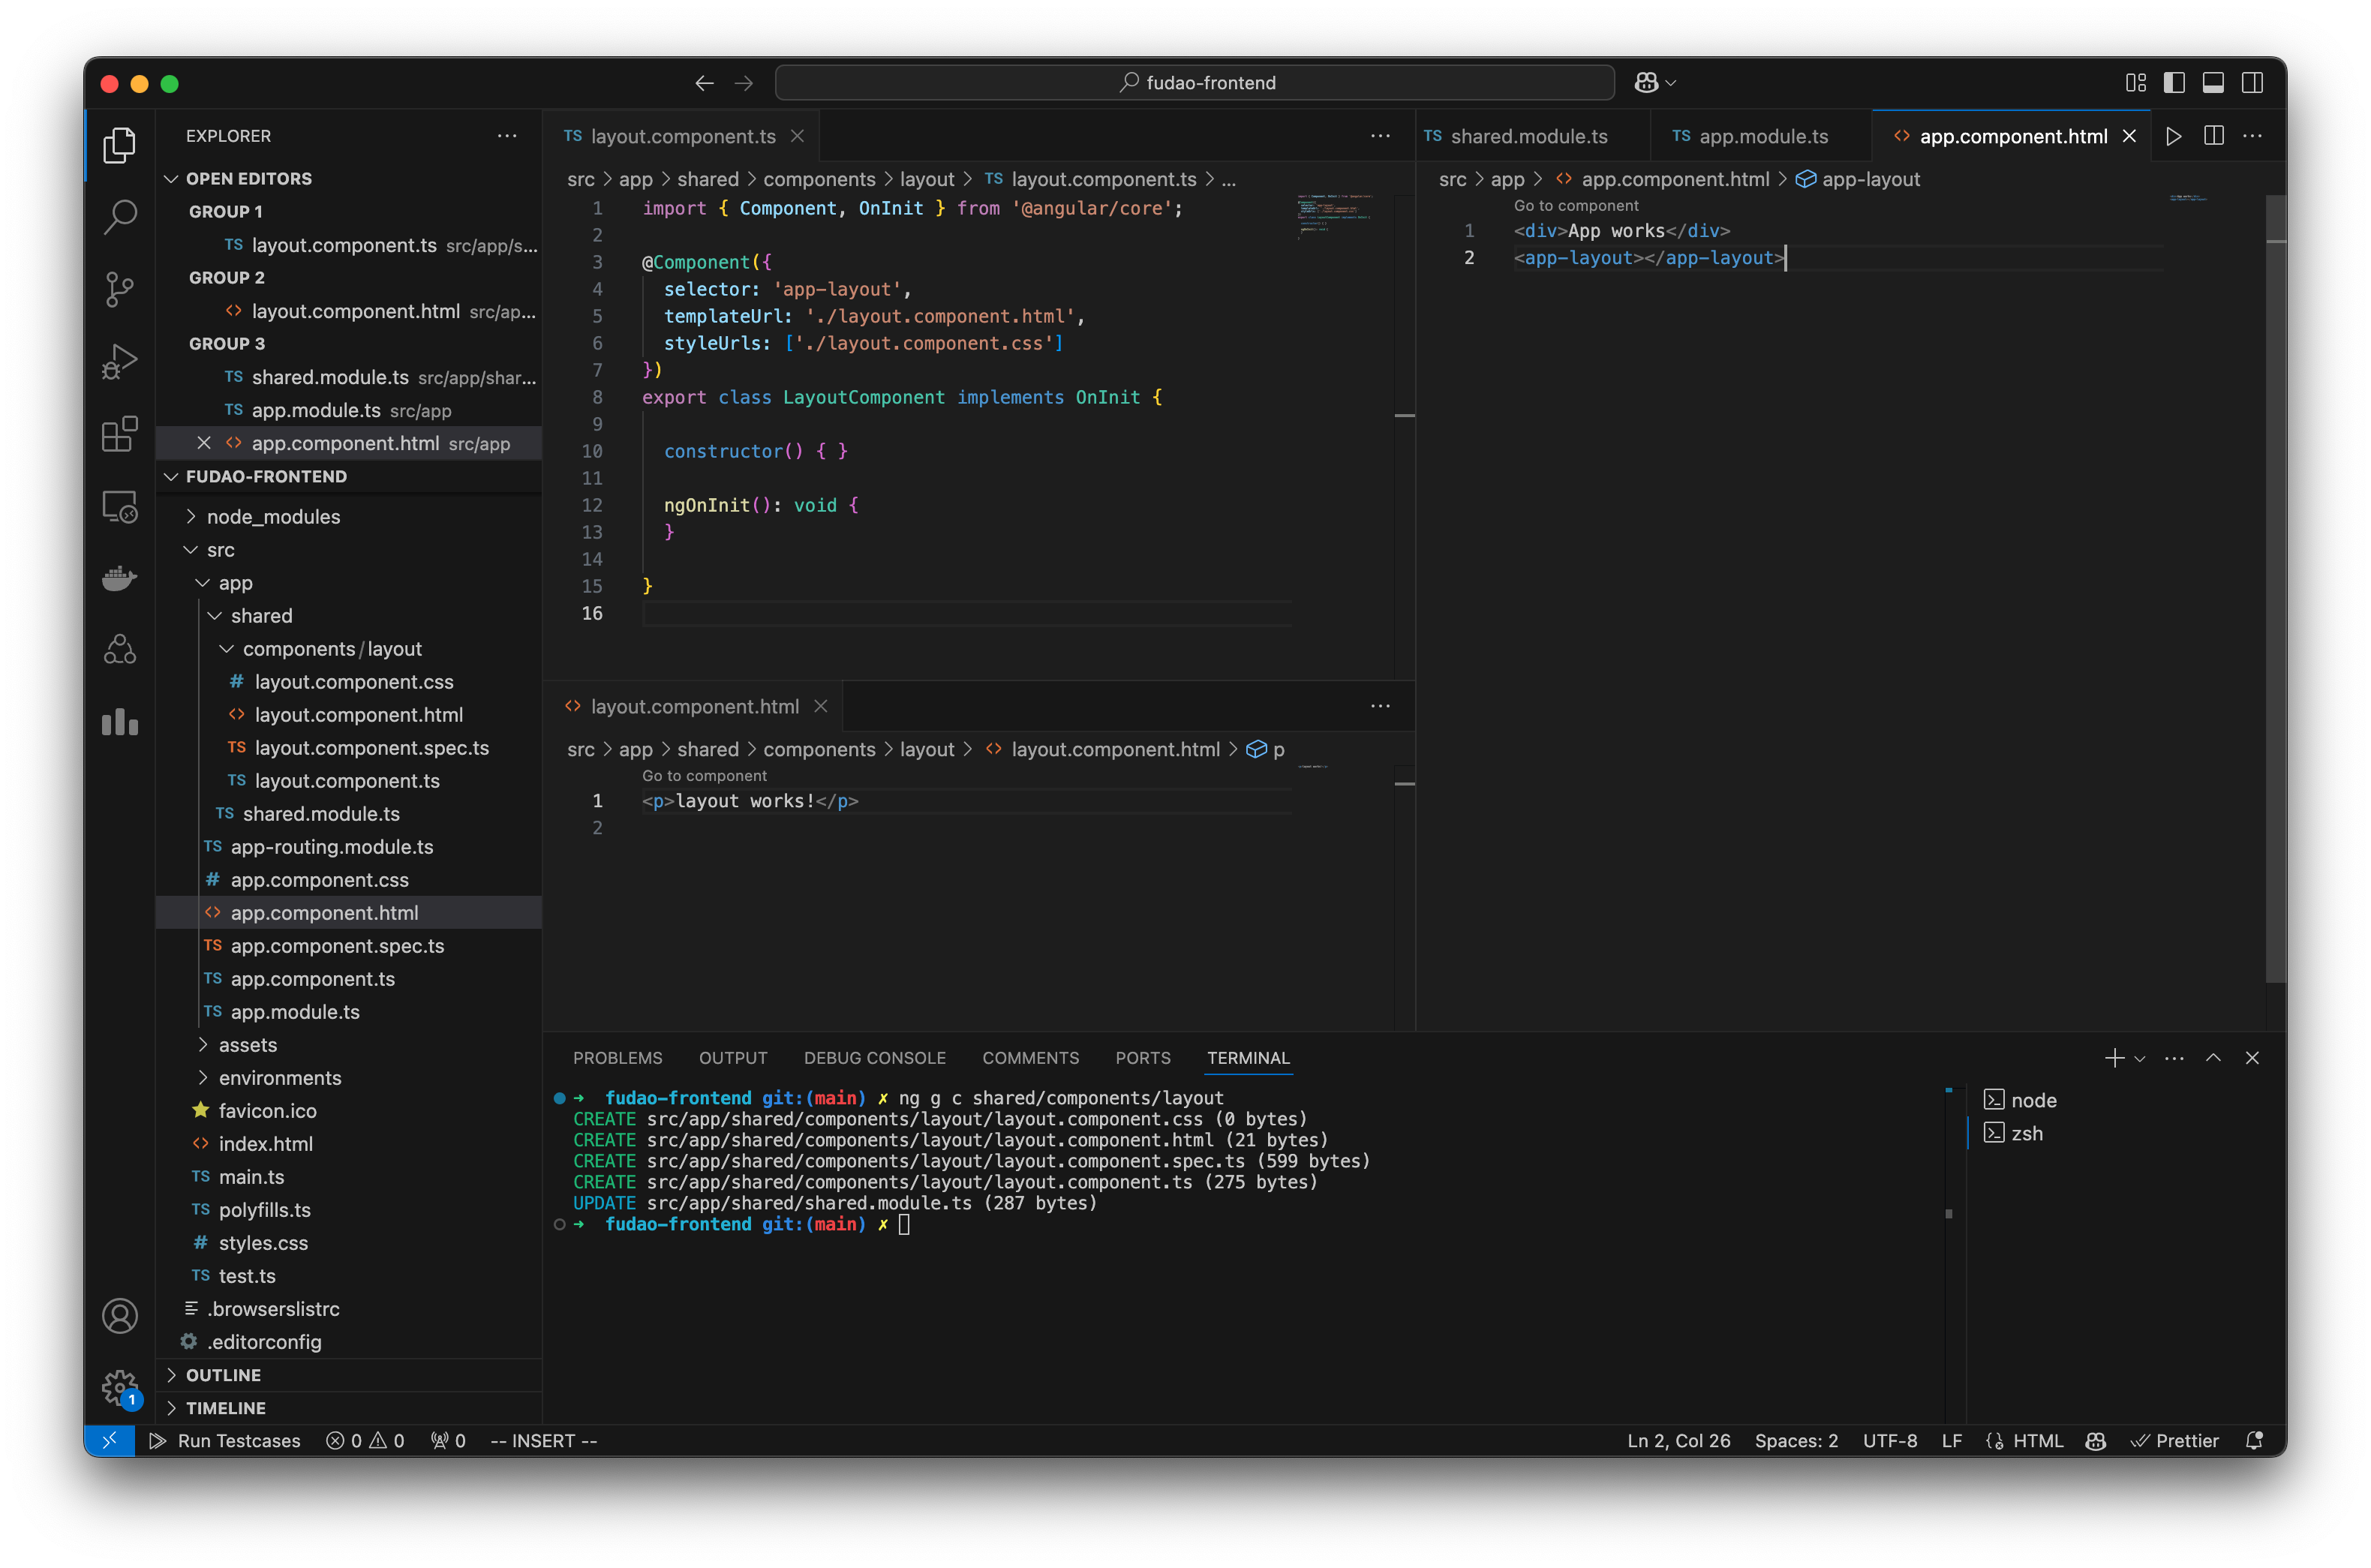
main.ts : is entry point of our application. This file bootstrap app.module.ts file.
app.module.ts: This file boostrap our first component. i.e app.component.ts
app.module.ts: This fille render app.component.html file.
app.component.html: Final HTML template
ng g m shared:
g: generate
m: module
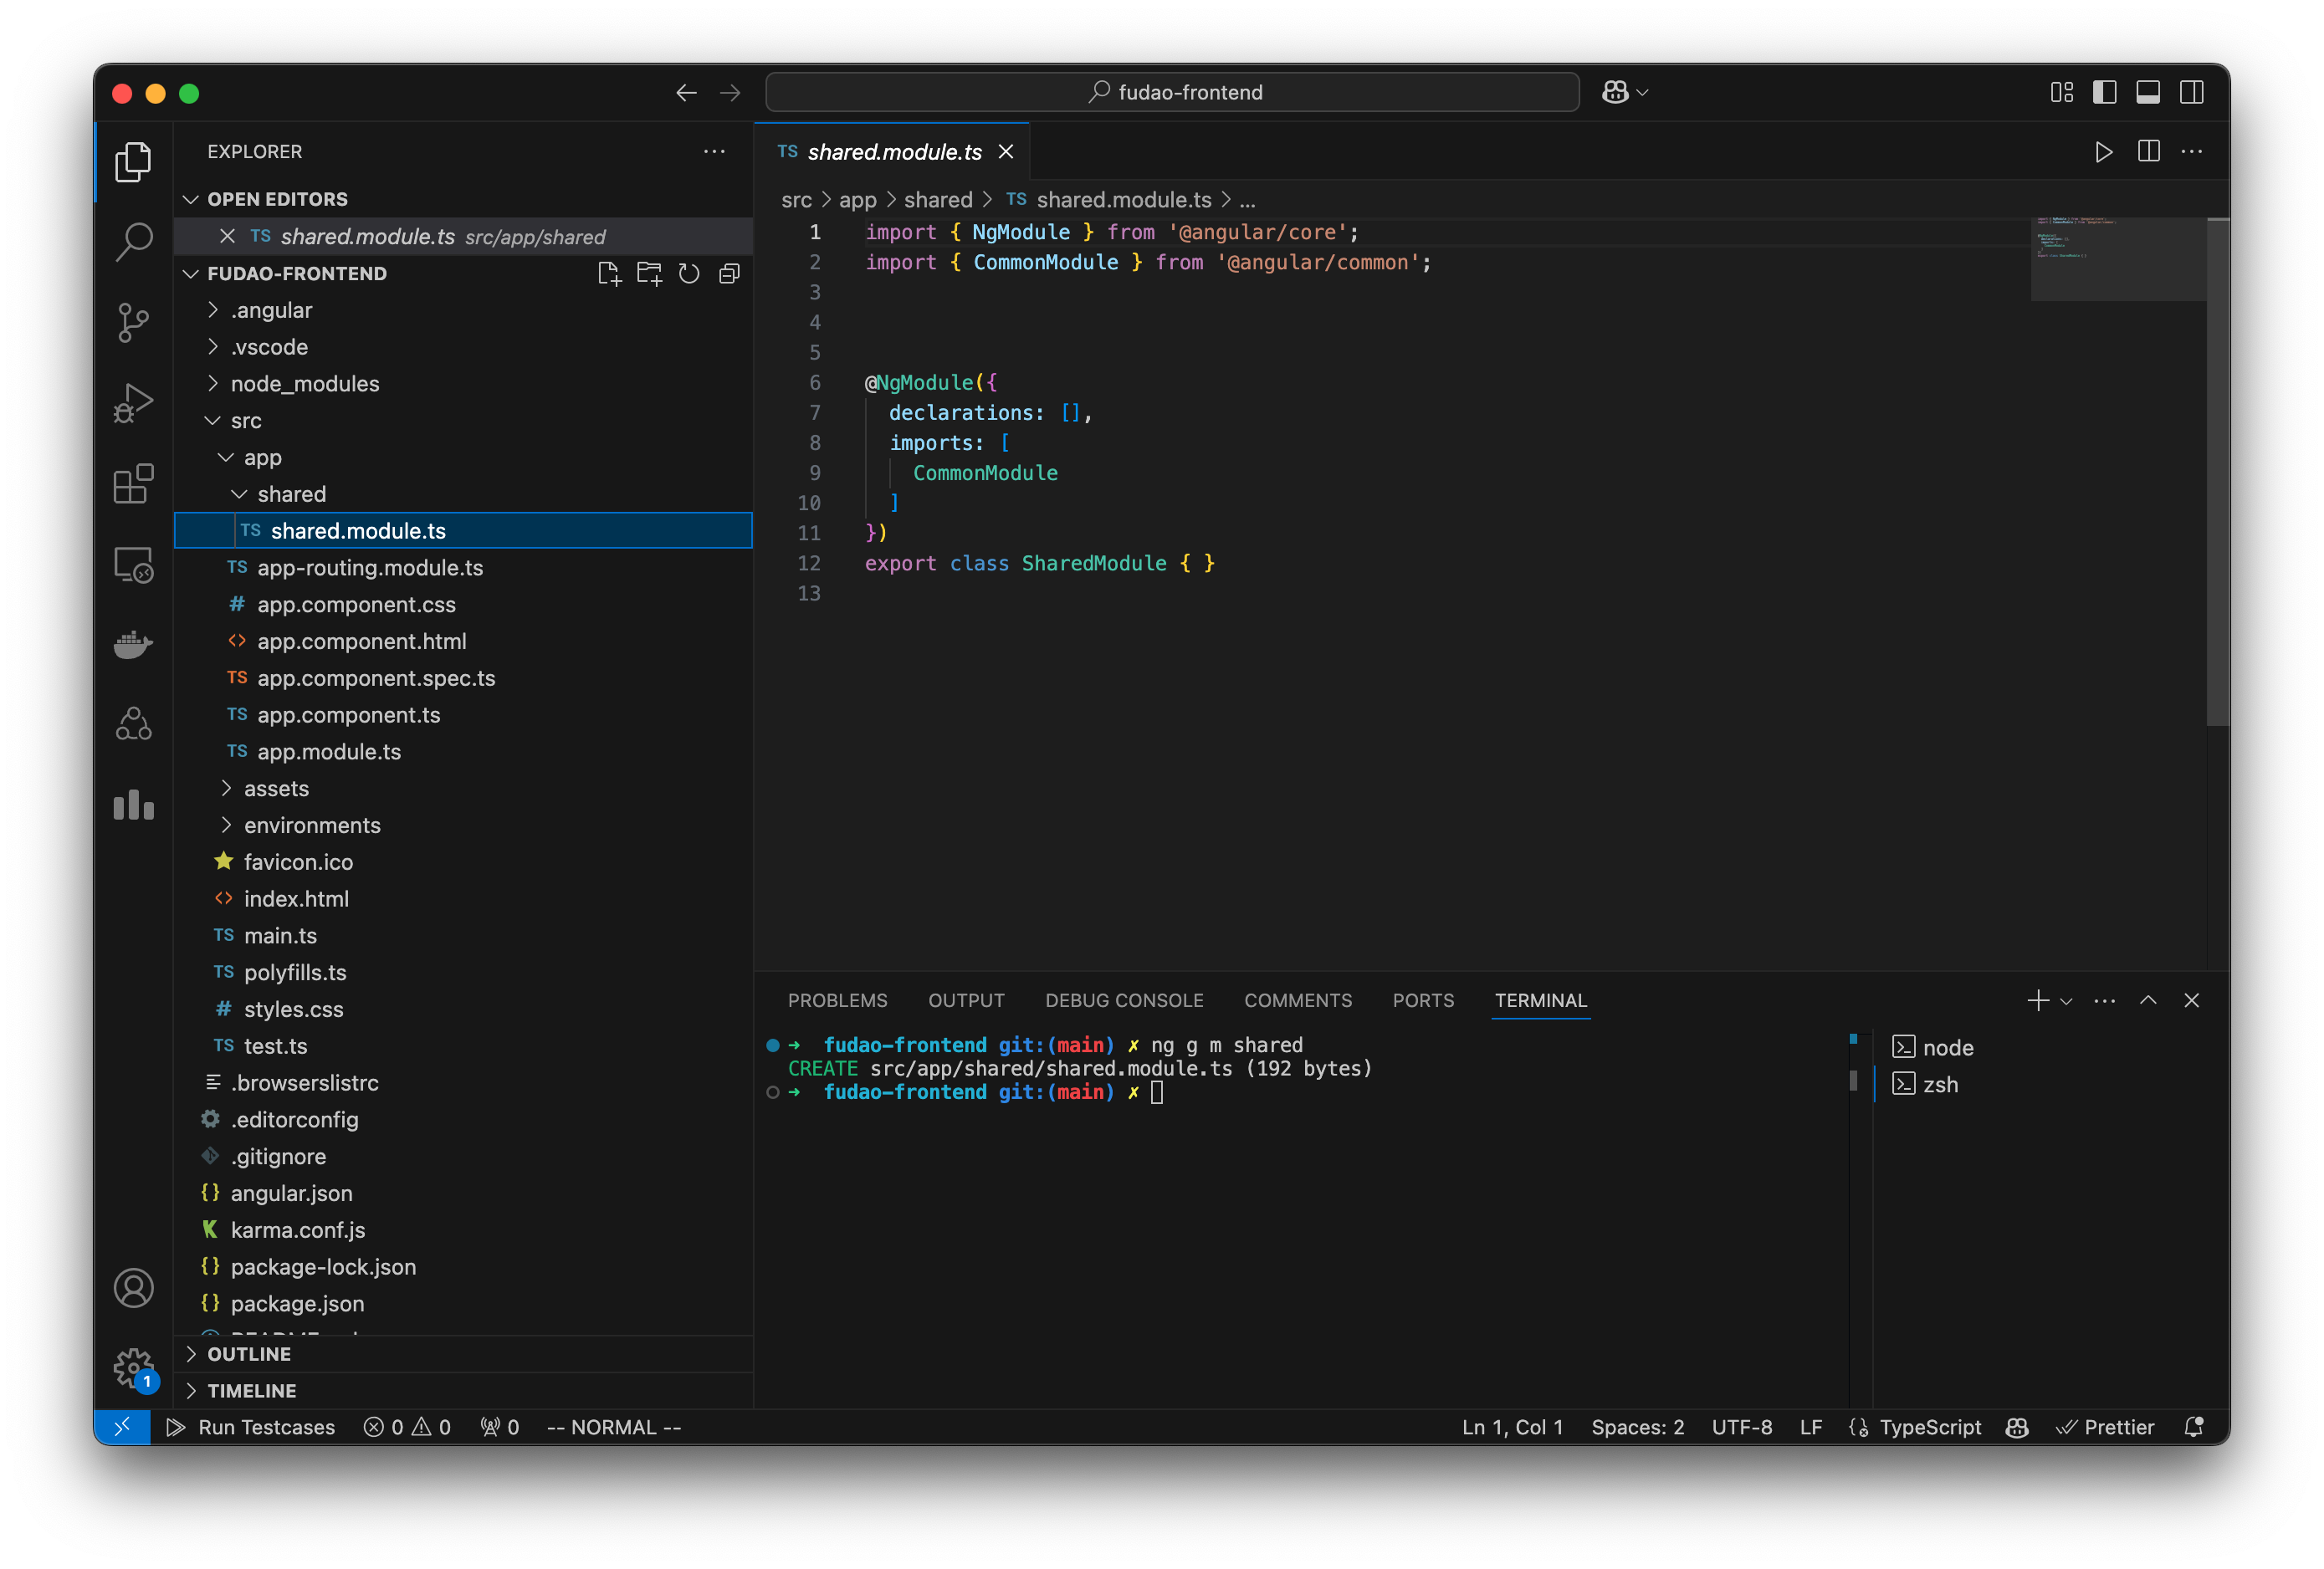
ng g c shared/components/layout
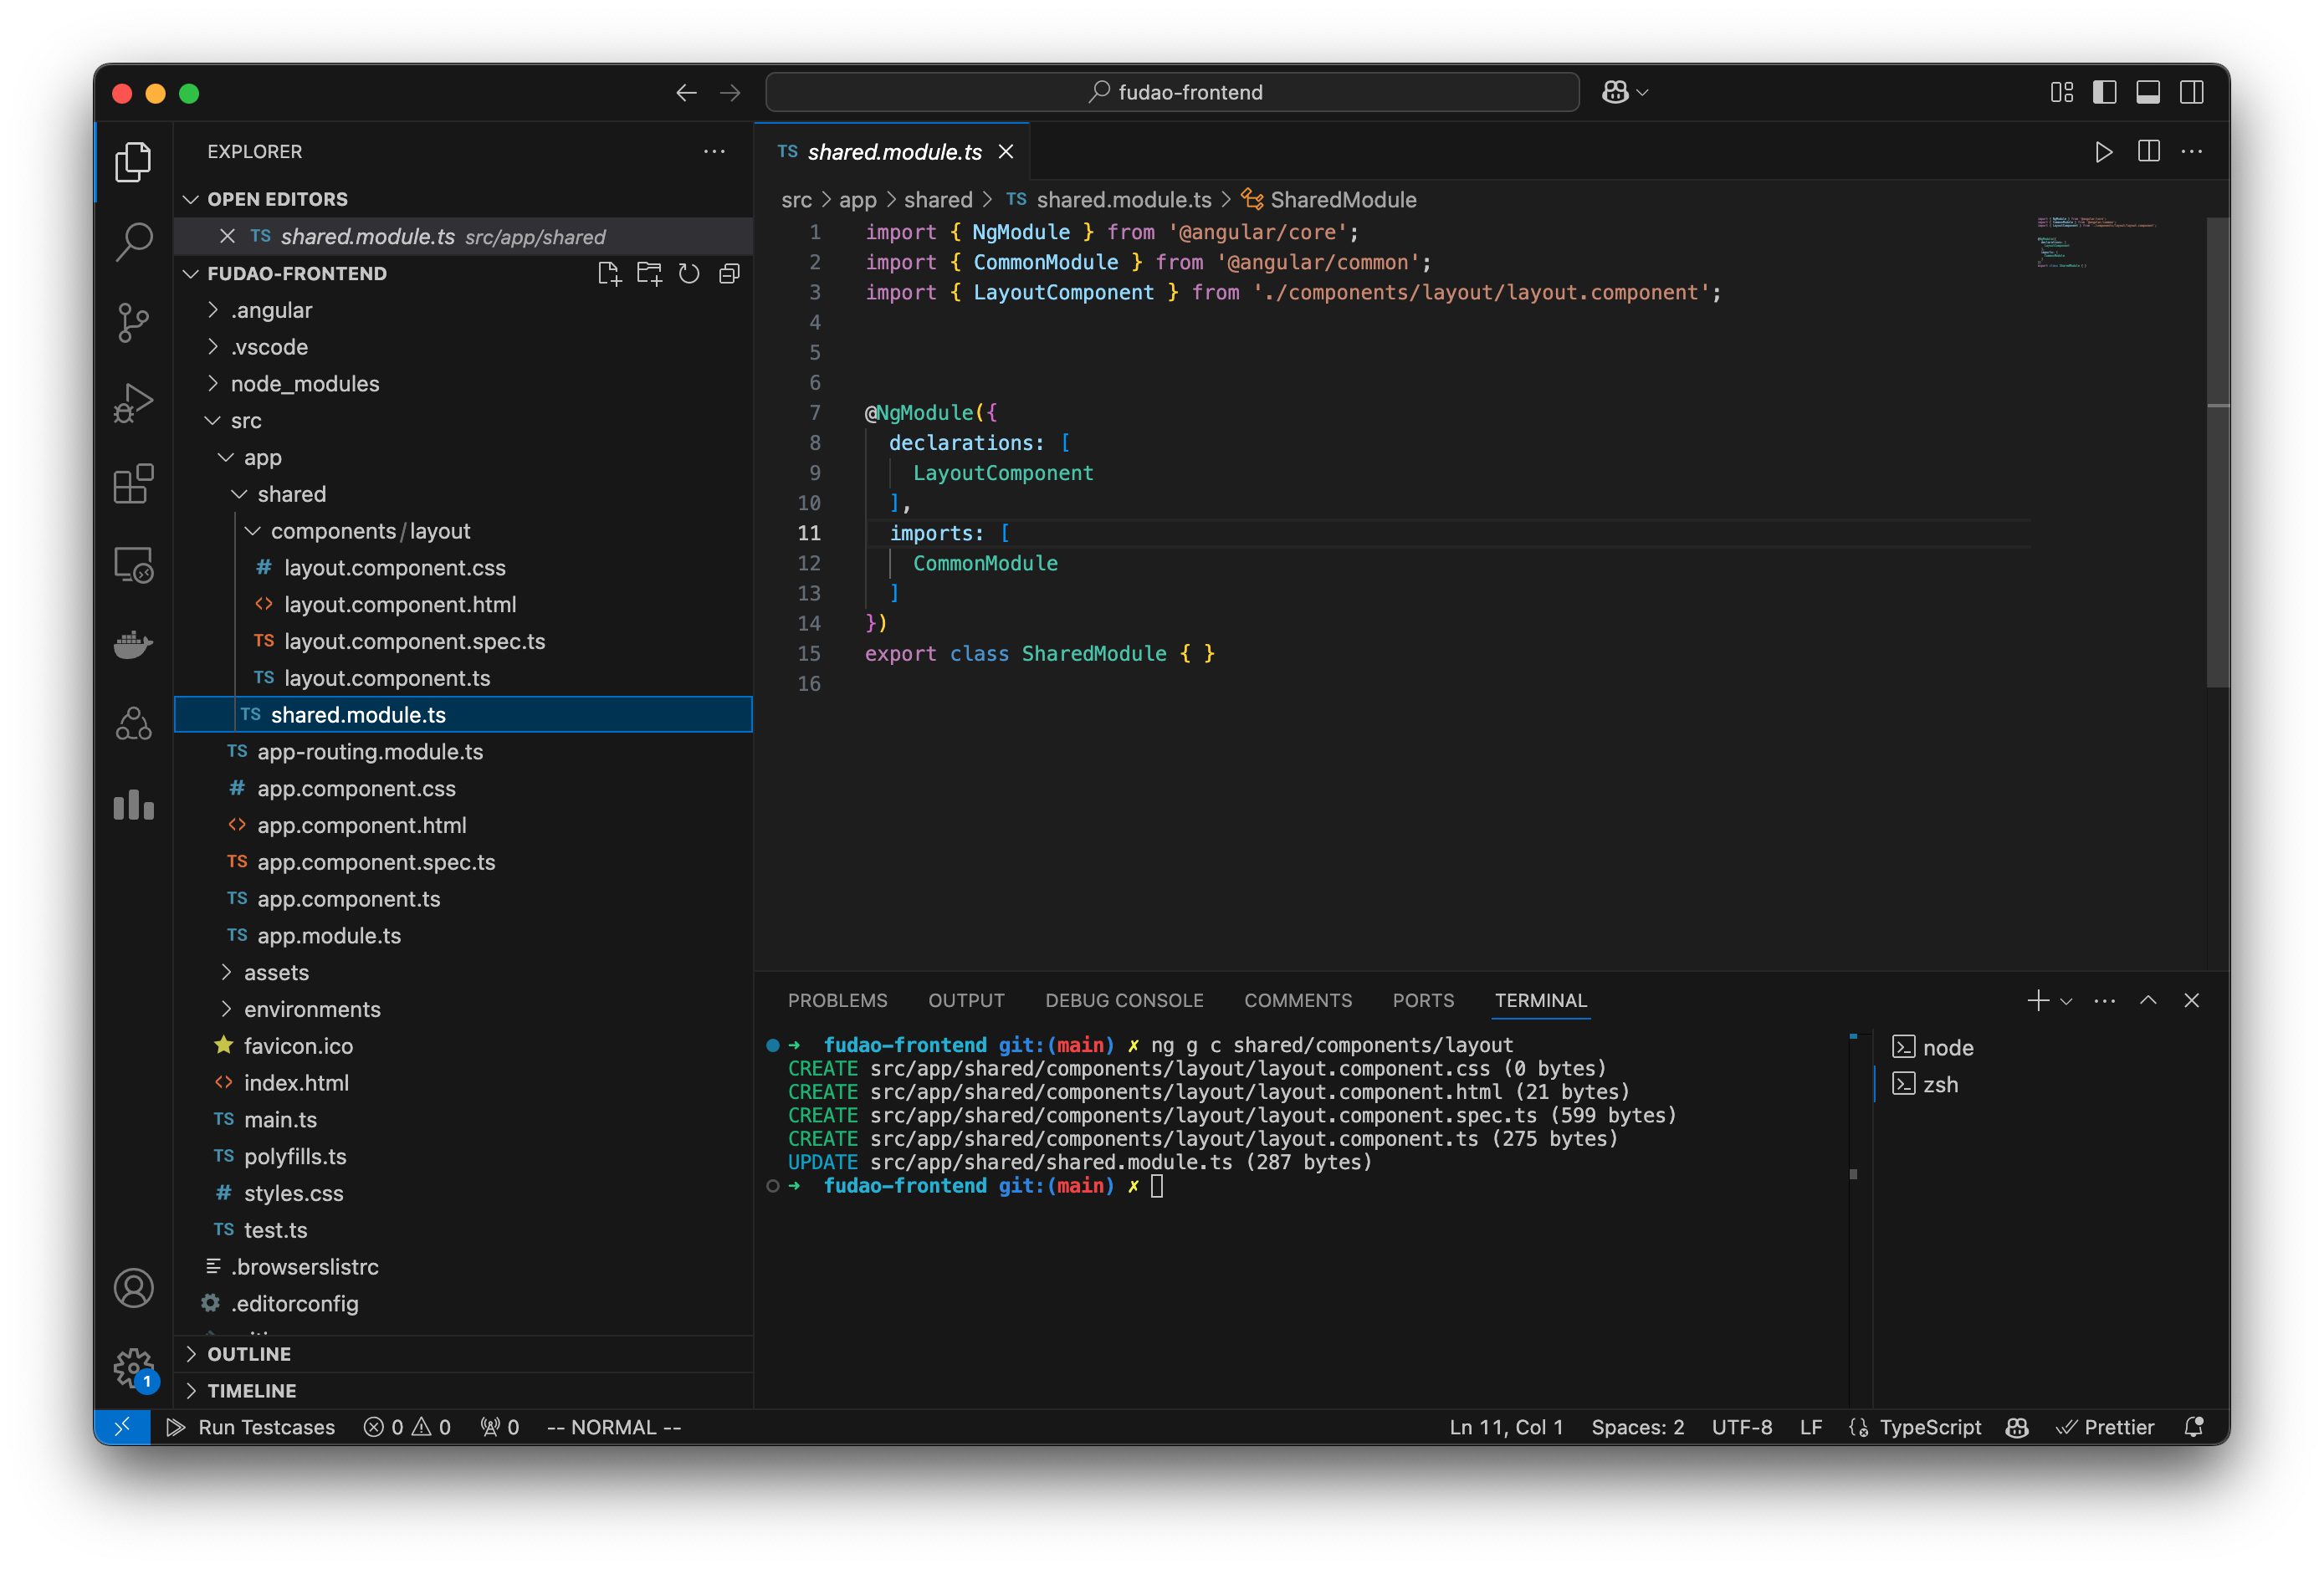
在共享模块中导出共享组件:
@NgModule({
  declarations: [
    LayoutComponent
  ],
  exports: [
    LayoutComponent
  ],// 其他模块使用该模块时,可以直接使用该模块的导出组件
  imports: [
    CommonModule
  ]
})
export class SharedModule { }
在根模块中导入共享模块
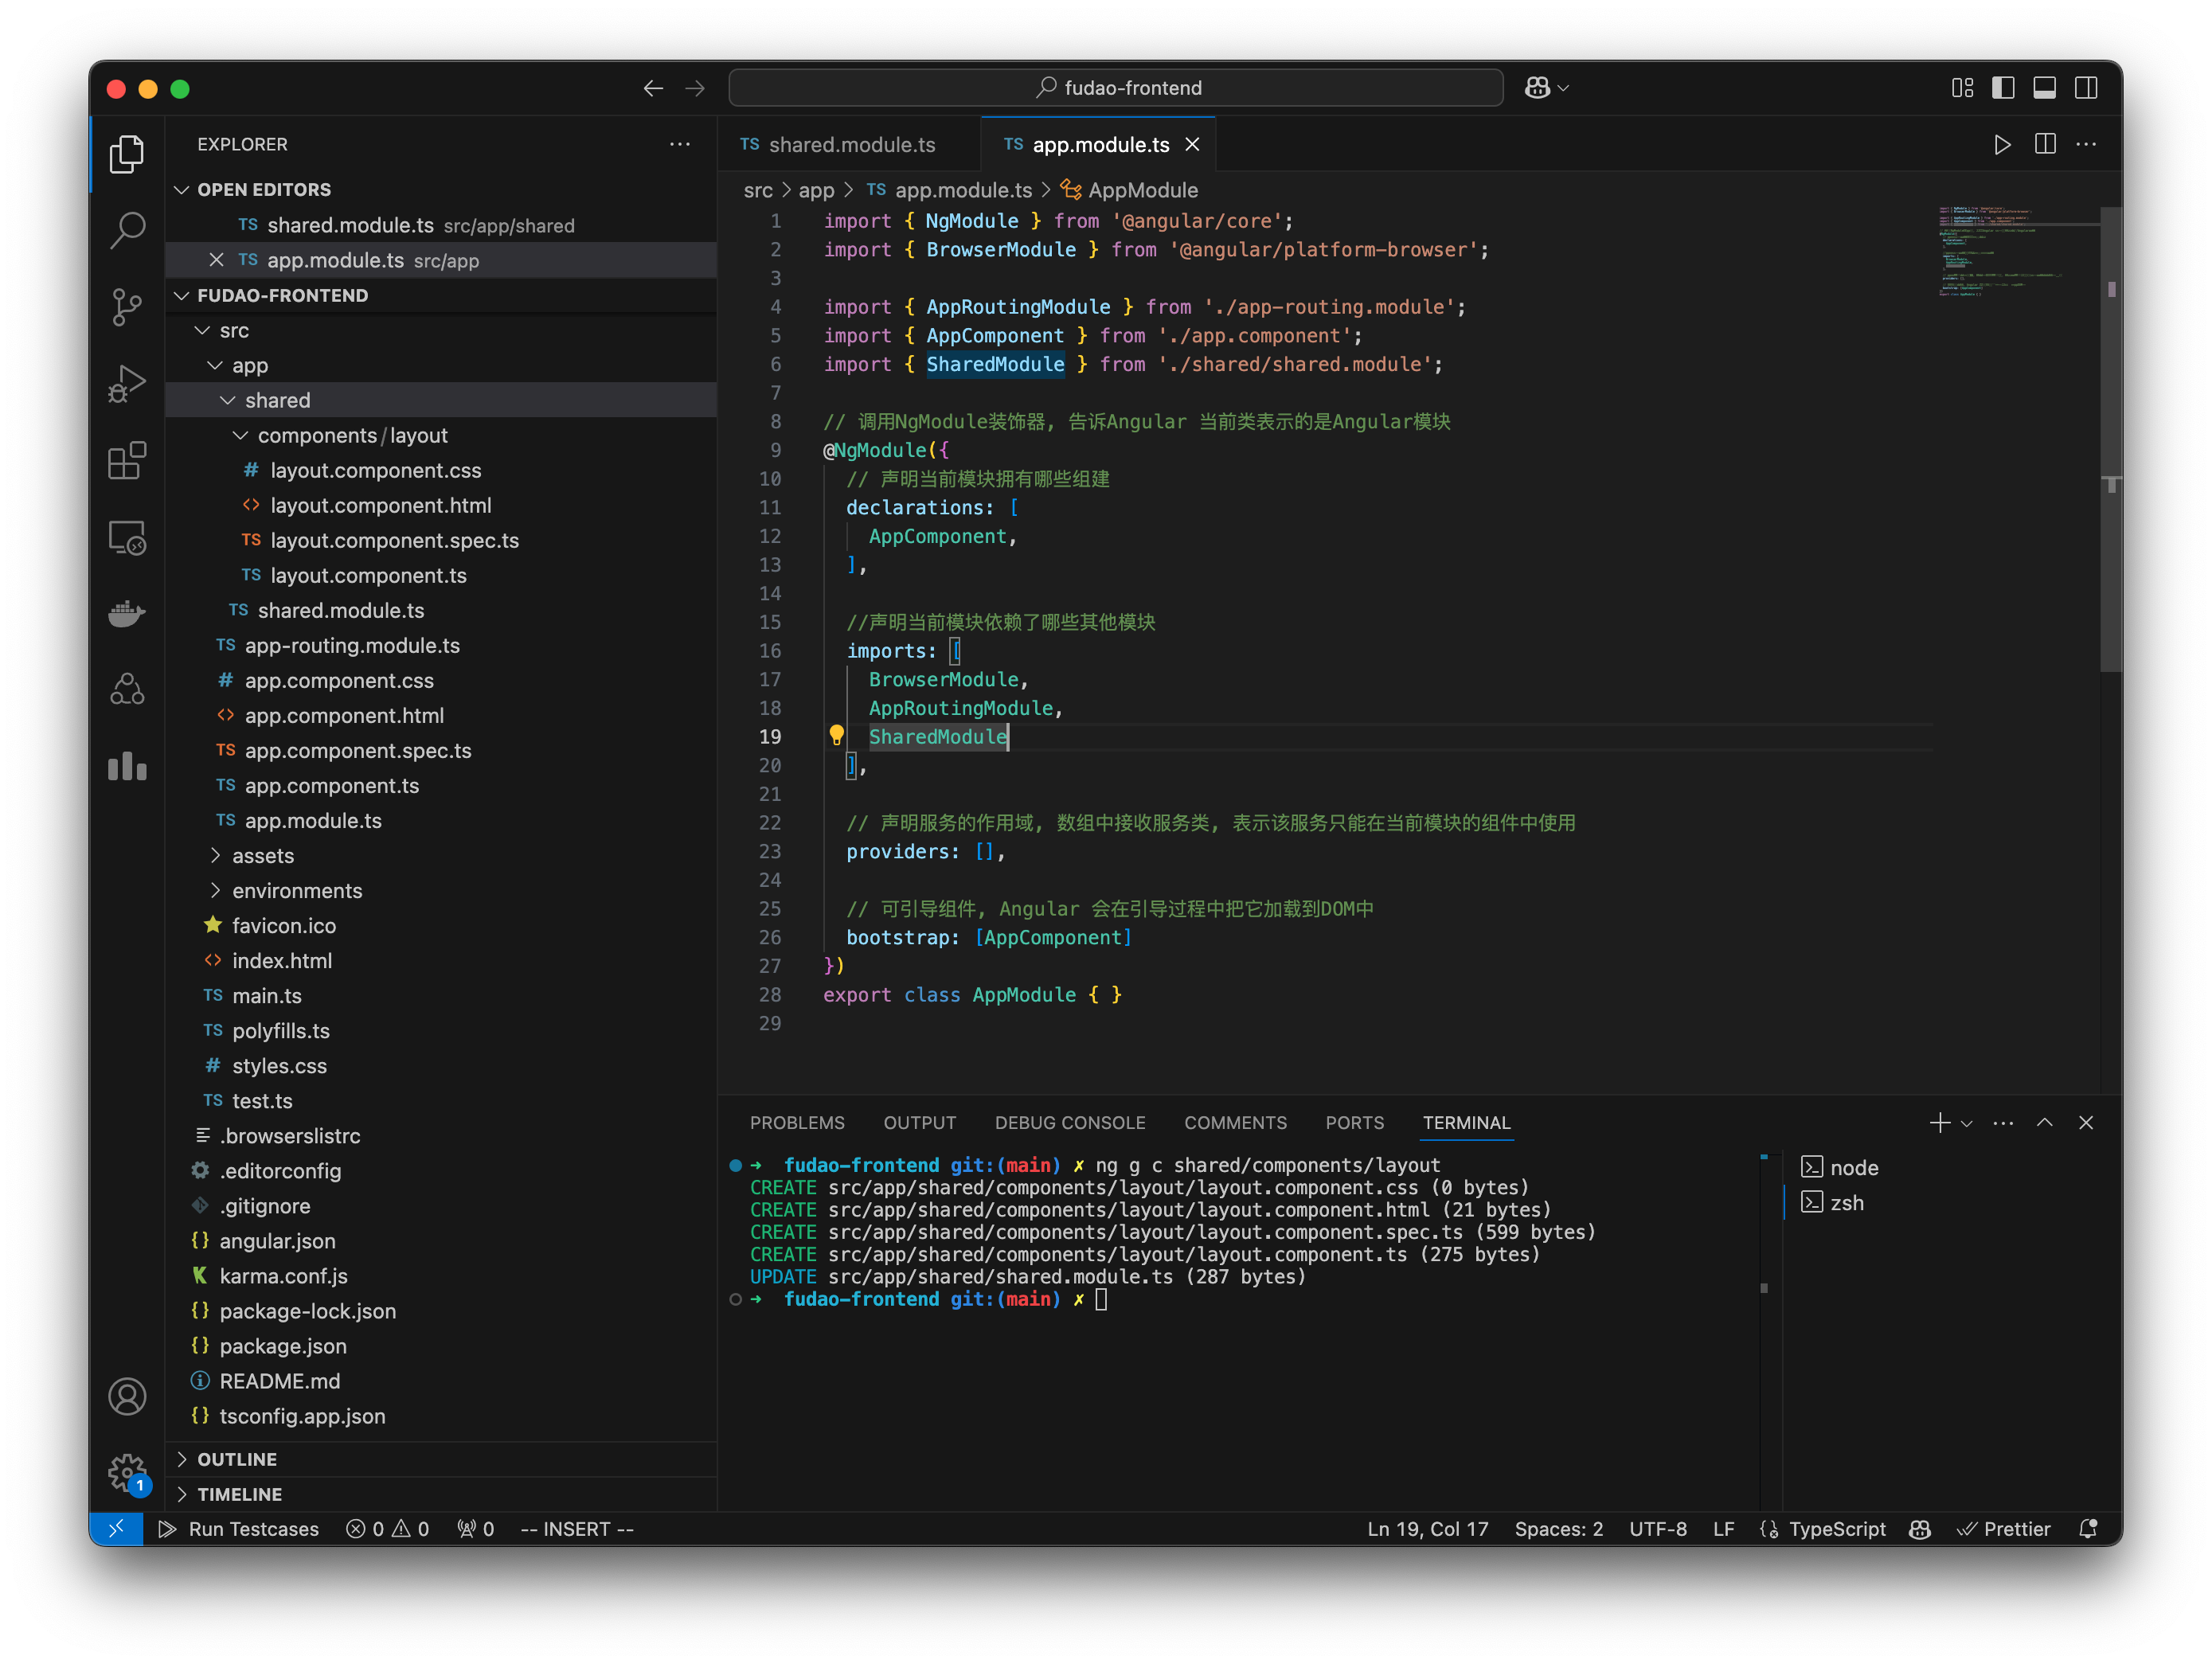
在根组件中使用Layout组件
3 Decorators (装饰器)
- Typescript Decorators are functions which we attach metadata to a class, method, accessor, property, or parameter. We apply the decorator using the form
@expression, where expression is the name of the decorator. The Decorators are a Typescript feature and not part of JavaScript. - They are functions that are invoked with a prefixed
@symbol, and immediately followed by a class, parameter, method, or property.
装饰器使用
@符号,然后跟着装饰器的名称。例如:这里的
@MyDecorator就是一个装饰器,应用到了MyClass类上。装饰器是 TypeScript 的功能,它并不是 JavaScript 的原生功能。这意味着,如果要在 JavaScript 中使用装饰器,你需要借助 TypeScript 编译器来把代码转换成普通的 JavaScript。
装饰器本质上是一个 函数,但你使用它时需要在前面加上
@符号。装饰器的应用总是紧接着它要修饰的目标,比如类、方法、参数或属性。function Log(target: any, propertyKey: string) { console.log(`Property ${propertyKey} is being accessed.`); } class MyClass { @Log myProperty: string; }
@Log是一个装饰器,它修饰了myProperty属性。- 它的作用是在运行时打印一些日志信息。
这样,装饰器提供了一种方便的方式来修改或扩展类的行为。
3.1 Metadata
Metadata tells Angular how to process a class. To identify components, check for metadata attached to a class
- We can use Typescript’s
@Decoratorto attach metadata - Metadata allows us to describe parts of the Angular application, and bind those parts together:
@NgModule- configures Modules@Component- configures Components@Directive- configures Directives@Injectable- configures Services@Pipe- configures Pipes
3.1.1 @NgModule
NgModules configure the injector and the compiler and help organize related things together.
An NgModule is a class marked by the @NgModule decorator. @NgModule takes a metadata object that describes how to compile a component’s template and to create an injector at runtime. It defines the module’s own components, directives, and pipes, making some of them public through the exports property, so that external components can use them.
Angular libraries are NgModules
- FormsModule (@angular/forms)
- HttpClientModule (@angular/common/http)
- RouterModule (@angular/router)
@NgModule has five fields:
- Declarations - lists the components, directives and pipes that are part of this module
- Imports - lists the other modules used by this module
- Exports - lists the declarations can be used by other module
- Providers - list of services other components can use (Dependency Injection)
- Bootstrap - identifies the root component of the module. When Angular loads the AppModule, it looks for the bootstrap metadata and loads all the components listed.
Angular 提供了一些常见的装饰器,用于绑定应用的不同部分。以下是关键装饰器及其用途
@NgModule
- 用来 配置模块。
- 描述模块的组成部分(组件、服务等)以及模块之间的依赖关系。
- 通常用于定义一个应用的根模块或特性模块。
@NgModule({
  declarations: [AppComponent], // 声明组件
  imports: [BrowserModule], // 导入依赖模块
  providers: [], // 提供服务
  bootstrap: [AppComponent] // 启动组件
})
export class AppModule {}
@Component
- 用来 配置组件。
- 定义组件的视图模板、样式和交互逻辑。
@Component({
  selector: 'app-root', // 组件的选择器
  templateUrl: './app.component.html', // 组件的 HTML 模板
  styleUrls: ['./app.component.css'] // 组件的样式文件
})
export class AppComponent {
  title = 'My Angular App';
}
@Dirctive用来 配置指令。
Angular 中指令用于操作 DOM 元素(比如改变样式、行为等)。
分为结构型指令(如
*ngIf)和属性型指令。
@Injectable
用来 配置服务。
Angular 中的服务是用于实现共享逻辑的类,例如 HTTP 请求、数据处理等。
@Injectable({
  providedIn: 'root' // 在根模块中提供服务
})
export class DataService {
  fetchData() {
    return 'Fetching data...';
  }
}
@Pipe
- 用来 配置管道。
- 管道用于数据转换,比如格式化日期、货币等。
@Pipe({
  name: 'uppercase'
})
export class UppercasePipe implements PipeTransform {
  transform(value: string): string {
    return value.toUpperCase();
  }
}
元数据 是用来告诉 Angular 如何处理类的描述信息。
装饰器(如
@Component、@Injectable等)是元数据的载体,通过它可以附加这些信息到代码中。Angular 使用这些元数据来 识别并绑定应用的不同部分,从而实现模块化、可维护的开发方式。
3.2 Views
Components define views, which are sets of screen elements that Angular can choose among and modify according to your program logic and data.
Components use services, which provide specific functionality not directly related to views. Services can be injected as dependencies, making your code more modular, reusable, and efficient.
Modules, components and services are classes that use decorators.
The decorators mark their type and provide metadata that tells Angular how to use them.
3.2.1 @Component
- A Component controls a patch of screen called a view.
- You define a component’s application logic (what it does to support the view) inside a class.
- Angular creates, updates, and destroys components as the user moves through the application.
- Your application can take action at each moment in this lifecycle through optional lifecycle hooks.
- When you generate an Angular application with the Angular CLI, the
app.component.tsfile is the default component file containing boilerplate code.
3.3 Template
- Each Angular template in your application is a section of HTML to include as part of the page that the browser displays.
- An Angular template renders a view, or user interface, in the browser, just like regular HTML, but with a lot more functionality.
-
When you generate an Angular application with the Angular CLI, the
app.component.htmlfile is the default template containing placeholder HTML. -
Template Syntax - https://angular.io/guide/template-syntax
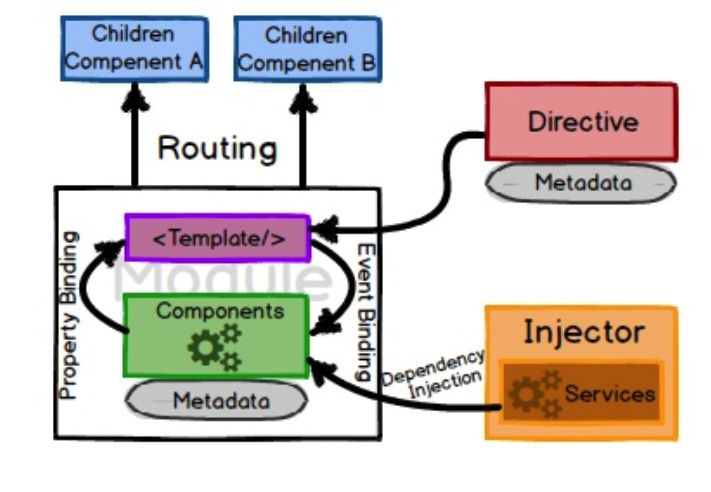
3.4 Angular View/Component Visualization

4 Binding 绑定
In Angular, a binding creates a live connection between a part of the UI created from a template and the model.
This connection can be used to synchronize the view with the model, to notify the model when an event or user action takes place in the view, or both.
- Text interpolations(插入)
- Property binding
- Event binding
- Two-way binding
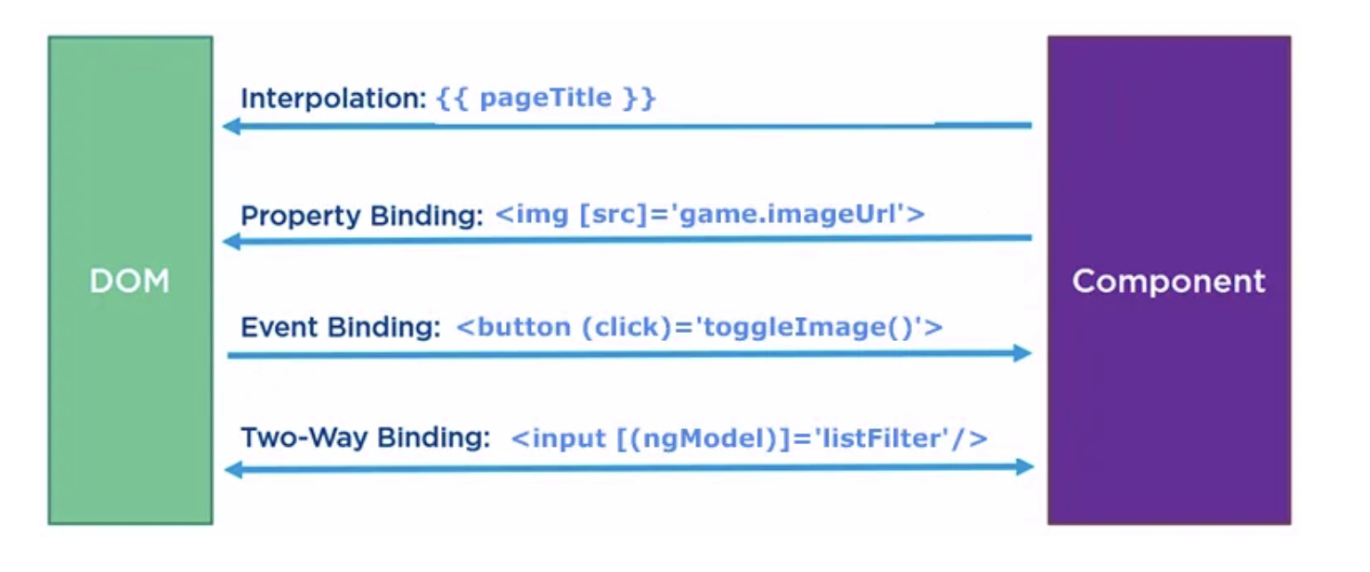
数据绑定就是将组类中的数据显示在组件模版中, 当组件类中的数据发生变化时会自动被同步到组件模块中(数据驱动DOM).
4.1 Text Interpolation
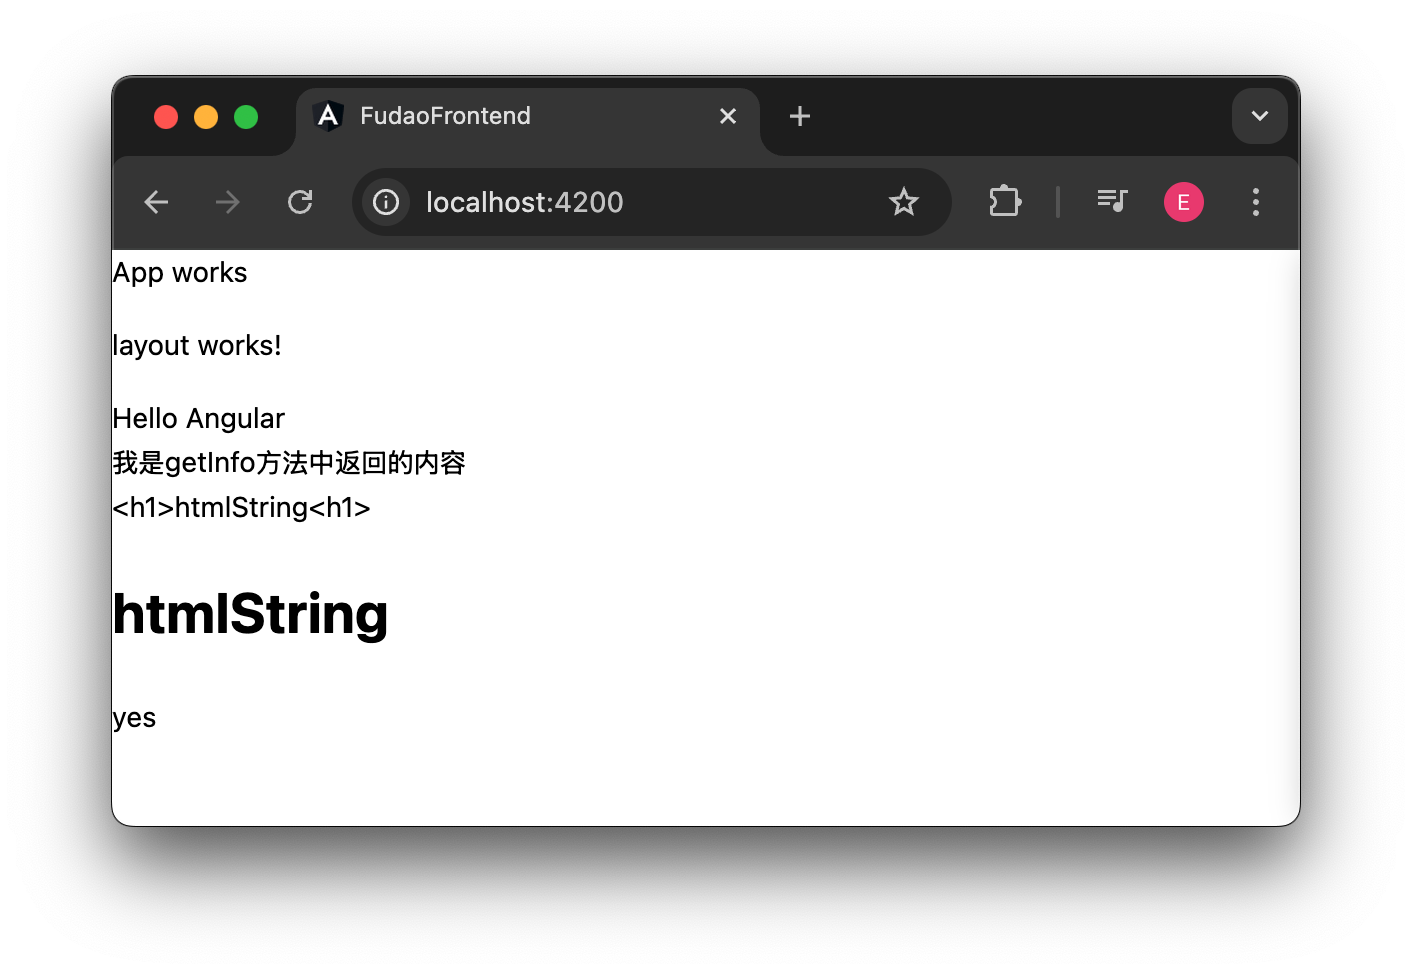
Interpolation refers to embedding expressions into marked up text. By default, interpolation uses double curly braces as delimiters. 即{{}} 大胡子语法.
// app.component.ts
currentUser = “Marie Curie”;
// app.component.html
<h3>Current User: {{ currentUser }}</h3>
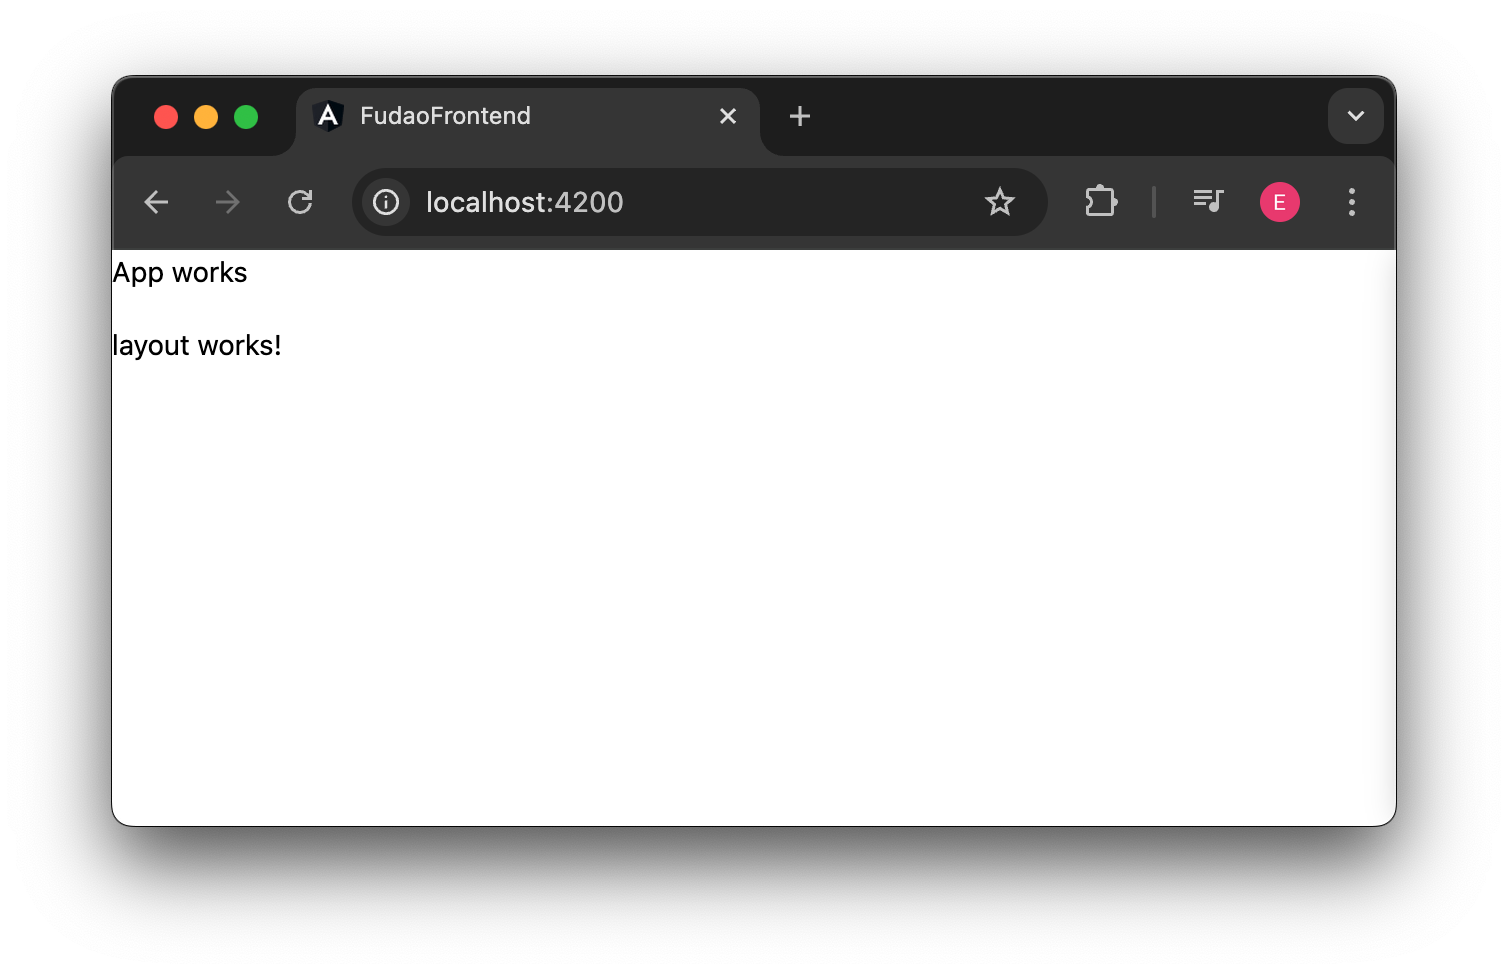
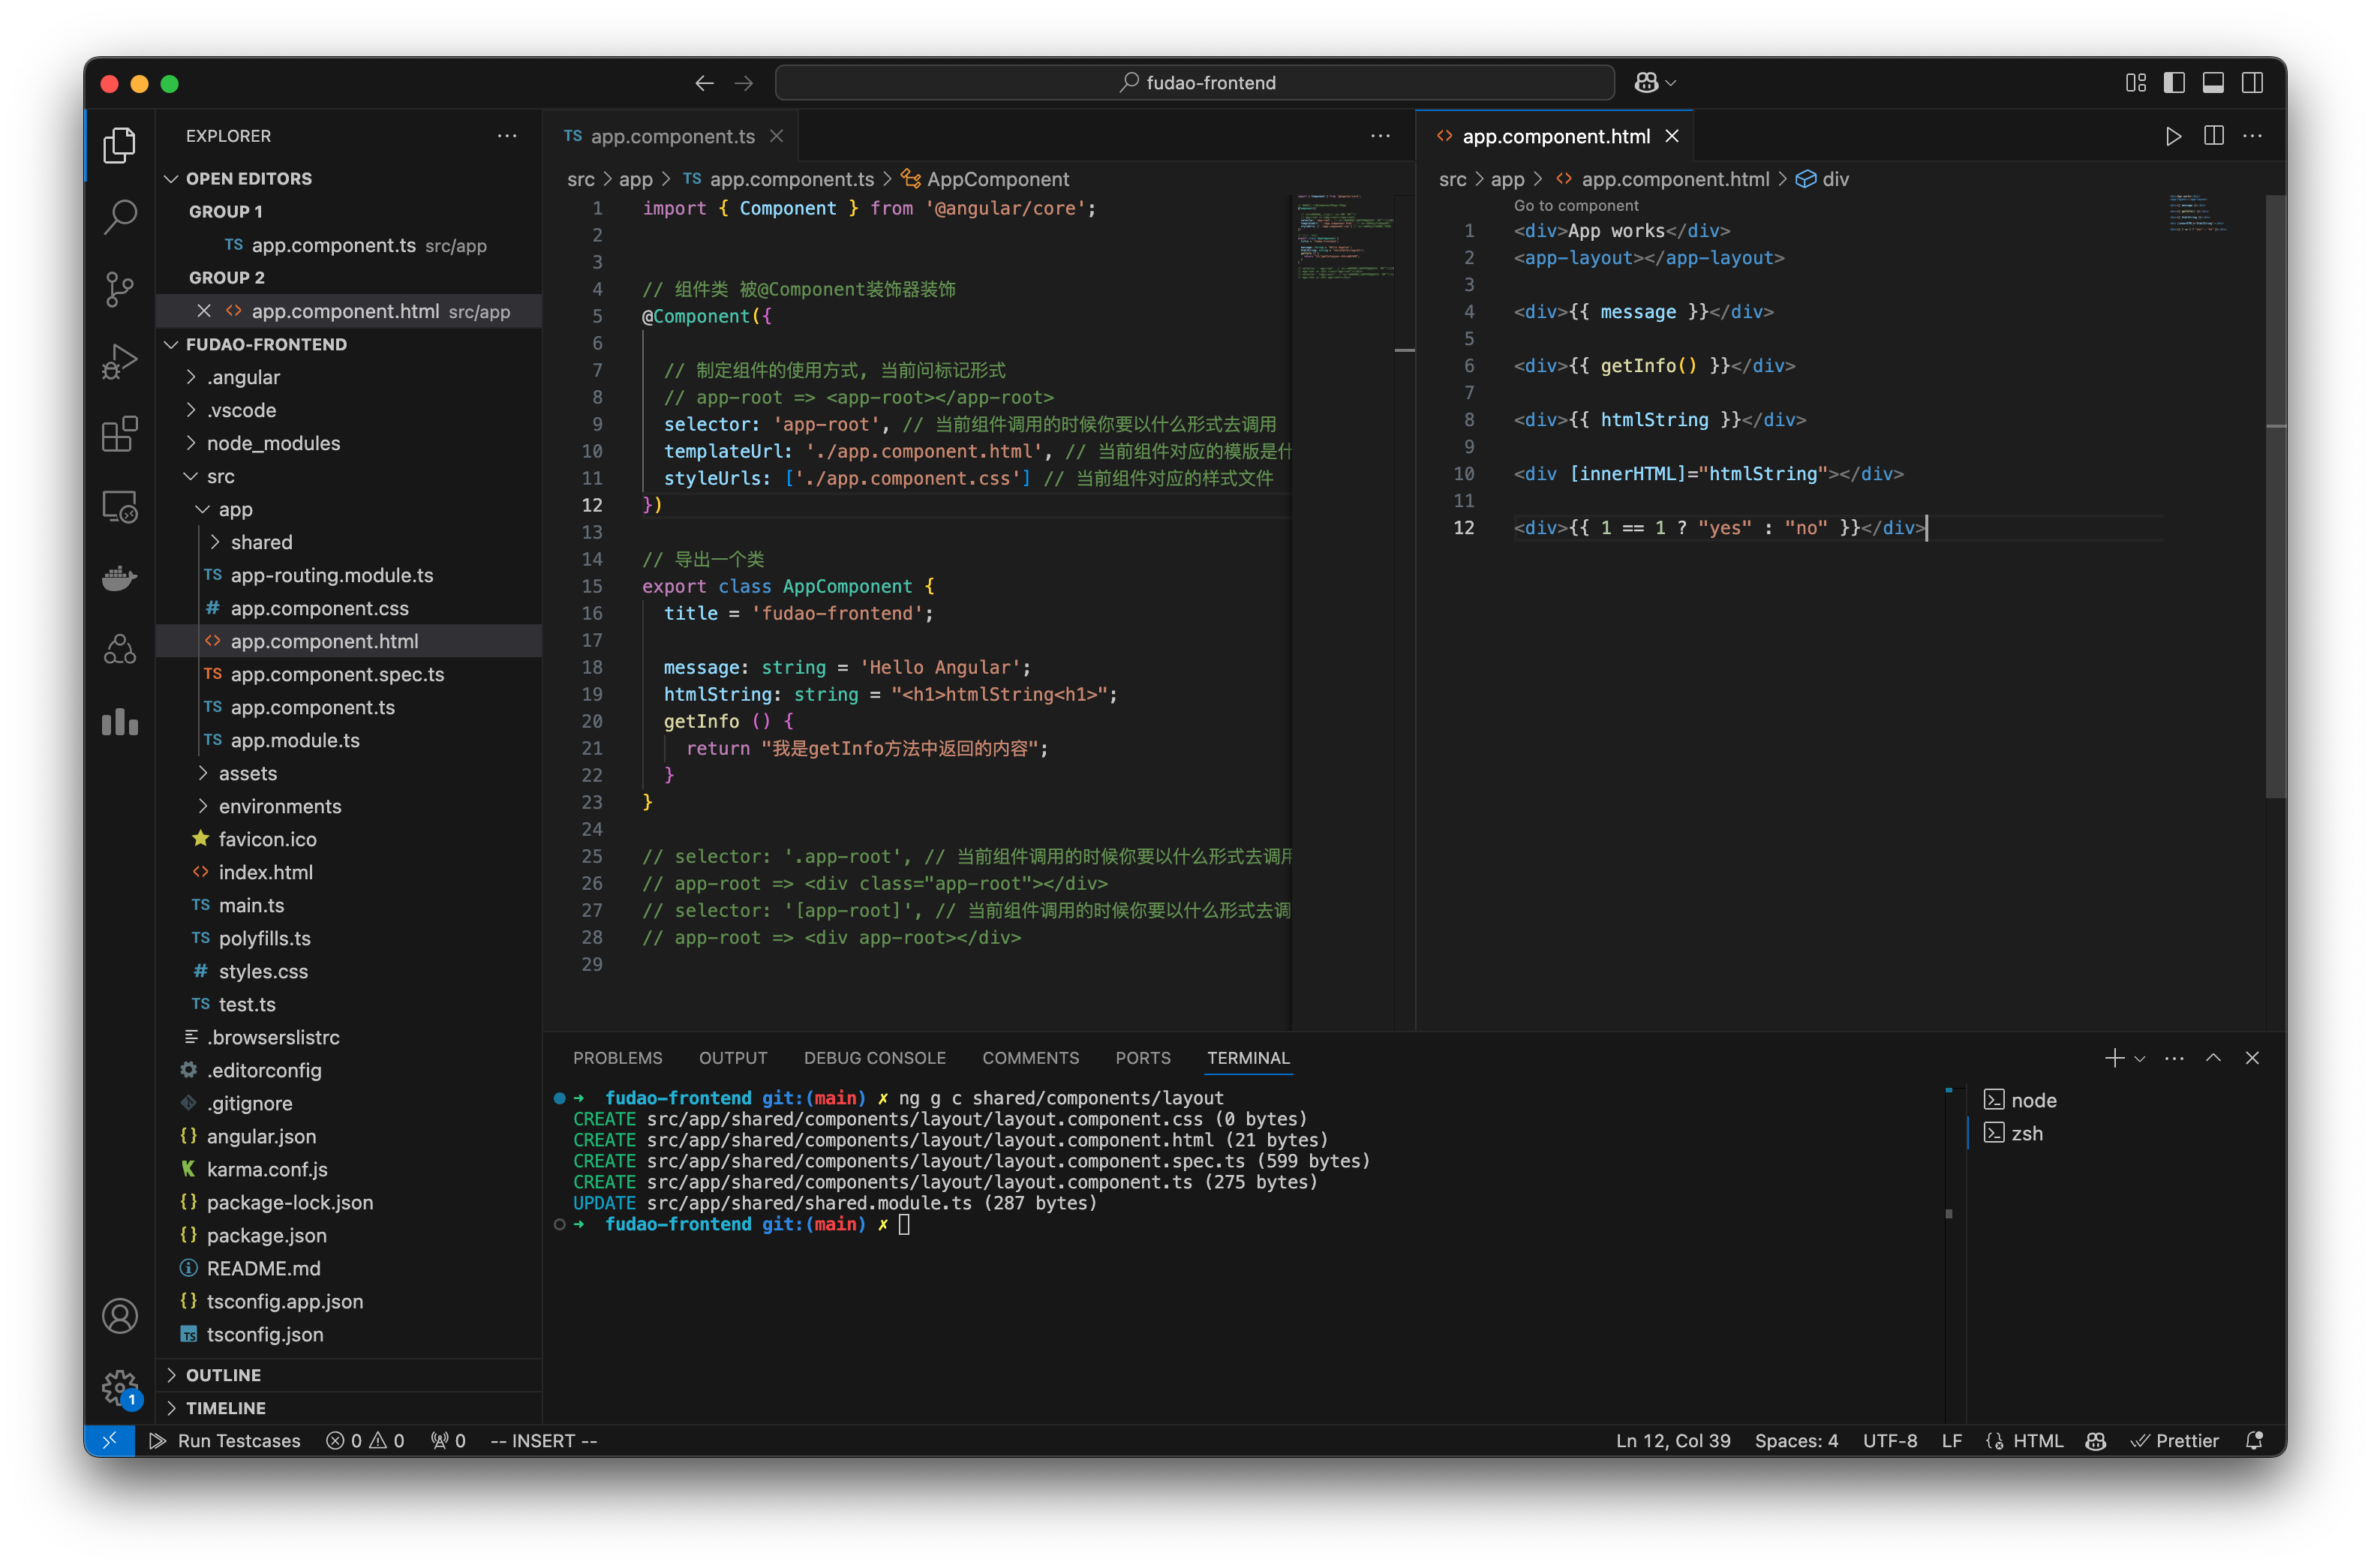
<div>App works</div>
<app-layout></app-layout>

<div>{{ message }}</div>

<div>{{ getInfo() }}</div>

<div>{{ htmlString }}</div>

<div [innerHTML]="htmlString"></div>

<div>{{ 1 == 1 ? "yes" : "no" }}</div>
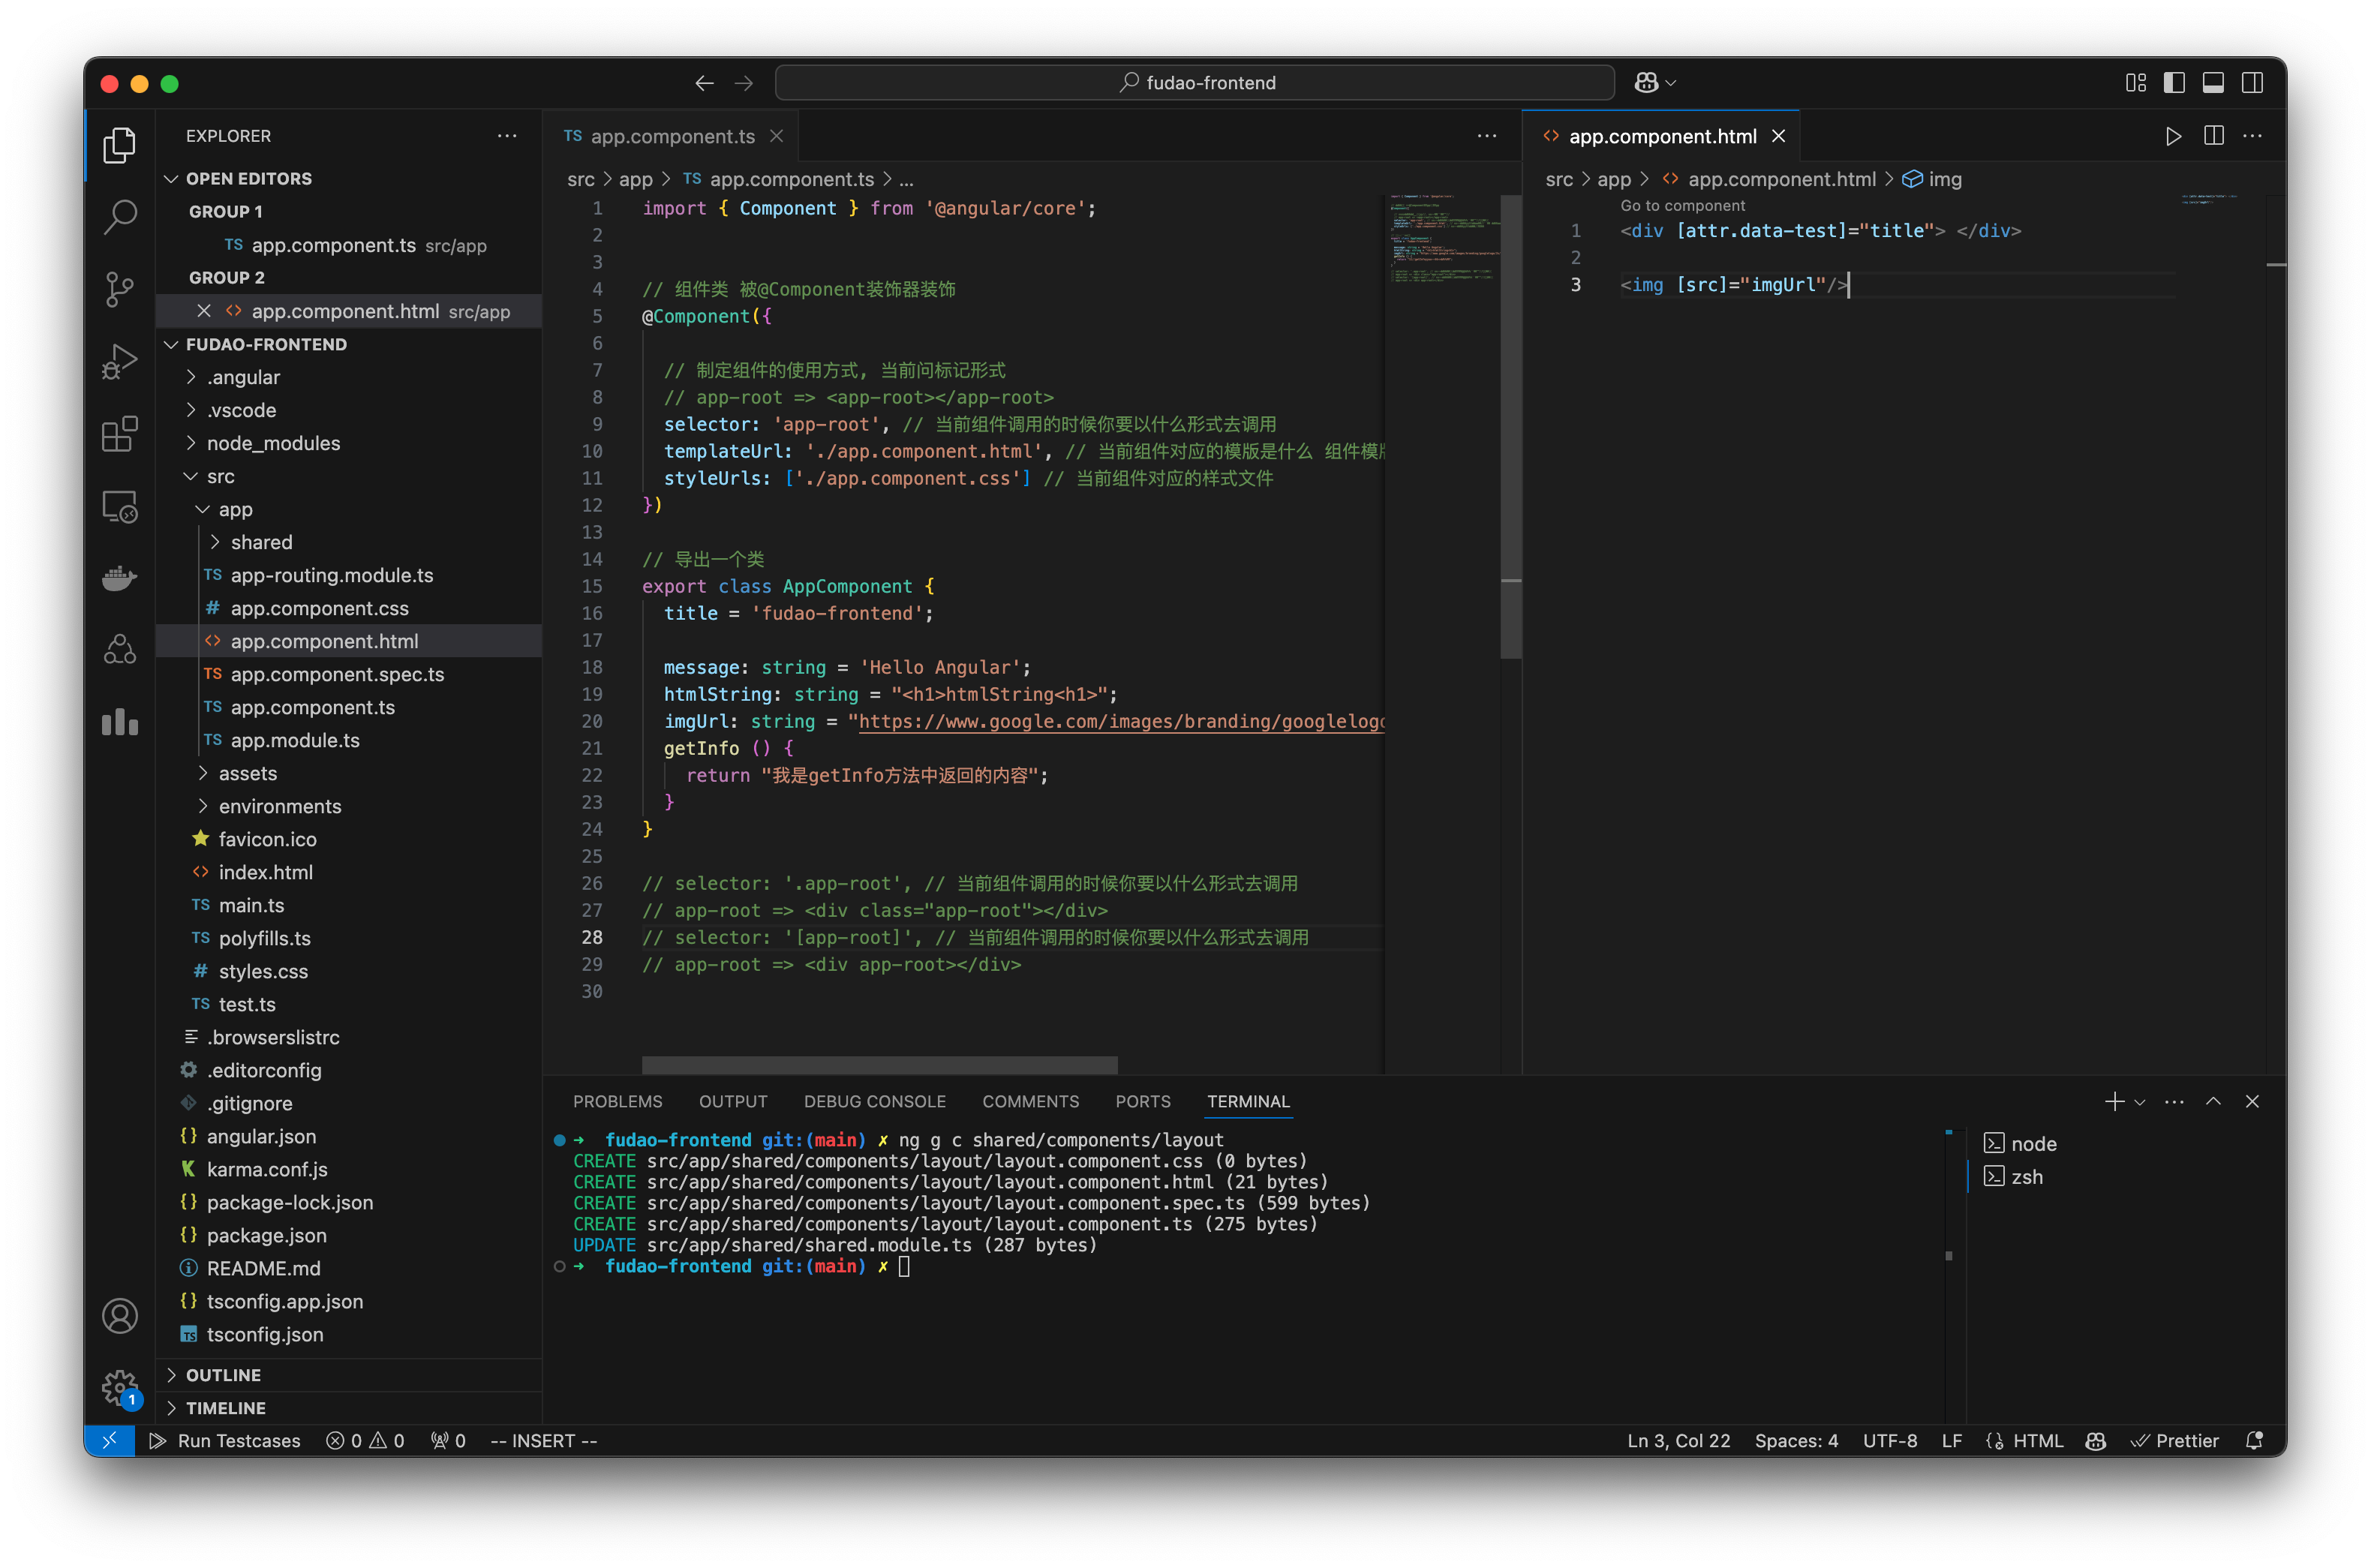
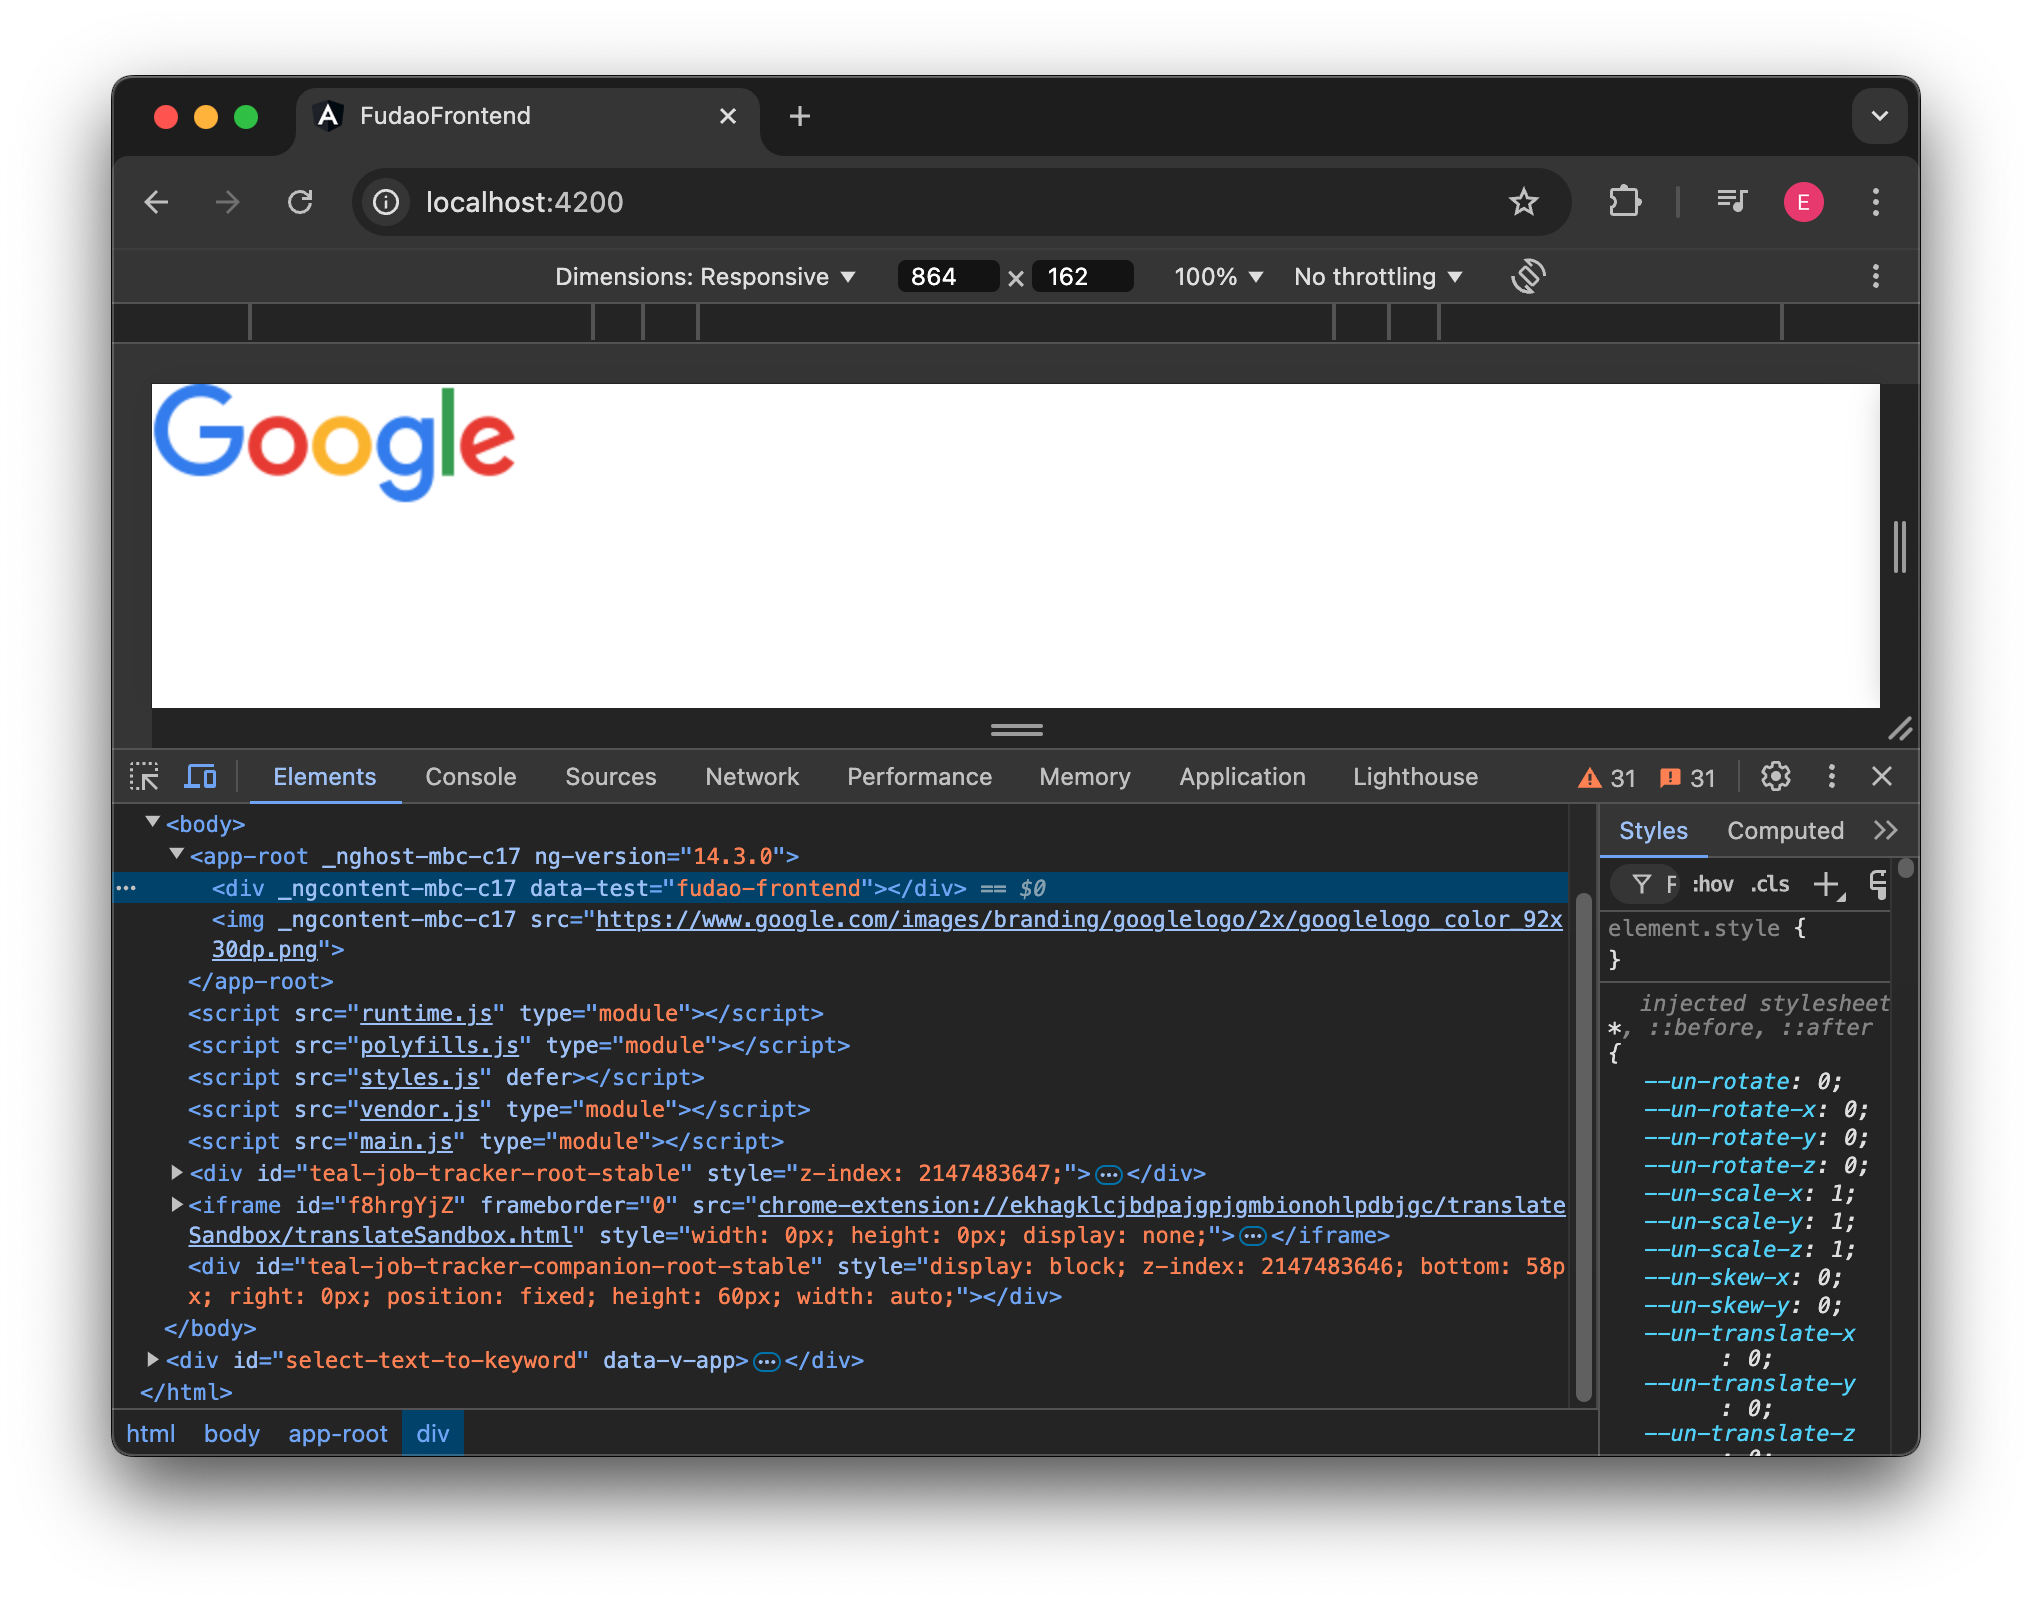
4.2 Binding: Property Binding
Property binding in Angular helps you set values for properties of HTML elements or directive. User property binding to do things such as toggle button functionality, set paths programmatically, and share values between components. Property binding moves a value in one direction, from a component’s property into a target HTML element property.
To bind to an element’s property, enclose it in square brackets.
Property Binding - https://angular.io/guide/property-binding
4.2.1 Property Binding vs Text Interpolation
-
Property Binding and Text Interpolation are similar in that you can achieve Interpolation through Property Binding.
-
The difference between the two is that Text Interpolation expects a string, while in Property Binding, the value passed in may be arbitrary. This means that if you want to pass in a non-string data type, you must use Property Binding
4.2.2 普通属性
属性绑定分为两种情况, 绑定DOM对象属性和绑定HTML标记属性.
4.2.3 class 属性


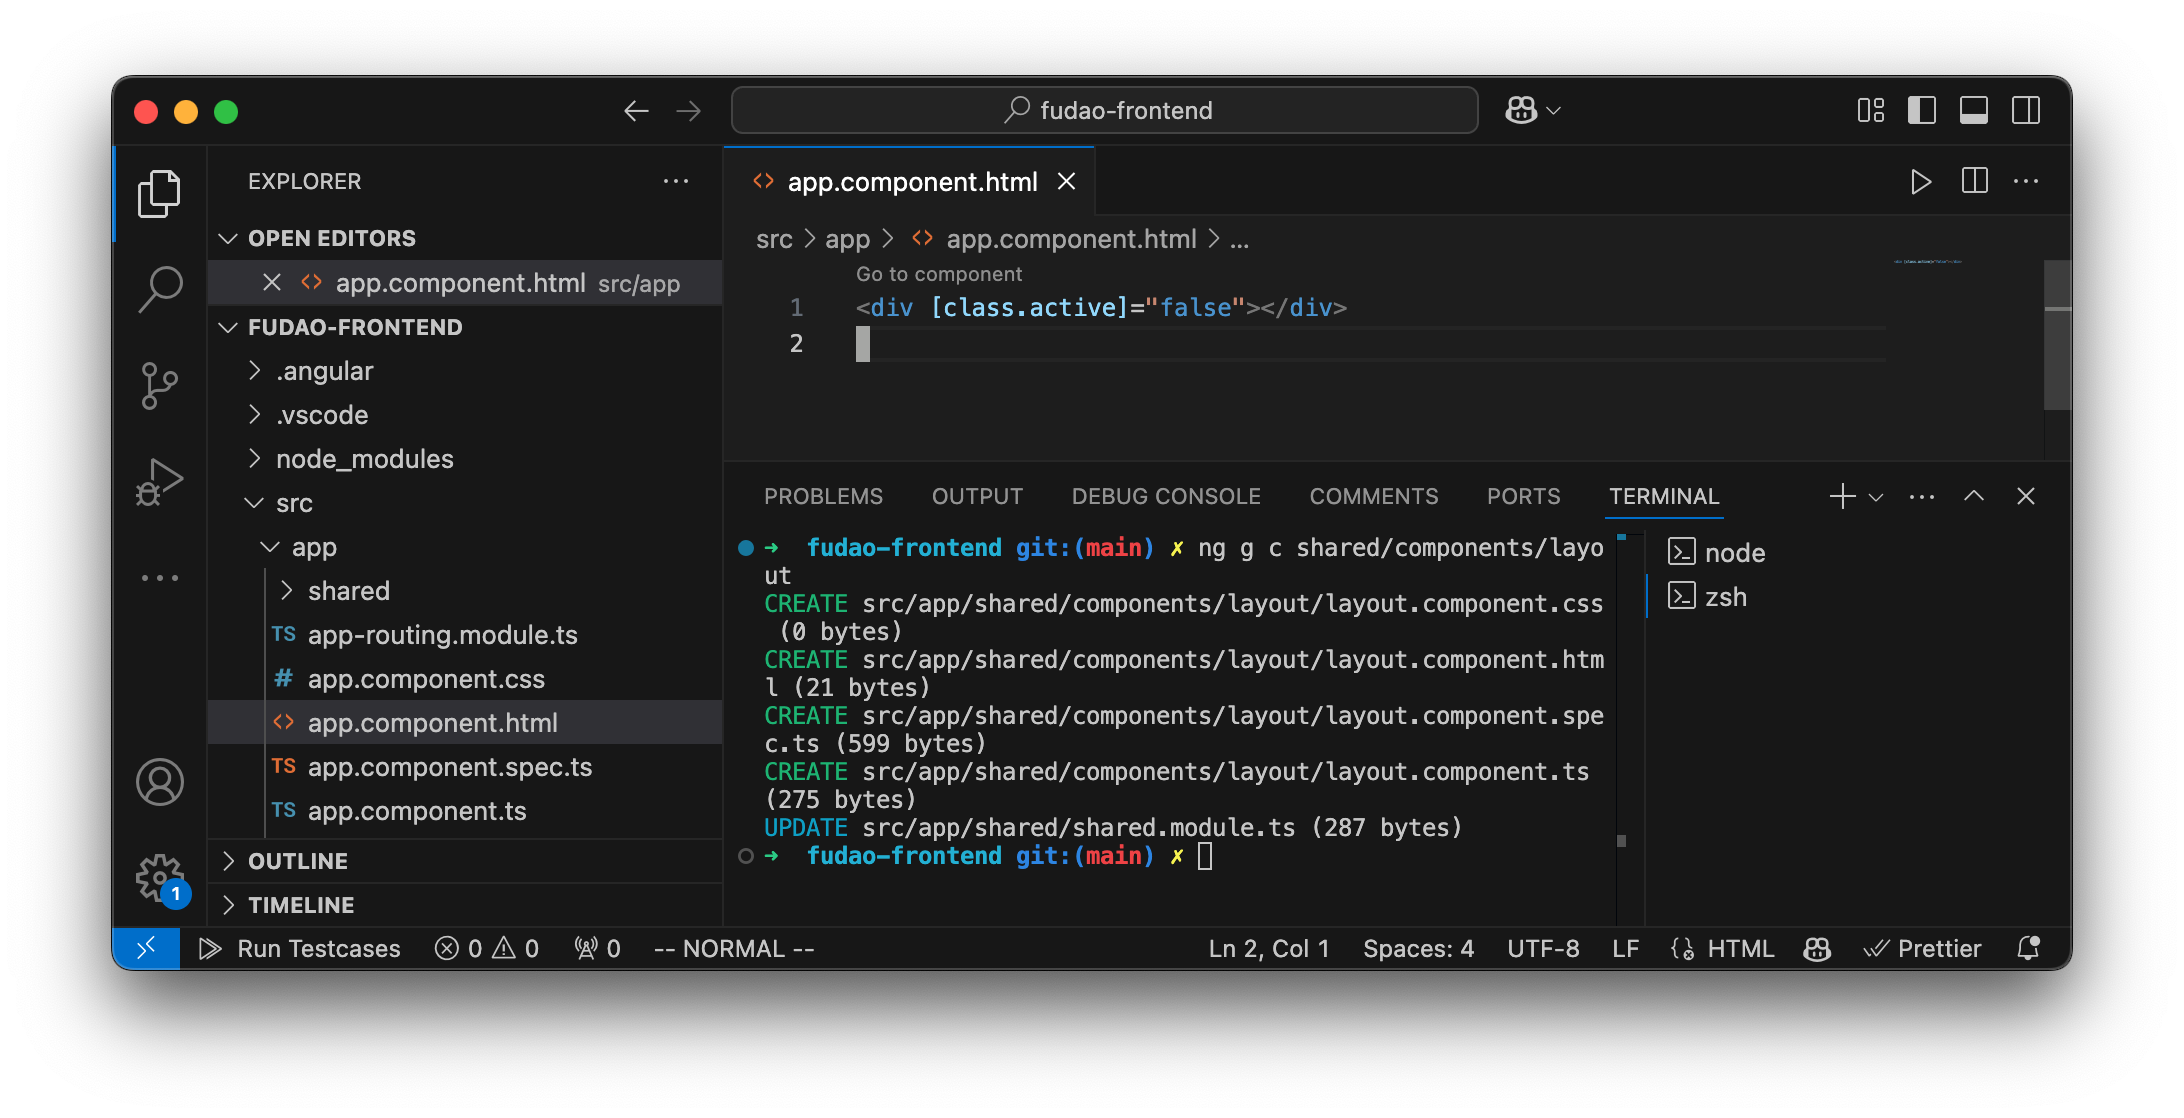
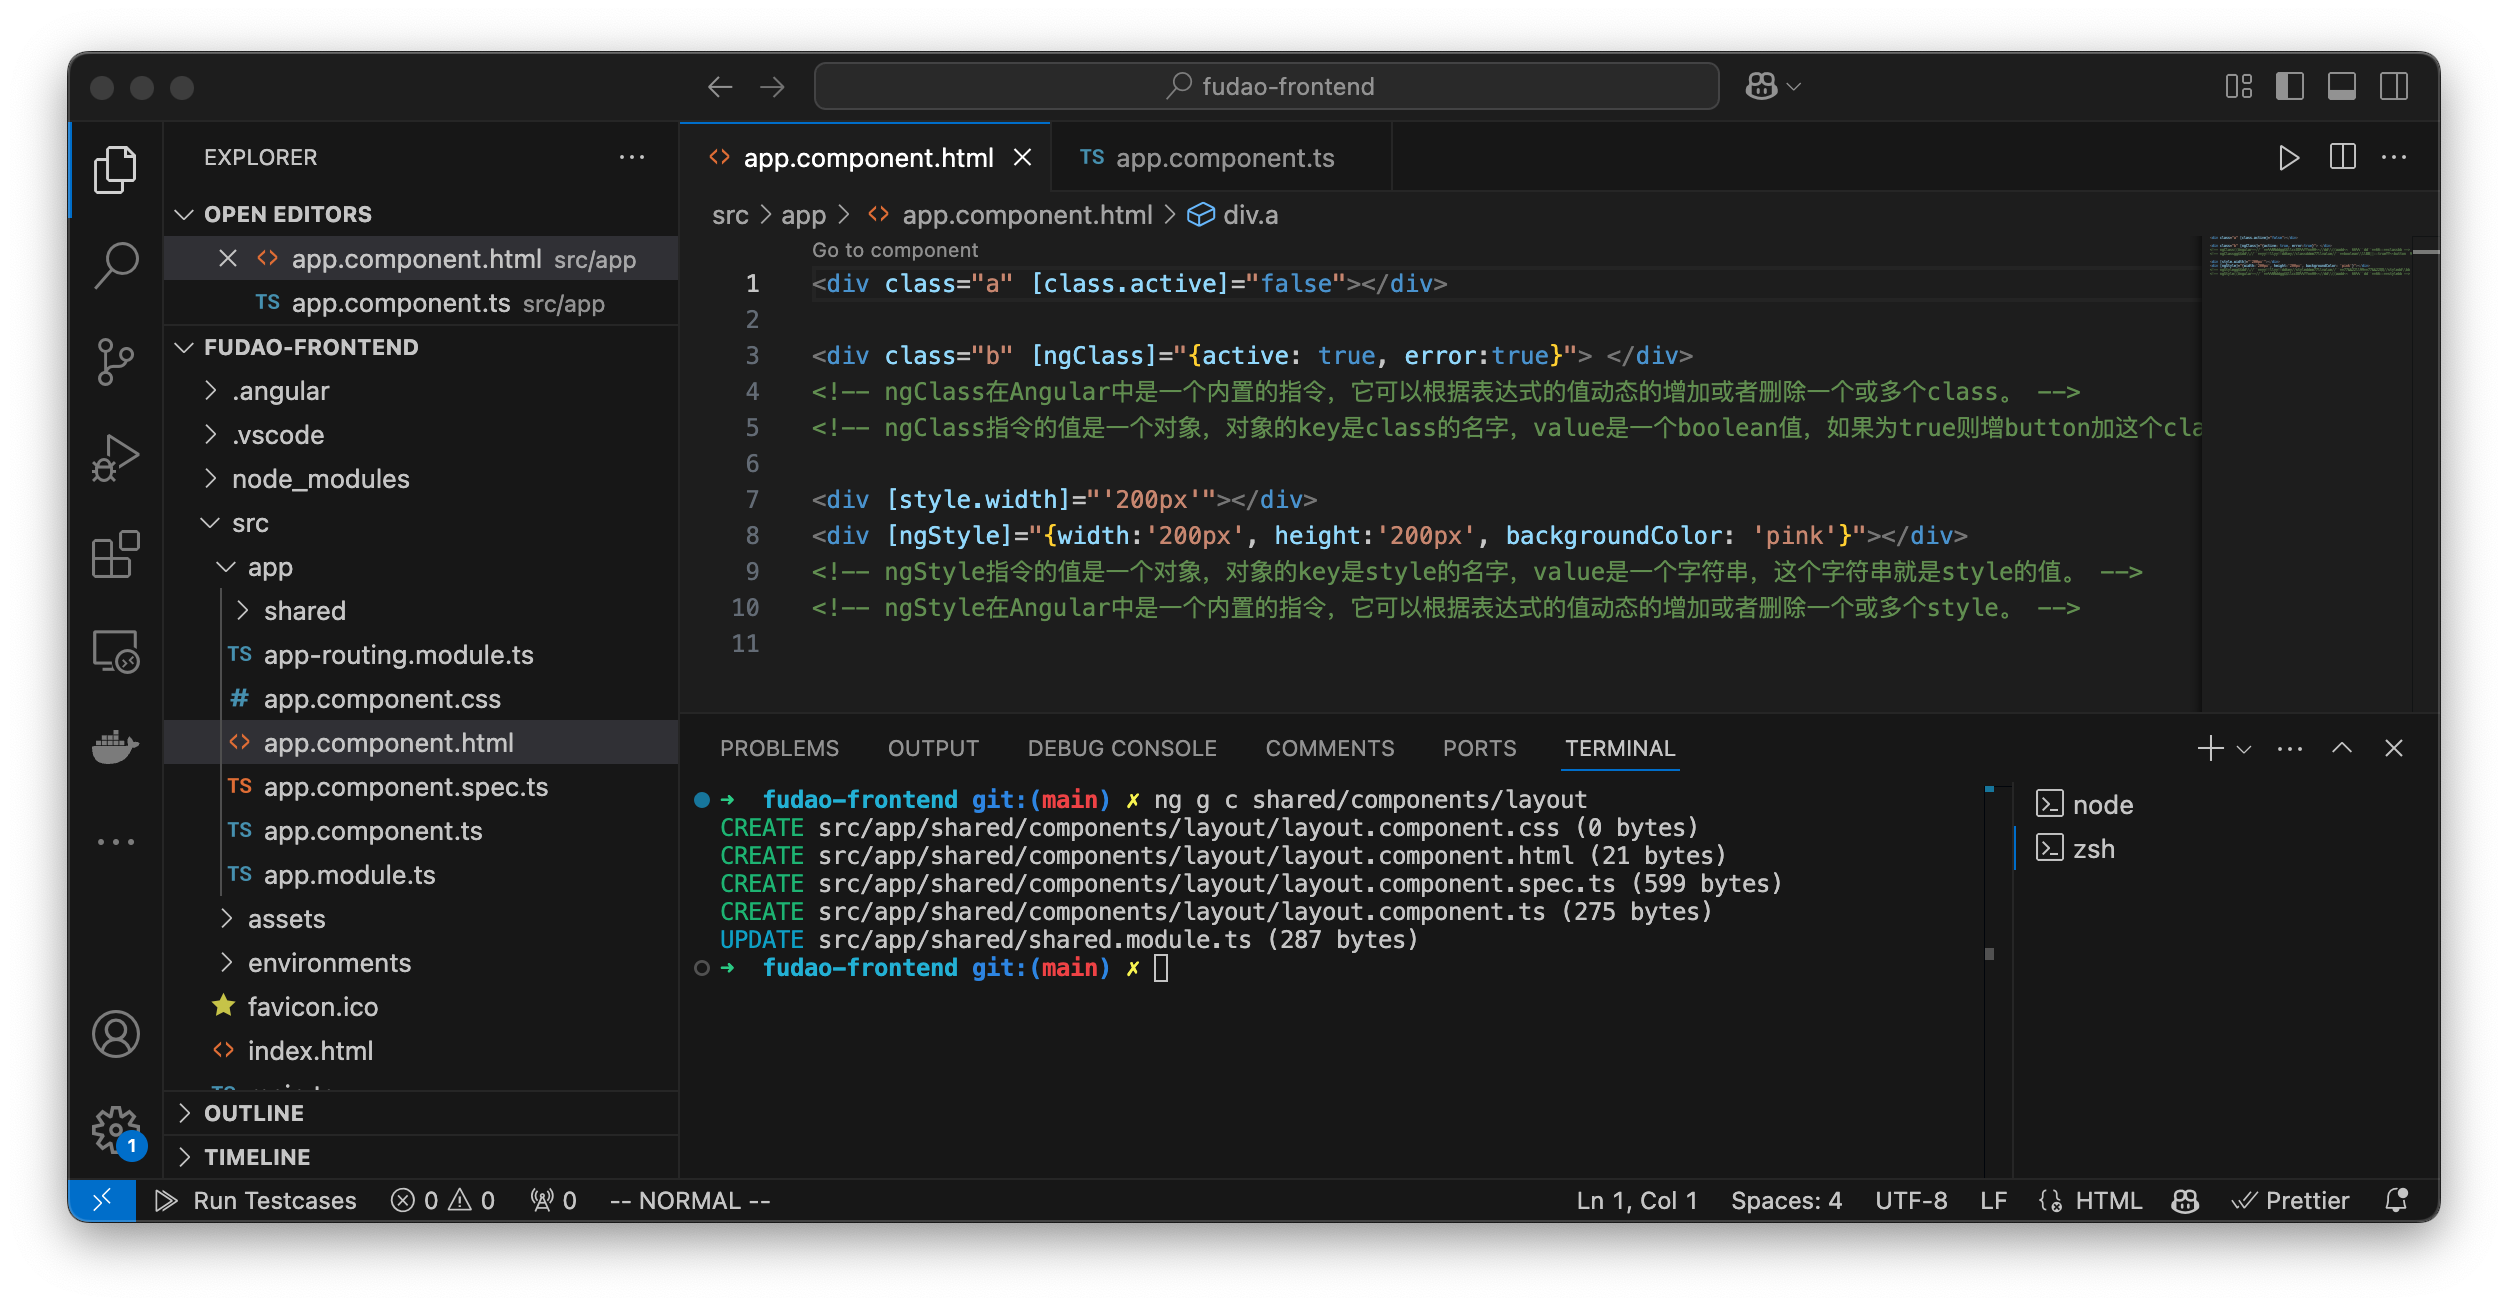
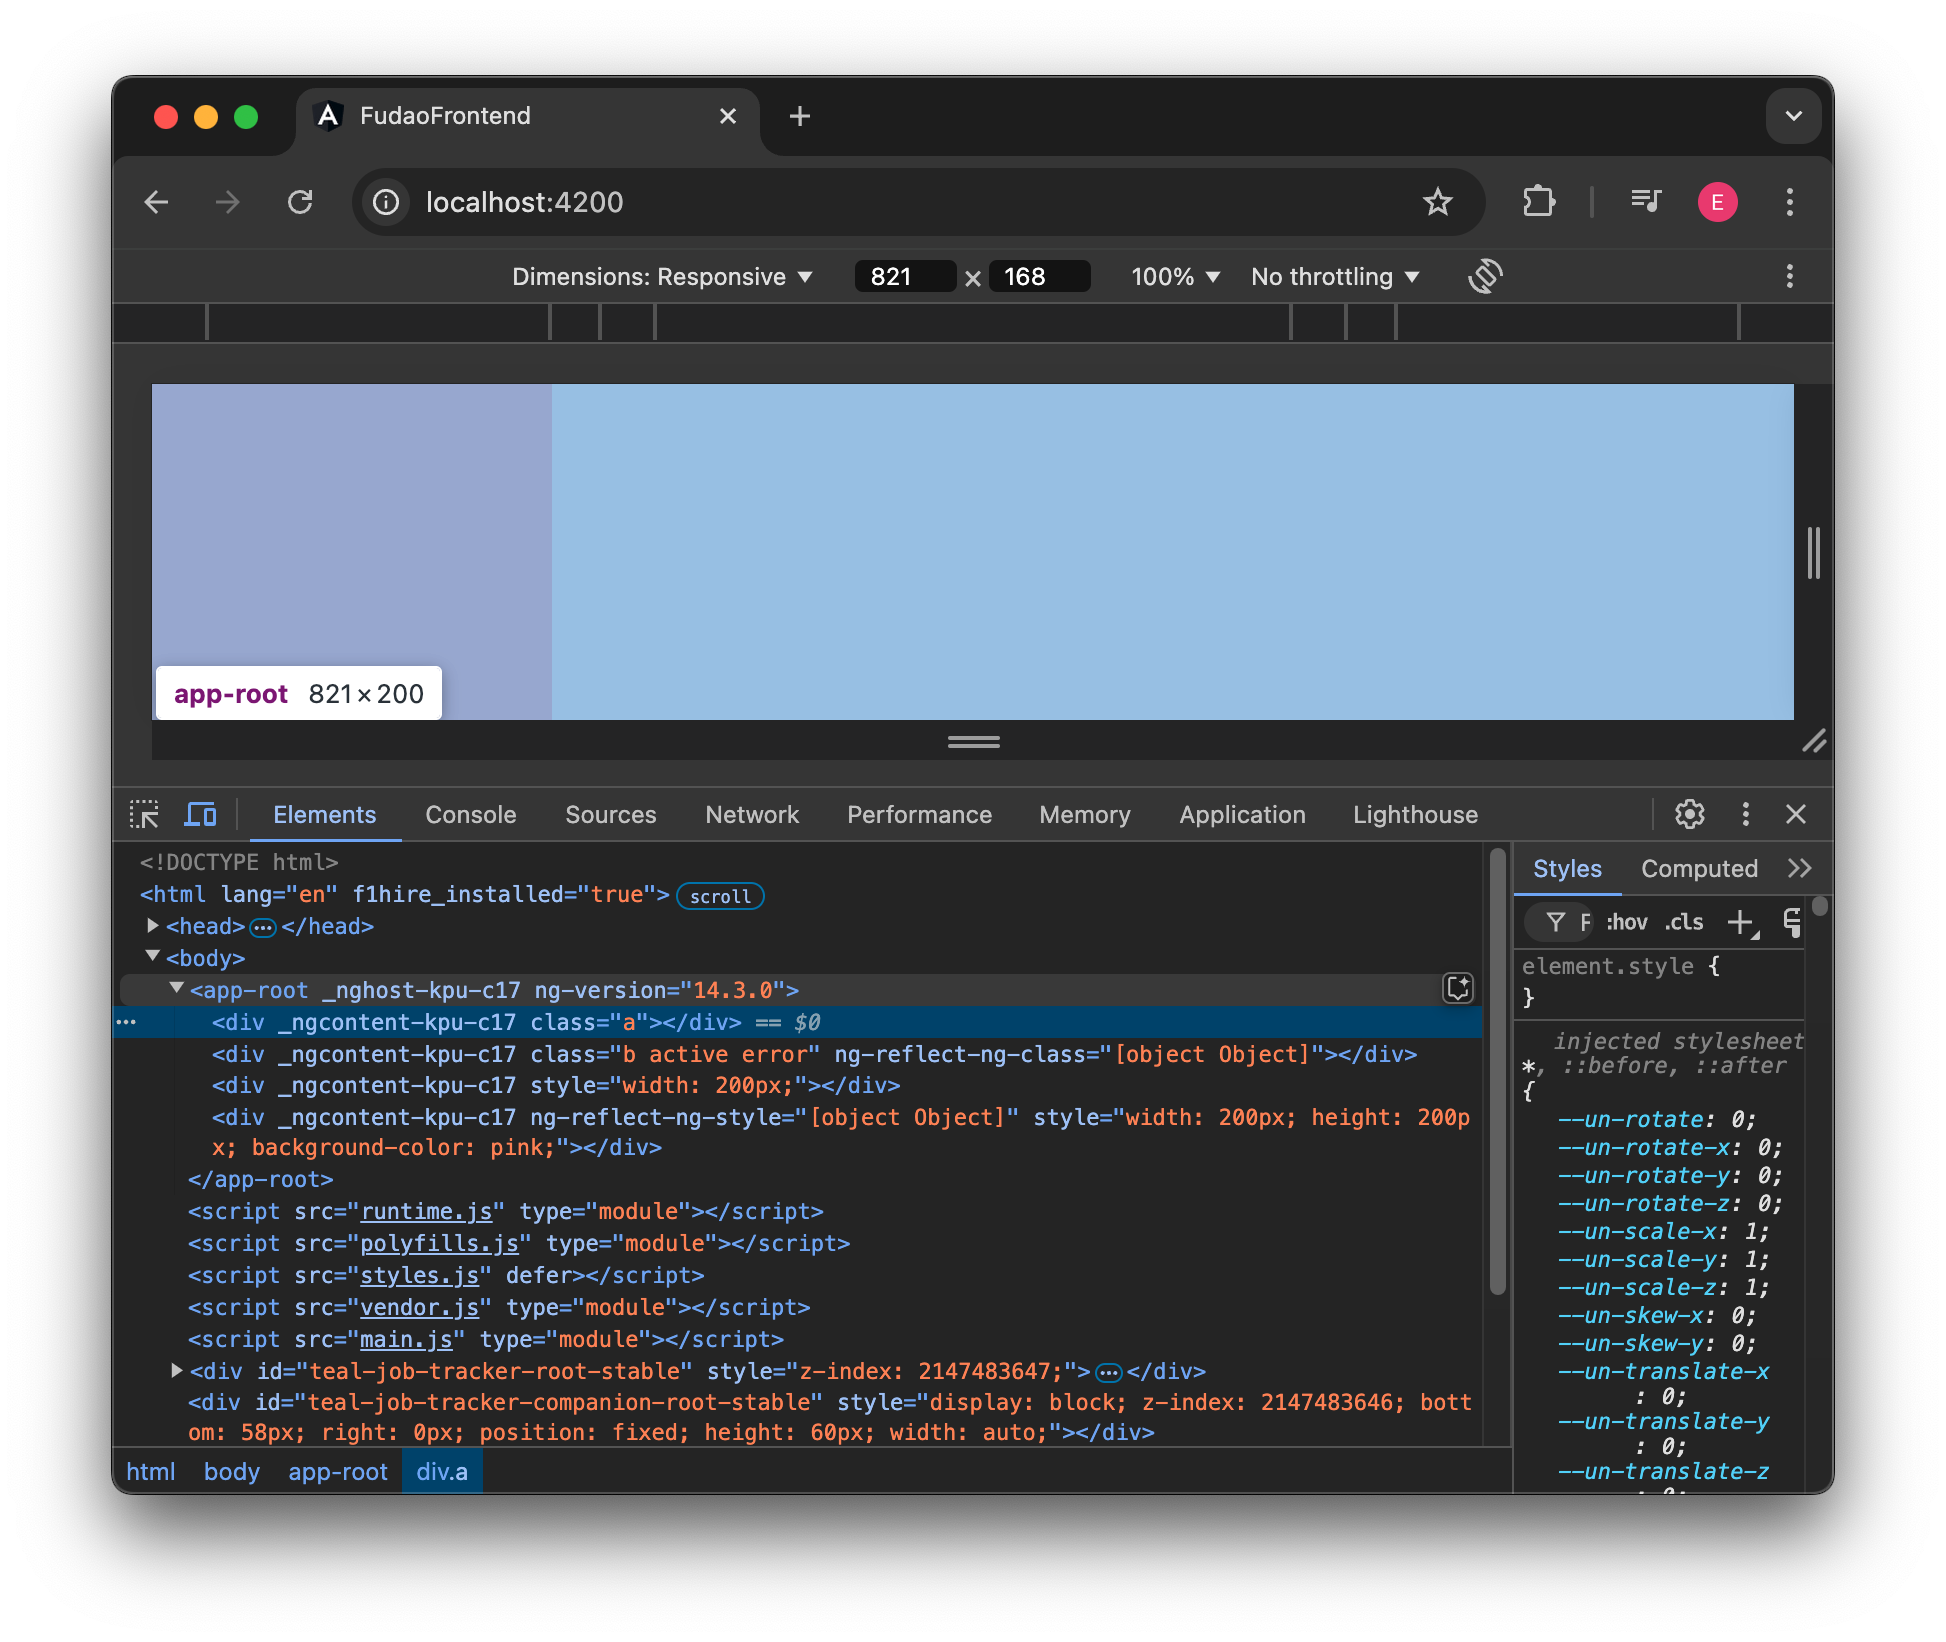
<div class="a" [class.active]="false"></div>

<div class="b" [ngClass]="{active: true, error:true}"> </div>
<!-- ngClass在Angular中是一个内置的指令,它可以根据表达式的值动态的增加或者删除一个或多个class。 -->
<!-- ngClass指令的值是一个对象,对象的key是class的名字,value是一个boolean值,如果为true则增button加这个class,如果为false则删除这个class。 -->

<div [style.width]="'200px'"></div>
<div [ngStyle]="{width:'200px', height:'200px', backgroundColor: 'pink'}"></div>
<!-- ngStyle指令的值是一个对象,对象的key是style的名字,value是一个字符串,这个字符串就是style的值。 -->
<!-- ngStyle在Angular中是一个内置的指令,它可以根据表达式的值动态的增加或者删除一个或多个style。 -->
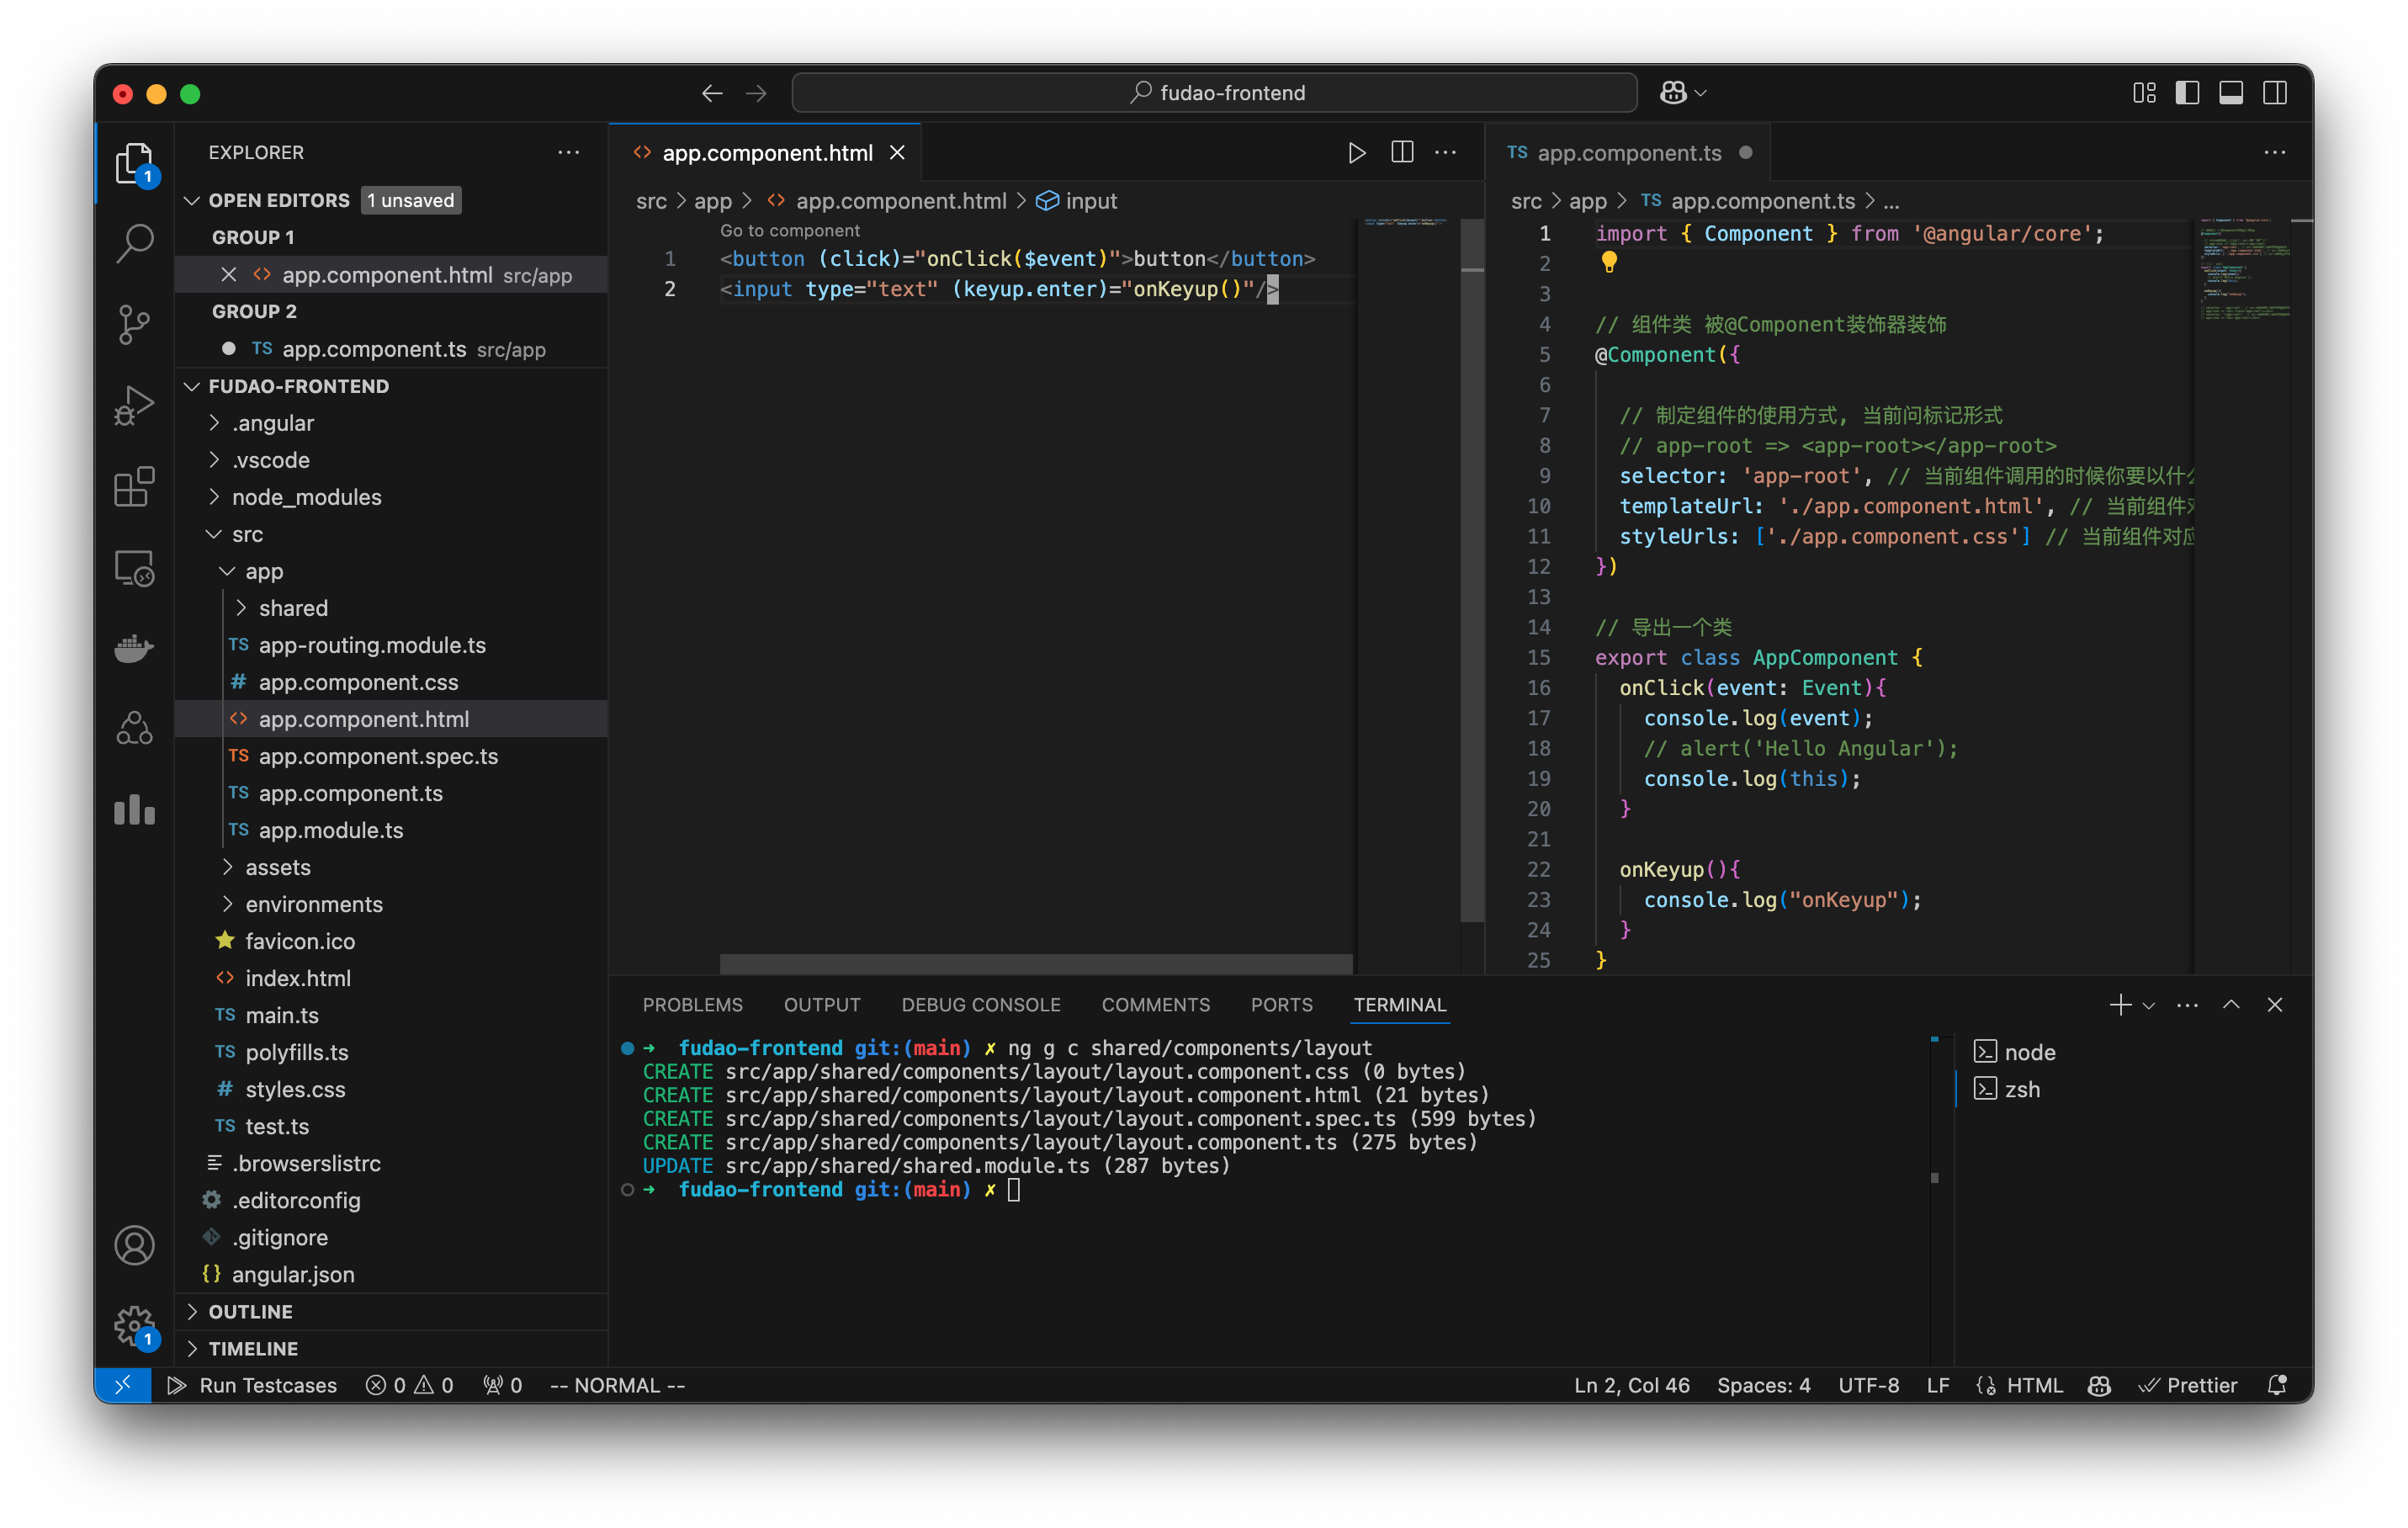
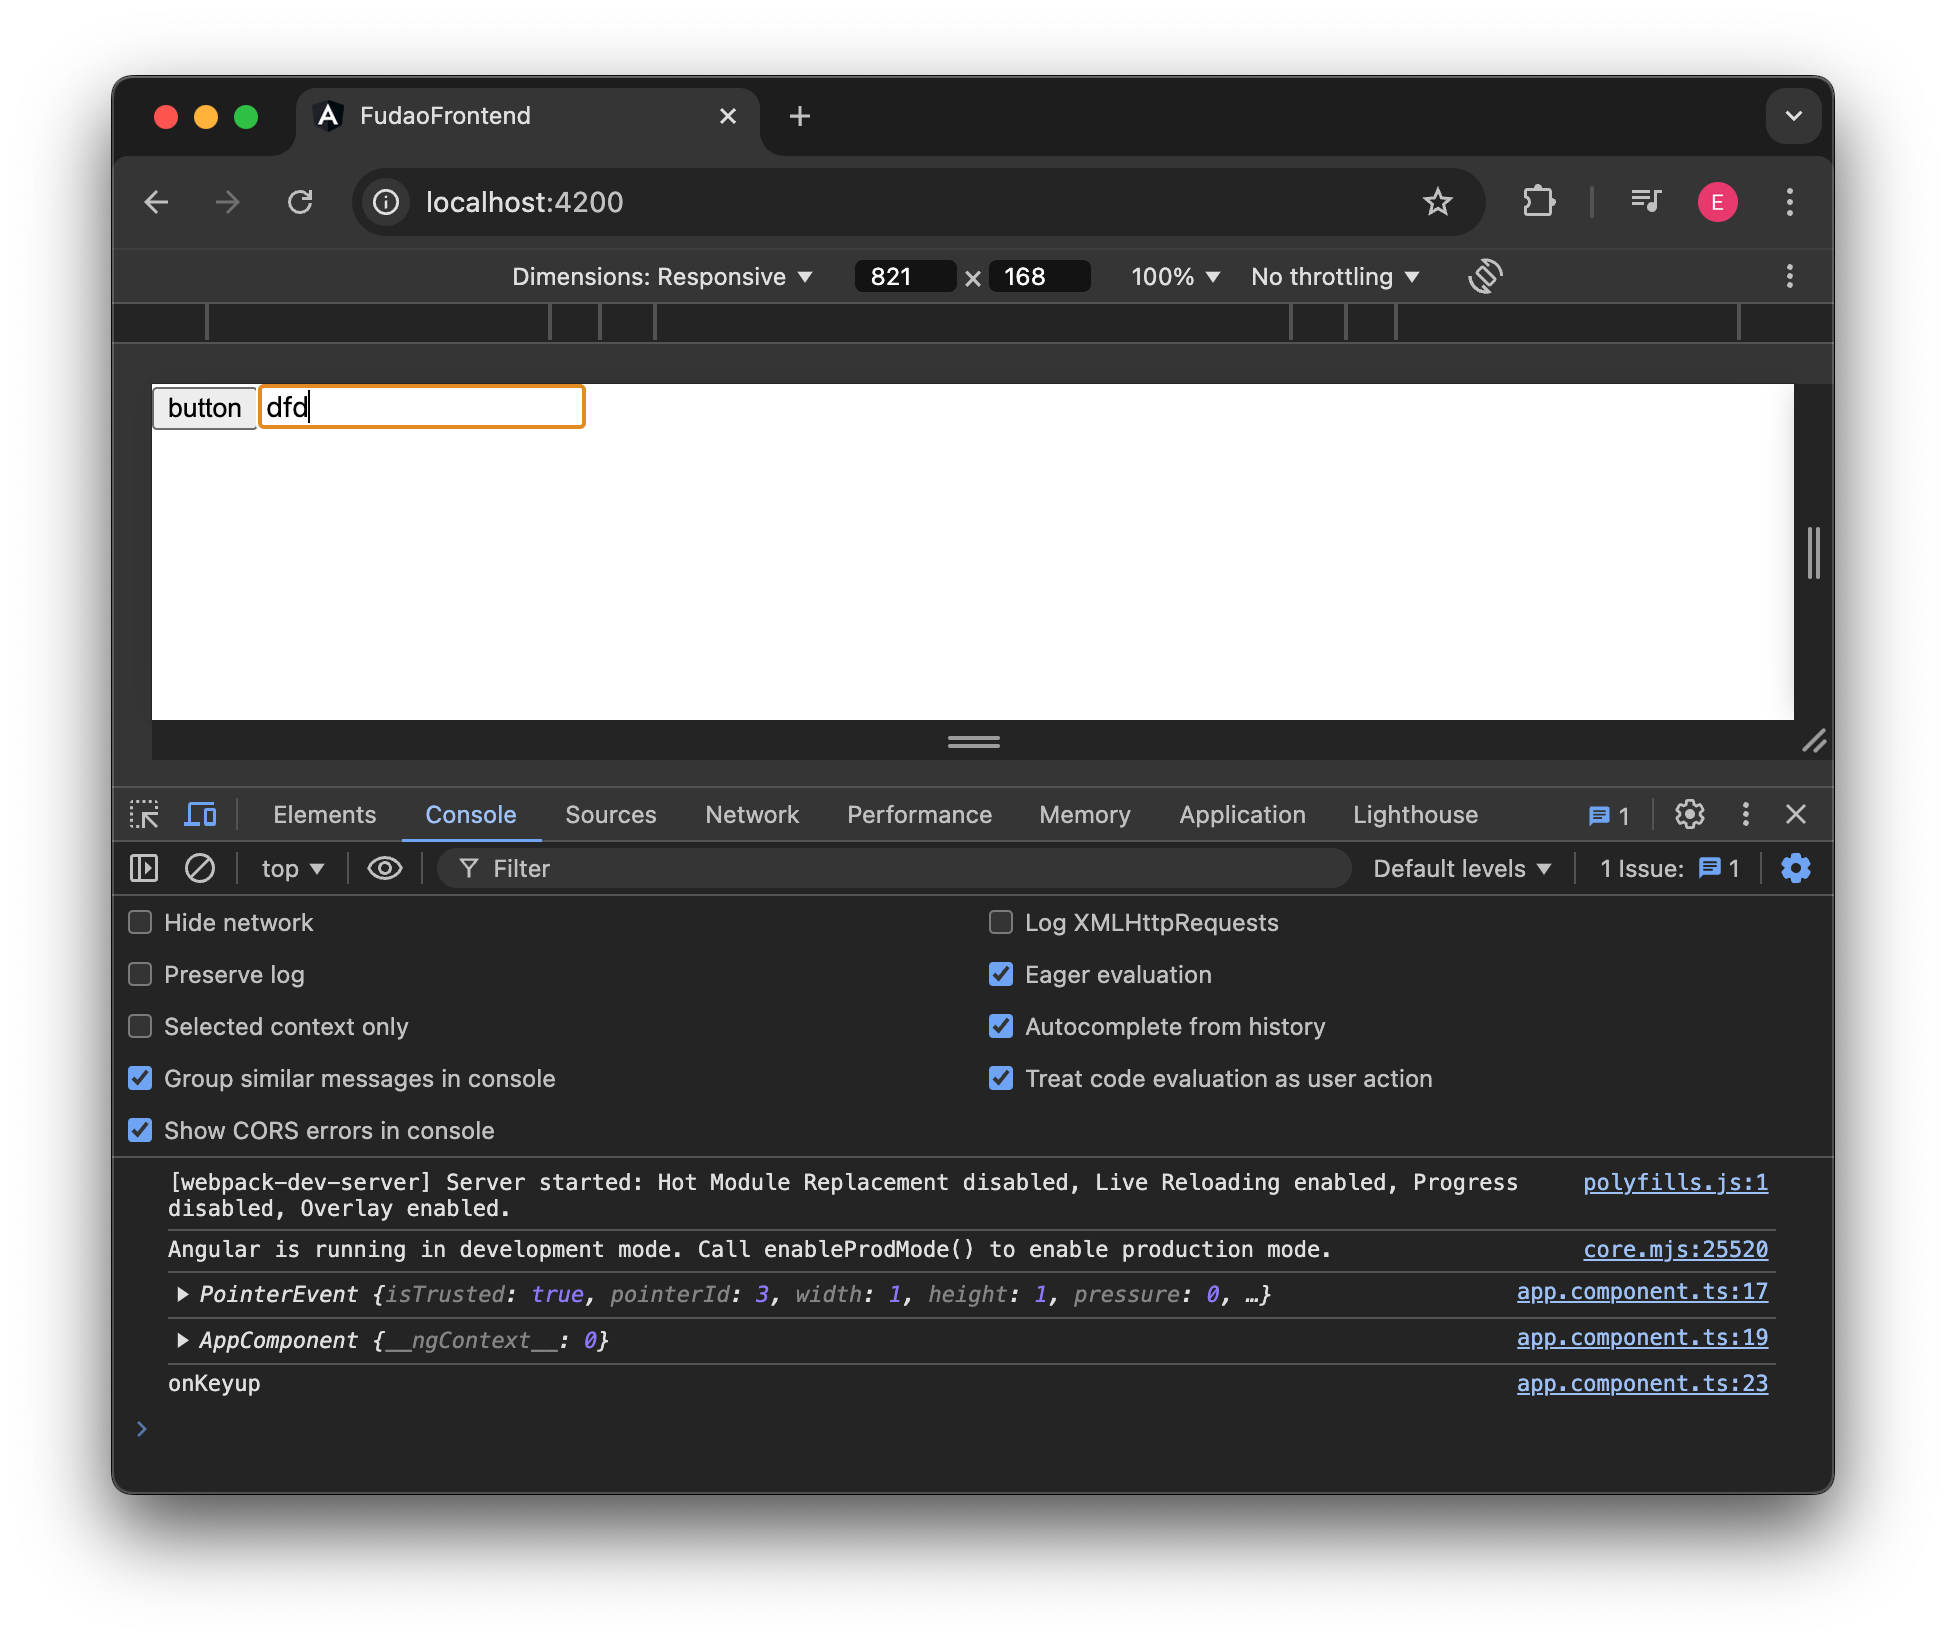
4.3 Binding: Event Binding
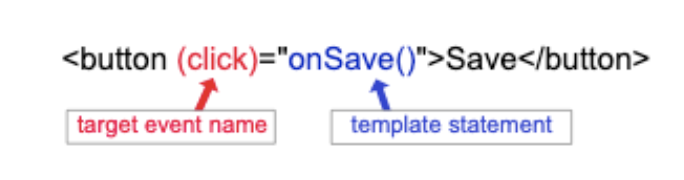
Event binding lets you listen and respond to user actions such as keystrokes, mouse movements, clicks, and touches. To bind an event, use the Angular event binding syntax. This syntax consists of a target event name within parenthesis to the left of an equal sign, and a quoted template statement to the right.
import { Component } from '@angular/core';


// 组件类 被@Component装饰器装饰
@Component({

  // 制定组件的使用方式, 当前问标记形式
  // app-root => <app-root></app-root>
  selector: 'app-root', // 当前组件调用的时候你要以什么形式去调用
  templateUrl: './app.component.html', // 当前组件对应的模版是什么 组件模版文件路径
  styleUrls: ['./app.component.css'] // 当前组件对应的样式文件
})

// 导出一个类
export class AppComponent {
  onClick(event: Event){
    console.log(event);
    // alert('Hello Angular');
    console.log(this);
  }

  onKeyup(){
    console.log("onKeyup");
  }
}
5 Component Interaction
- Parent to child:
-
Using
@Input()to pass data down to child components. -
Child to parent:
- Using
@Output()andEventEmitterto send data back to the parent. -
Sharing Data via
@ViewChild() -
Unrelated Components
- Using shared services or state management libraries (NgRx)
5.1 @Input
- A property Decorator for binding custom properties.
- Allows pass data from a parent component to a child component
- Data bound values can be passed at any time, updating the child component’s input property.
- Essential for defining external properties within child components.
5.2 @Output
- A property Decorator that enables a child component to emit events.
- Allows child components to send custom events to a parent component.
- Data can be emitted as custom events with the EventEmitter class.
- Can be bound to event handlers in the parent component’s template.
- Utilized in both Components and Directives for event-driven interactions.
5.2.1 Emitting Events
Emitting events allows us to update a parent component from a child component. This is accomplished through two-way binding.
- Import { EventEmitter } from “@angular/core”;
- Define the event and instantiate a new EventEmitter()
- Bind the event
- Emit the event
5.3 @ViewChild
- A property Decorator that configures a view query.
-
Used to obtain a reference to template elements in a parent component locally
-
Data bound values will be available AfterViewInit() and not during component initialization time!
-
Useful for referencing specific children from the parent
-
Can be used on Components and Directives
6 Componets and Templates
6.1 Two-Way Binding
Two-way binding gives components in your application a way to share data. Use two-way binding to listen for events and update values simultaneously between parent and child components.
Angular’s two-way binding syntax is a combination of square brackets and parenthesis. You will need to import the FormsModule if you use [(ngModel)].
For two-way binding to work, the @Ouput() property must use the pattern, inputChange, input is the name of the @Input() property. For example, if the @Input() property is size, the @Output property must be sizeChange.
6.2 Directives 指令
Directives - classes that add additional behavior to elements in Angular applications.
- Structural Directives - directives which change the DOM layout by adding and removing DOM elements. (ngFor, ngIf, *ngSwitch)
- Attribute Directives - change the appearance or behavior of DOM elements and Angular components. (Directive, @angular/core)
- Custom Directives - allows us to define our own directives.
6.2.1 Custom Directives
- We can define our own custom Structural or Attribute Directives
- @Input set - setter property which will intercept and act upon a value from the parent
- ViewContainerRef - represents a container where one or more views can be attached
- TemplateRef - represents an embedded template that can be used to instantiate embedded views
- ElementRef - A wrapper around a native element inside the view
6.3 ngTemplate, ngContainer, ngContent
- We can optimize Angular Views through the use of built-in elements
- ng-template: commonly used to conditionally render DOM elements (not rendered by default)
- ng-container: used to group together other elements, commonly where multiple Structural Directives may be needed to render the View (optimization). Does not render! (Displaced as a comment in HTML)
- ng-content: used as a placeholder, commonly used to create reusable components (Content Projection). Does not create a DOM element!
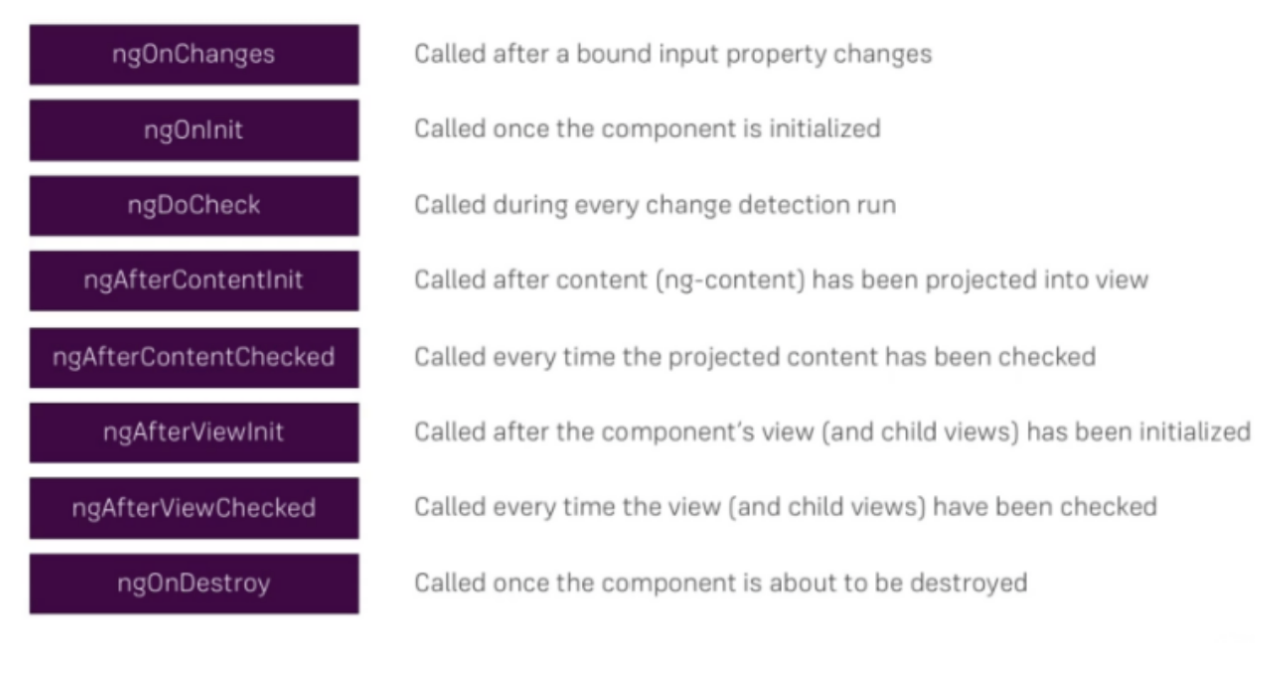
7 Component Lifecycle
7.1 Component Lifecycle and Lifecycle Hooks
A component instance has a lifecycle that starts when Angular instantiates the component class and renders the component view along with its child views.
The lifecycle continues with change detection, as Angular creates, updates, and destroys instances in the course of execution.
The lifecycle ends when Angular destroys the component instance and removes the rendered template from the DOM.
7.2 Lifecycle Hooks
- ngOnInit - initializes the directive or component after Angular first displays the data-bound properties and sets the directive or components’s input properties. (@angular/core)
- ngOnChanges - respond when Angular sets or resets data-bound input properties. (@angular/core)
- ngDoCheck - ran on every change detection (@angular/core)
- ngOnDestroy - cleanup just before Angular destroys the directive or component. (@angular/core)
- https://angular.io/guide/lifecycle-hooks
7.3 Change Detection
- Change Detection performs a check against two states (current state and new state).
- If a difference between the two is detected, then something has changed and Angular will update the view (re-render).
- Angular employs two Change Detection Strategies: 1. CheckAlways (ChangeDetectionStrategy.Default) - Default strategy; Change detection is automatic until explicitly deactivated. (Dirty Checking) 2. CheckOnce (ChangeDetectionStrategy.OnPush) - change detection is deactivated until explicitly reactivated by setting the strategy to Default. Change detection can still be explicitly invoked. This applies to all child directives and cannot be overridden
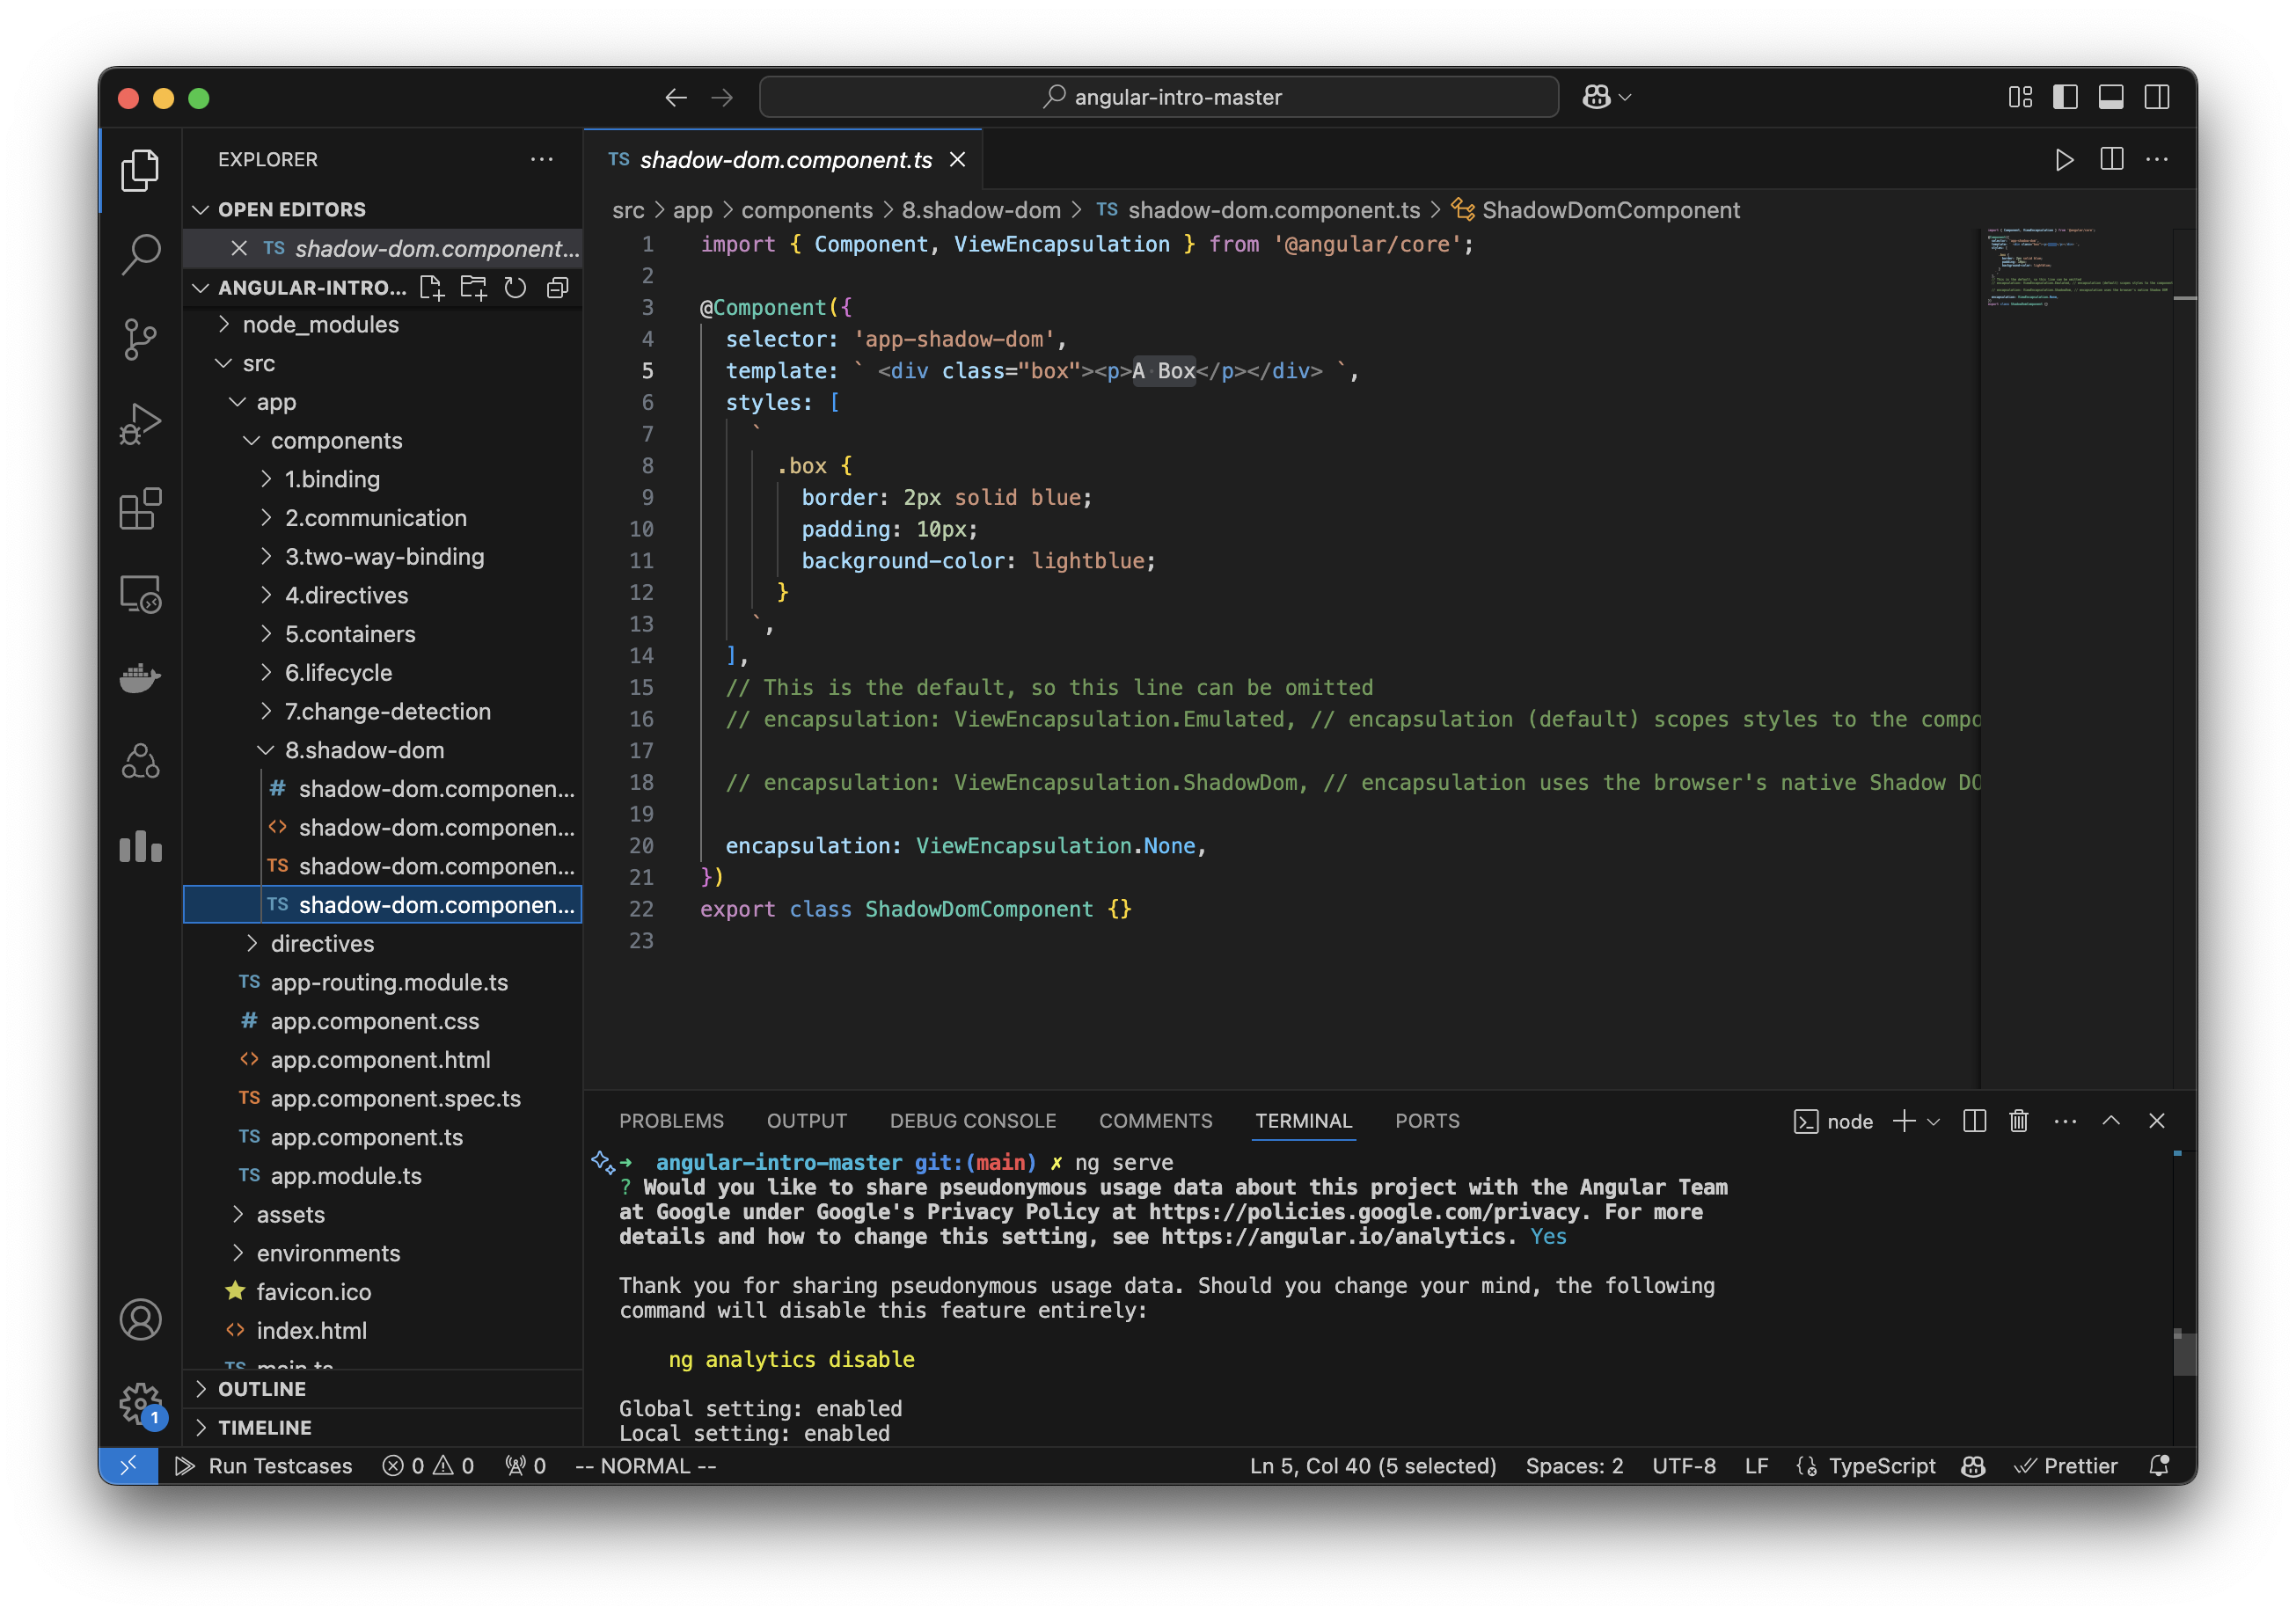
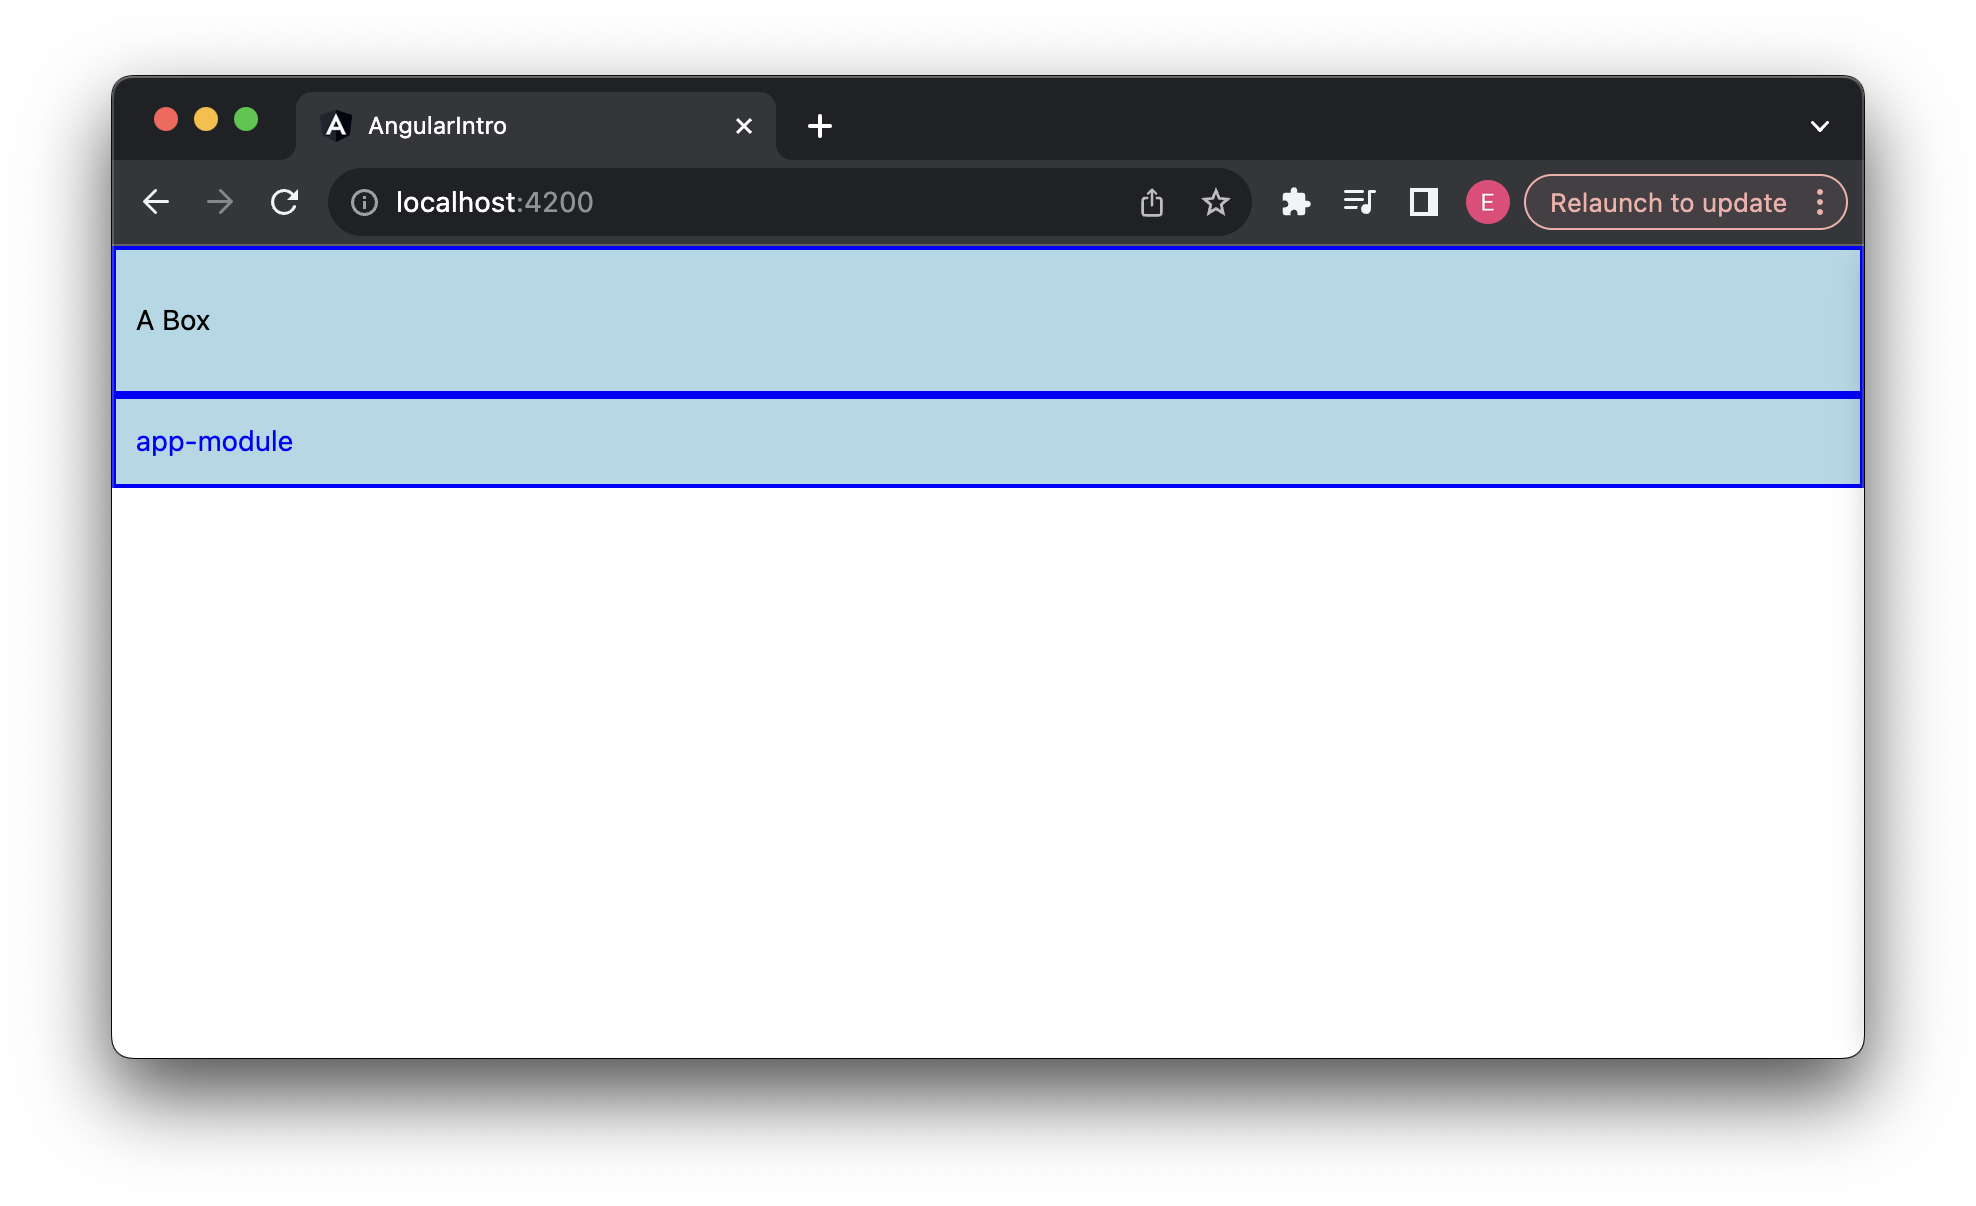
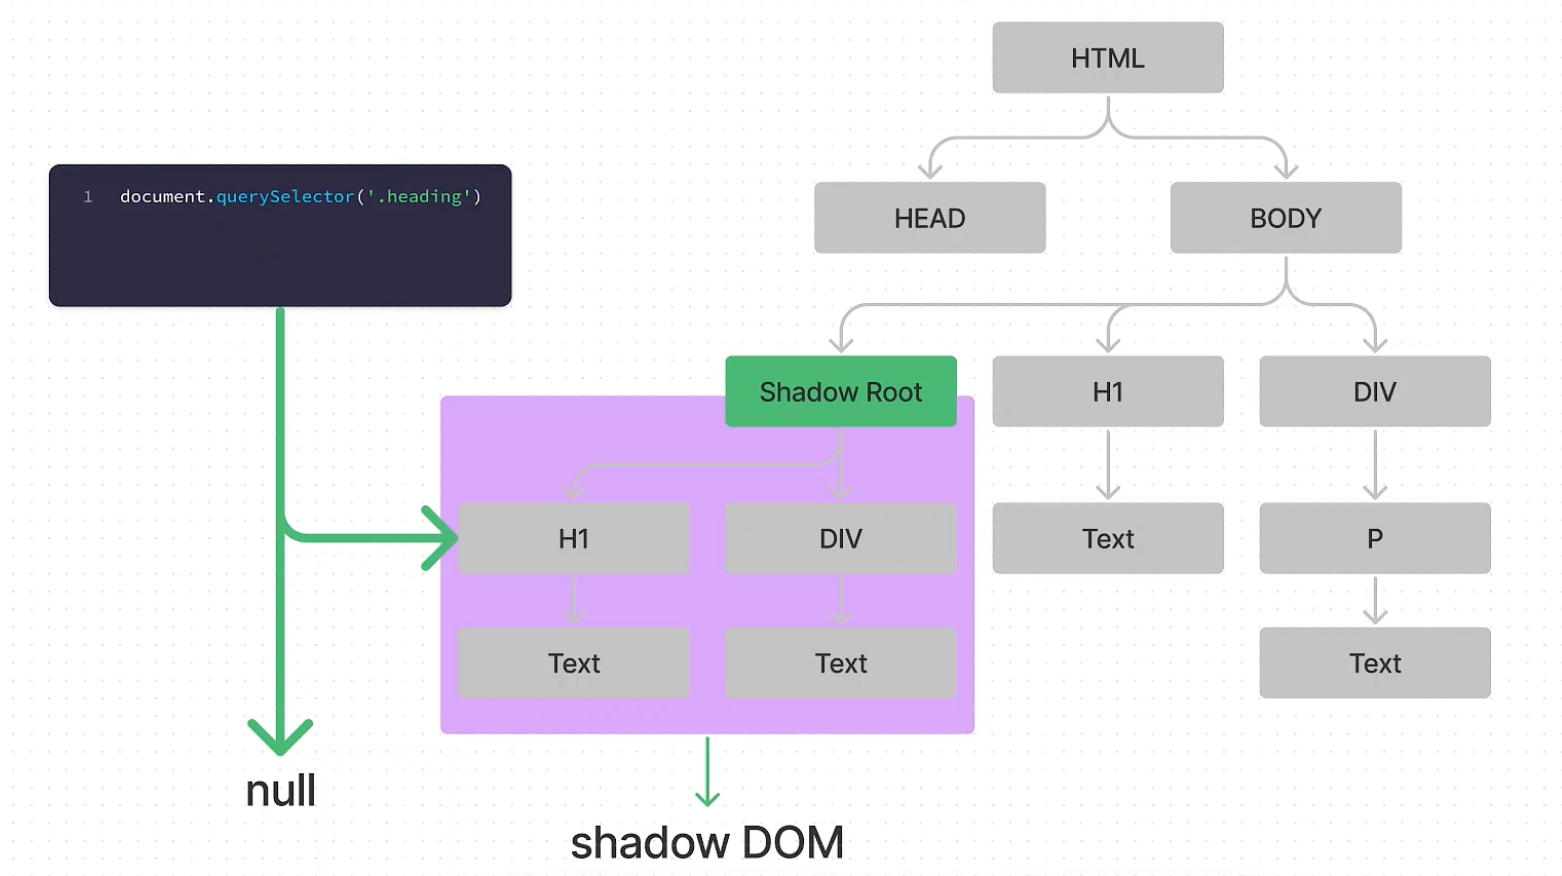
7.4 Shadow DOM
The Shadow DOM can be thought of as a parallel DOM tree, separate from the actual DOM. The Shadow DOM allows groups of DOM implementation to be hidden inside a single element and encapsulates styles to the element.
Shadow DOM Terminology:
- Shadow Host - the regular DOM node that the shadow DOM is attached to
- Shadow Tree - The DOM tree inside the Shadow DOM
- Shadow Boundary - the place where the Shadow DOM ends, and the regular DOM begins
- Shadow Root - the root node of the Shadow Tree
eg.
<!DOCTYPE html>
<html lang="en">
<head>
  <meta charset="UTF-8">
  <meta name="viewport" content="width=device-width, initial-scale=1.0">
  <title>Shadow DOM Example</title>
</head>
<body>
  <!-- 使用自定义组件 -->
  <my-counter></my-counter>
  <my-counter></my-counter>

  <script>
    // 定义一个类,用于创建自定义元素
    class MyCounter extends HTMLElement {
      constructor() {
        super(); // 调用父类的构造函数

        // 创建 Shadow DOM,并设置为 open 模式
        this.attachShadow({ mode: 'open' });

        // Shadow DOM 的内容
        this.shadowRoot.innerHTML = `
          <style>
            /* 内部样式,只影响当前组件 */
            .counter {
              display: flex;
              align-items: center;
              gap: 10px;
              font-family: Arial, sans-serif;
            }
            .counter button {
              padding: 5px 10px;
              font-size: 16px;
              cursor: pointer;
            }
            .counter span {
              font-size: 20px;
              font-weight: bold;
            }
          </style>
          <div class="counter">
            <button id="decrease">-</button>
            <span id="value">0</span>
            <button id="increase">+</button>
          </div>
        `;

        // 获取组件中的元素
        this.valueElement = this.shadowRoot.querySelector('#value');
        this.decreaseButton = this.shadowRoot.querySelector('#decrease');
        this.increaseButton = this.shadowRoot.querySelector('#increase');

        // 初始化计数值
        this.value = 0;

        // 绑定事件
        this.increaseButton.addEventListener('click', () => this.increment());
        this.decreaseButton.addEventListener('click', () => this.decrement());
      }

      // 增加计数
      increment() {
        this.value++;
        this.updateValue();
      }

      // 减少计数
      decrement() {
        this.value--;
        this.updateValue();
      }

      // 更新计数显示
      updateValue() {
        this.valueElement.textContent = this.value;
      }
    }

    // 注册自定义元素
    customElements.define('my-counter', MyCounter);
  </script>
</body>
</html>
8 Forms
Forms allow us to accept user input. Angular has a number of modules to accomplish this functionality:
- FormsModule (@angular/forms)
- ReactiveFormsModule (@angular/forms)
- FormControl (@angular/forms)
- FormGroup (@angular/forms)
Template-Driven Forms use two-way data binding to update the data model in components as changes are made in the template and vice versa.
Angular supports two design approaches for interactive forms:
- Template Syntax and Directives approach, with form specific directives and techniques
- Reactive (model-driven) approach
8.1 FormsModule and Template-Driven Forms
Import the FormsModule into app.module.ts from @angular/forms. With the FormsModule, we can use:
-
[(ngModel)]- a directive used to reconcile value changes in the attached element with changes in the data model. This allows us to respond to user input with validation and error handling -
NgForm - creates a top-level FormGroup instance and binds it to a
-
[ngModelGroup] - creates and binds a FormGroup instance to a DOM element
8.1.1 NgModelGroup
- This directive can only be used as a child of NgForm (within the
- This directive can be used to validate a sub-group of forms separately from the rest of the form, or if some values in your domain model make more sense to consume together in a nested object.
- https://angular.io/api/forms/NgModelGroup
8.2 ReactiveFormsModule and Reactive Forms
-
To use Reactive Forms, we must import the "ReactiveFormsModulefrom" @angular/forms into app.module.ts
-
Also known as Model-Driven Forms, with this approach, forms are designed in the component (Typescript code) which we then bind or relate them to our HTML templates
- Reactive forms are built around observable streams
- We define our forms using an instance of FormGroup
- We control the form inputs with instances of FormControl
8.3 FormGroup and FormControl
- FormGroup - defines a form with a fixed set of controls that you can manage together. You can also nest form groups to create more complex forms
- FormControl - takes a single generic argument, which describes the type of its value and can also be used to set a default value (defaults to null if no argument is passed in)
- FormBuilder - short-hand for FormGroup and FormControl
- Validators - library for some basic validations (included with “ng new”)
8.4 Model vs Template Driven
Model-Driven
- ReactiveFormsModule
- Synchronous
- Logic resides mainly in the component (Typescript)
Template-Driven
- FormsModule
- Asynchronous
- Most of the logic is driven from the template
9 Pipes
- Pipes are used to transform data
- Denoted with the | character
- Custom Pipes
- Common pipes: 1. object | json 2. string | uppercase 3. string | lowercase 4. number | percent 5. number | decimal
10 Observable
10.1 Reactive Programming
- Reactive Programming is a declarative programming paradigm that is based on the idea of asynchronous processing and data streams
- This allows for the fast processing of large amounts of data
- RxJS(Reactive Extensions for JavaScript) - a library for JavaScript/Typescript to implement Reactive Programming, which makes use of observables, making it easy to write asynchronous code
- Implementation of Reactive Programming with RxJS will follow a Pub-Subpattern
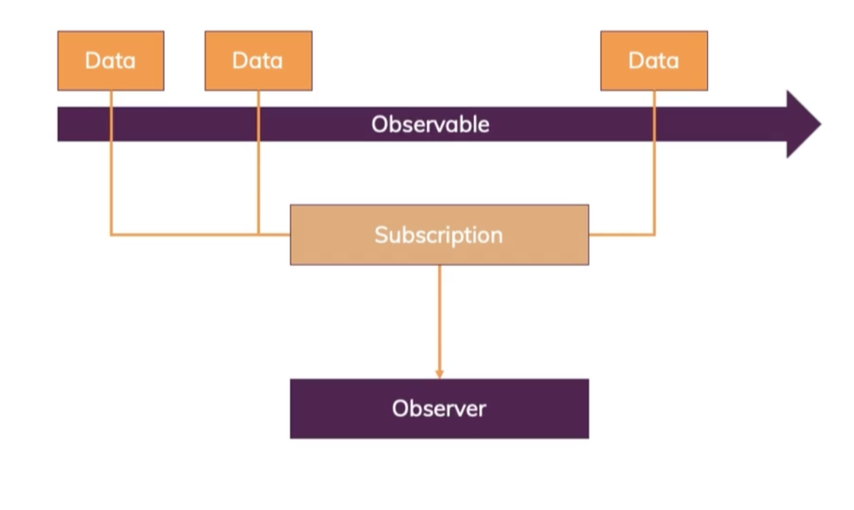
10.2 Observables
- Observables are streams of data that asynchronously emit values that can be subscribed to. When something subscribes to an observable using .subscribe(handler) and passes in a handler, and that observable emits a value, the handler is executed.(They don't start emitting values until someone subscribes to them)
- Observables may emit multiple values.
- Observables are cancelable.
- The Observable module can be imported from the RxJS library
- Hot Observable - when data is produced outside the Observable
- Cold Observable - when data is produced by the Observable itself
- Unicast - every subscriber will be subscribed to a different execution of the Observable
- Observable vs Promise - a Promise is an Object and is considered static, because it will return only one value (resolve, reject). If more data is required, an additional call will be needed. Observables are streams, that when subscribed to, will emit the latest value to its subscribers
- Can be thought of as streams of data which can emit values over time
- Similar to Event Emitters, but instead represents a sequence of values rather than an event and a handler function
- Observer - anything that subscribes to the Observable stream
- Subscription - in order to receive values from an Observable stream, you must subscribe to that stream
- Next - a method for Observers to specify the next emitted value in the stream
- Error - a callback which defines how to handle errors, if any occur
- Complete - a callback used to specify an action to invoke when the Observable has completed producing and emitting data
- Import from RxJS
- Of - creates the observable from the arguments that you pass into it. Each argument is emitted separately, one after the other and sends the complete signal in the end
- From - takes one argument that can be iterated and converts it into an observable
10.1 Async Pipe
The AsyncPipe subscribes to an observable or promise and returns the latest value it has emitted. When a new value is emitted, the pipe marks the component to be checked for changes.
Eg. We can use the | async pipe to create a timer constructed with setInterval()
11 Subject
- Can be thought of as a special type of Observable
- Can be both an Observer and an Observable. Every Subject is an Observer and an Observable
- Multi-Cast - every subscriber is subscribed to same execution of the Subject, and similar to EventEmitters, the Subject will keep a registry of its listeners/Observers
- asObservable - a method used to return the Subject as an Observable
- BehaviorSubjects - a Subject variant which stores latest emitted value. When a new subscriber subscribes to the BehaviorSubject, it will automatically receive this value (old value to new subscribers). Requires an initial value
- ReplaySubject - similar to a BehaviorSubject in which it can send old values to new subscribers, but it can record a part of the Observable execution. Requires a buffer (used to define how many values should be recorded), which can then “replay” the buffered values to new subscribers, even after the subscription has closed
- AsyncSubject - a Subject variant where only the last Observable value is sent to its subscribers, and only when the execution has completed
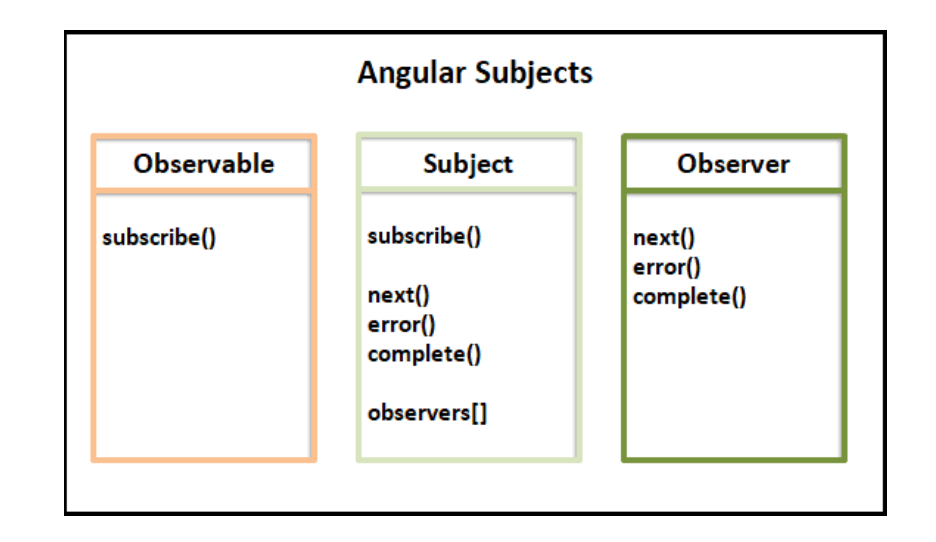
11.1 Subjects vs Observables
Subjects
- Can be multicasted to many observers
- Behaves similar to an event emitter
- Has state (keeps a list of observers)
Observables
- Unicast (singular, each observer owns an independent execution of the Observable)
- “Lazy Collections” of multiple values over time
11.2 Higher Order Observables
- Nested Subscriptions - we should AVOID nesting our subscriptions, as this may lead to Callback Hell, memory leaks, and complex error handling
-
Higher Order Observables - Similar to Higher Order Functions, but instead will take an Observable and return an Observable. This solves the Nested Subscriptions issue
-
We can create Higher Order Observables with RxJS operators
-
Extremely powerful: Flatten Nested Data Structures, Manage Multiple Concurrent Requests, Combining Data Streams
12 RxJS Operators
12.1 Operators
12.2 RxJS Operators
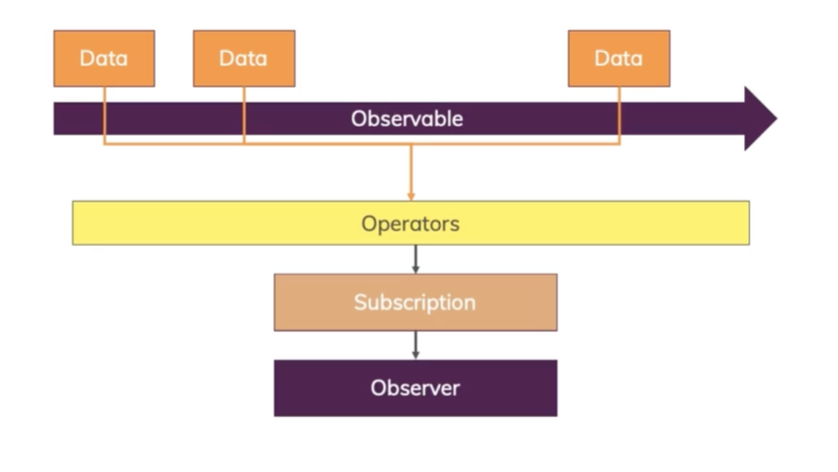
-
Pipe-able Operators - used to create Higher Order Observables based on the subscription logic in the original Observable (pipe). Takes an Observable as the input and generates another Observable as the output
-
Creation Operators - standalone functions to create a new Observable (ex. of, from)
- Of - a creation operator used to create an Observable. When passing in an array, it will emit the entire array
-
From - a creation operator used to create an Observable. When passing in an array, it emit each element separately
-
mergeMap (flatMap) - a pipe-able operator used to map each source value to an Observable and merge those inner values into a single Observable. Often used when you have a stream of events and want to make asynchronous requests or perform operations on each event
-
concatMap - a pipe-able operator similar to mergeMap, but maintains the order of emissions from the inner Observable
-
exhaustMap - a pipe-able operator which ignores all source values while an inner Observable is still executing. Useful for ensuring only one operation is performed at a time
- switchMap - a pipe-able operator used to cancel the previous inner Observable when a new source value arrives. Commonly used to handle the most recent request or emitted value, and ignore previous ones
- forkJoin - a creation operator which can take in any number of input Observables passed as an array or dictionary. forkJoin will wait for passed Observables to emit and complete, and will emit an array or dictionary with last values of the corresponding Observables
- Tap - a utility operator used to perform side effects from the source Observable
- Debounce - a filtering operator used to emit a value from the source Observable after a particular time span
- Throttle - a filtering operator which emits a value from the source Observable, then ignores subsequent source values for a duration determined by another Observable and repeats this process
- Take - a filtering operator where you pass in a count value, and the Observable will emit the first count values
13 Dependency Injection
Dependency injection is a design pattern that reduces class dependencies by inject dependencies into classes rather than having those classes create or manage their own dependencies.
Dependencies are injected by the Angular DI framework when the class is instantiated. This means the class doesn’t need to know where its dependencies come from or how they are created.
Angular facilitates the interaction between dependency consumers and dependency providers using an abstraction called Injector.
14 Service
Service is a broad category encompassing any value, function, or feature that an application needs. A service is a class with a narrow, well-defined purpose, meaning its should do something specific and do it well.
An example would be a “user service”, which handles all user related actions, such as logging in, registration, and logging out. To make this service available to a component, we need to inject the service into the component(s) that need it.
Injectables are denoted with the @Injectable Decorator
ng generate service
15 HttpClientModule
-
The HttpClientModule is a service module provided by Angular that allows us to perform HTTP Requests and easily manipulate those requests and their responses.
-
This service makes use of Observables for all transactions.
- For example, the HttpClient.get() method sends an HTTP request, and returns an Observable that emits the requested data when the response is received. Return type can vary, based on the observe and responseType values that you pass to a call:
- observe - this option specifies how much of the response to return
- responseType - this option specifies the format in which to return data
- Observables may emit multiple values. HttpClient is the exception
16 Http Interceptors
An Http Interceptor is a tool for handling Http Requests on a global application level. We can define our interceptors to handle errors, modify our request headers, and even transform data.
Being able to modify our headers is extremely useful. For added security, we can append our auth token to our headers with every request and have our server validate this token.
ng generate interceptor
- Import HTTP_INTERCEPTORS in app.module.ts
- Add an object with the provide, useClass, and multi to your providers array
- Define your header interceptor with { HttpRequest, HttpInterceptor, HttpHandler, HttpEvent } imports from ‘@angular/common/http’
- The intercept() method handles and identifies a given Http Request
- setHeaders will allow you to add your token to the headers of every request
17 Router Guard
Routing is the mechanism by which requests (as specified by a URL and HTTP method) are routed to the code that handles them.
When you create a new Angular project with “ng new”, you are given the option of including the AppRoutingModule in your application.
This module makes use of the RouterModule and Routes Module from @angular/router.
This will generate an app-routing.module.ts file which is an NgModule.
- By default, the generated app-routing.module.ts will contain a constant:
-
routes: Routes which is an array of object routes
-
{ path:
, component: @Component } -
Path - specifies a route’s url string
-
Component - specifies which component to render when the specified path is visited
-
routerLink - Given a route configuration (see above), creates a static link to the route and renders the corresponding component. You may also use dynamic values to generate the link
-
CanActivate - a Guard Route interface to to insure some condition before a route can be visited
-
ng generate guard guards/name
18 Feature Module
Feature modules help in modularizing the application, making it more manageable, scalable, and maintainable.
By separating different concerns into feature modules, you can reduce the complexity of your AppModule (the root module) and improve code organization.
Feature modules can be lazy-loaded, meaning they are only loaded into the application when needed.
ng generate module modules/feature --route feature --module app.module
Introductionchevron_right
Anatomy of a Component
- Updating the component
- Component composition
- Control flow in components - @if
- Control flow - @for
- Property Binding
- Event handling
- Communicating with @Input
- Communicating with @Output
- Deferrable views
- Optimizing images
- Enabling routing
- Define a route
- Link to a route with RouterLink
- Forms
- Getting form control values
- Reactive forms
- Validating forms
- Creating an injectable service
- Inject-based dependency injection
- Constructor-based dependency injection
- Pipes
- Formatting data with pipes
- Create a pipe
Next steps
https://angular.dev/tutorials/learn-angular
https://www.youtube.com/watch?v=xAT0lHYhHMY&list=PL1w1q3fL4pmj9k1FrJ3Pe91EPub2_h4jF&index=1